![]()
![]() Try before you buy. Download any Adobe product for a free 30 day trial.
Try before you buy. Download any Adobe product for a free 30 day trial.
![]()
Welcome To The April 2013 Photoshop Newsletter
![]()
Creative Cloud Discount - Adobe Creative Cloud 40% Off Discount
 Current Creative Suite users - Save 40% off the first year on Adobe Creative Cloud.
Offer available to all registered users of individual products and suites, CS3 or later. Not available for education or volume licensing customers.
With Adobe Creative Cloud, a simple monthly membership gives you the entire collection of CS6 tools and more. Love print? Interested in websites and iPad apps? Ready to edit video? You can do it all. Plus, Creative Cloud members automatically get access to new products and exclusive updates as soon as they’re released. And, with cloud storage and the ability to sync to any device, your files are always right where you need them. Creative Cloud is available for individuals or teams.
![]()
Drawing An Angry Birds-like Character In Illustrator - 17 Minute Video Tutorial
Are you a fan of a particularly popular game featuring a group of agitated birds and noisy green pigs? Well, in this week’s installment of Deke’s Techniques, Deke McClelland shows you how to create your very own “grumpy bird” with Adobe Illustrator (free download).
You can get a free 7-day trial to the lynda.com Online Training Library. The trial membership entitles you to 7 days of access to all 986 courses in the lynda.com Online Training Library for free. Click sign up on the subscription plan of your choice to get started.
![]()
InDesign CS6 Free PDF - Building Documents with Master Pages
 Here is a free chapter you can download: Chapter 2 from Adobe InDesign CS6 Digital Classroom. (Excerpted with permission from the publisher, Wiley, from Adobe InDesign CS6 Digital Classroom by Christopher Smith, AGI Creative Team. Copyright © 2012.)
Building Documents with Master Pages
Master pages serve as the foundation for InDesign documents that are more than a few pages in length. You can use master pages to maintain consistency throughout your document and work more efficiently.
Expert book-and-video package helps you conquer Adobe InDesign CS6
Whether you want to create sophisticated page layouts for print or electronic books or produce dazzling brochures and other publications, chances are Adobe InDesign is the design and page layout tool you'll call upon. Now you can enhance your creativity and discover all the ways to use Adobe InDesign with Adobe InDesign CS6 Digital Classroom, a book-and-DVD training package.
Thirteen self-paced lessons teach you how to design, produce, and develop streamlined workflows for page layout. Each lesson is accompanied by a video tutorial that clearly demonstrates techniques and further explains concepts.
![]()
Adobe Creative Cloud Buying Guide - Product Comparison
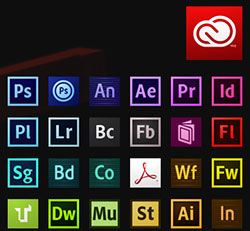 If you need to clearly understand what you get when you join the Creative Cloud, see this new info page at Adobe. It shows you all the apps and services and the pricing for the whole thing.
Current Creative Suite users - Save 40% off the first year on Adobe Creative Cloud.
Offer available to all registered users of individual products and suites, CS3 or later. Not available for education or volume licensing customers.
With Adobe Creative Cloud, a simple monthly membership gives you the entire collection of CS6 tools and more. Love print? Interested in websites and iPad apps? Ready to edit video? You can do it all. Plus, Creative Cloud members automatically get access to new products and exclusive updates as soon as they’re released. And, with cloud storage and the ability to sync to any device, your files are always right where you need them. Creative Cloud is available for individuals or teams.
![]()
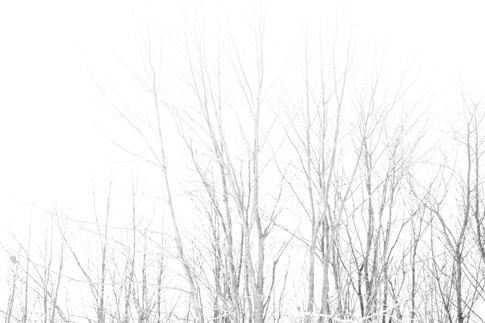
6 Simple Treeline Brushes - Free Photoshop Brushes From Bittbox
Download six free treeline brushes from Bittbox. Very nice.
![]()
How To Create An Antique Photo Effect In Camera Raw - Video and Step-by-step Tutorial
This week learn how to transform the Dunguaire Castle image from last week’s technique into a weathered black-and-white print with Adobe Photoshop and Camera Raw. . We’ll balance the luminance levels to create the sepia tone, and we’ll add some film grain and vignetting. Let’s see how it works.
To get started, follow along with Deke in this week’s free video and use the companion text below to help with each step.
1. Open the photo in Photoshop and transform it into a Smart Object so that you can revisit your changes at any time.
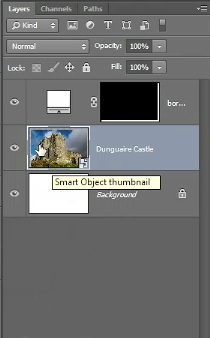
2. Double-click the layer thumbnail to open the image in Camera Raw. Go to the Basic panel and make sure all the adjustments are at zero. However, change Contrast to +35.
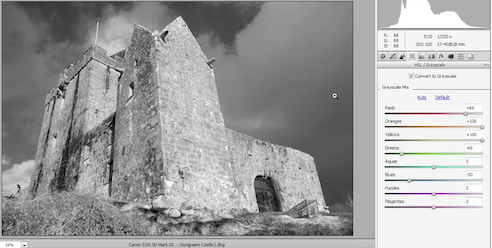
3. Go to the HSL/Grayscale tab and check the Convert to Grayscale box to dial in a custom black-and-white adjustment. Increase the Reds to brighten those areas of the image. Darken the grass by reducing the Greens and make the sky more dramatic by reducing the Blues.
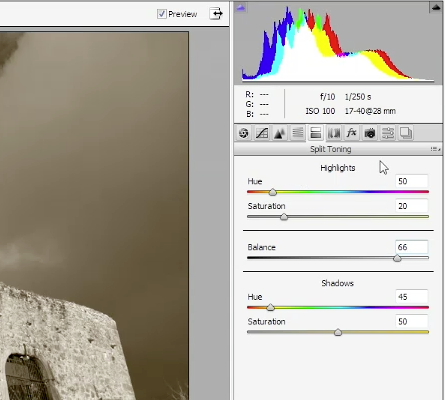
4. Switch to the Split Toning panel and increase the Saturation values for both the highlights and shadows. Change the Hue of the highlights to 50, which is a yellowy orange color. Change the Hue associated with shadows to 45. Adjust the Balance to increase the contrast a bit more.
5. Select the Lens Correction tab and turn on Enable Lens Corrections. And if you’re working inside Camera Raw 6, which is included along with Photoshop CS5, then you’ll want to turn on the check box at the bottom of the panel as well. In Camera Raw 7, it’s located here inside the Color panel, and it’s called Remove Chromatic Aberration.
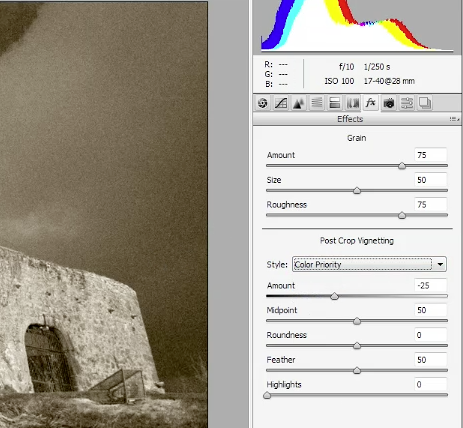
6. Switch to the fx tab. Increase Amount and Size in the Grain section to add a film grain effect to your image. Change the vignetting style to Color Priority and increase the Roughness and decrease the Amount. This will create a dark vignette in the corners of your image. Click OK to exit out of Camera RAW and open your image in Photoshop.
7. Lastly, in Photoshop we’ll add some sharpening by choosing Filter > Sharpen > Smart Sharpen and dial in an Amount of 200%, a Radius of 2 pixels, and enable the Lens Blur setting. This filter will be applied as a Smart Filter since the image was converted to a Smart Object. This way you can adjust the filter settings at any time. If you like, you can reduce the Opacity of the Smart Filter layer to take a bit of an edge off the sharpening.
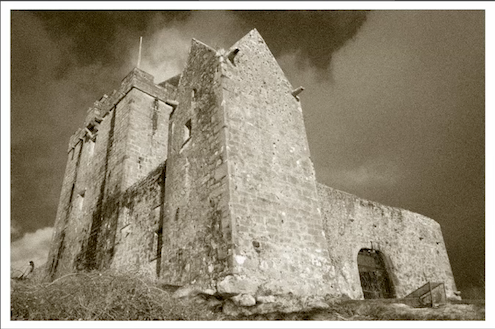
And that’s how you take a full-color digital photograph and render it out as a kind of antique film photo using a combination of Camera Raw and Photoshop. You can get a free 7-day trial to the lynda.com Online Training Library. The trial membership entitles you to 7 days of access to all 986 courses in the lynda.com Online Training Library for free. Click sign up on the subscription plan of your choice to get started.
![]()
Deke’s Techniques: Developing A Dramatic Castle in Camera Raw
This week’s installment of Deke’s Techniques reveals how to develop a dramatic photograph inside of Camera Raw—in particular, an already enchanting photo of the Dunguaire Castle in County Clare, Ireland, that Deke shot on his Canon 5D Mark III. Deke applies a series of discrete selective nondestructive modifications in Adobe Camera Raw to achieve even more of a dramatic effect. Let’s see exactly how it works!
You can get a free 7-day trial to the lynda.com Online Training Library. The trial membership entitles you to 7 days of access to all 986 courses in the lynda.com Online Training Library for free. Click sign up on the subscription plan of your choice to get started.
![]()
Video Tutorial – Controlling Selective Color Changes in Lightroom And Camera Raw In Photoshop CS6
In this episode of The Complete Picture, Julieanne Kost demonstrates how to use Hue, Saturation, Luminance and the Adjustment Brush to selectively control color in Lighroom (free trial). Note: although this video was recorded in Lightroom, the same techniques are available in Adobe Camera Raw in Photoshop CS6 (free trial).
![]()
Wacom’s Cintiq Line Draws Attention with its Slim, New 13-inch Interactive Pen Display
The Cintiq 13HD offers creative professionals a compact interactive pen display with high quality HD resolution and improved pen feel for a digital experience consistent with Wacom’s family of Cintiqs. Wacom’s newest pen display combines a 13-inch HD screen, an adjustable stand and an improved Pro Pen for a digital workflow that feels just like drawing or painting with traditional media. The new Cintiq 13HD is priced at $999.95 (USD) and is scheduled to be available in early April at Wacom’s eStore and other select retailers.
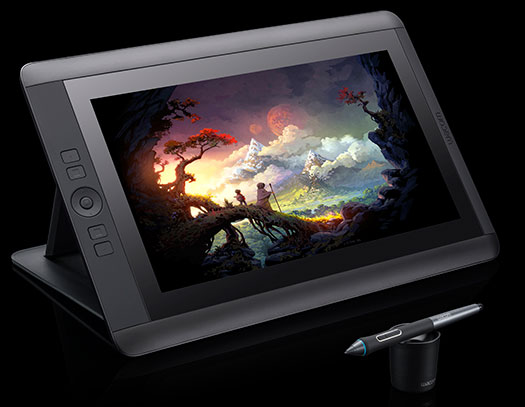
Key to the Cintiq 13HD is its compact, slim design and easy setup with both Mac and PC.computers. For complete comfort, whether positioning it on your desk or in your lap, the Cintiq 13HD’s stand is optimized for use in a choice of four settings – flat, 22°, 35° and 50°.
Perfect for professional artists, graphics designers and photographers, the Cintiq 13HD ‘s best-in-class screen displays 16.7 million colors to ensure crisp color quality. In addition, the wide-format HD LED display’s 178° viewing angle and 1920x1080 resolution are particularly beneficial to those working with intricate graphics or images.
As with all Wacom interactive pen displays, the Cintiq 13HD enables users to create directly on screen for a seamless process that feels natural and speeds production. Offering 2048 levels of pressure sensitivity as well as tilt recognition, the new and improved cordless and battery-free Pro Pen delivers superior comfort, precision and control.
![]()
How To Do Macro Photography With Deep Depth of Field
 From CreativePro, Macro Photography with Deep Depth of Field by Ben Long. From the intro: Macro photography—the process of shooting extreme close-ups of things—has been popular for as long as there have been cameras.
But as you might expect, digital technology, both hardware and software, has made it possible to shoot macro photographs that would have been impossible to achieve with film. And one of the most important macro-related innovations has to do with depth of field. Technically, a macro photo is one that captures your image at a 1:1 scale. That is, the size of the object on your image sensor is actual size. (Going to higher magnifications is also considered macro, of course.)
To shoot a macro photo, you need a lens that’s capable of focusing close enough to your subject that you can achieve this 1:1 or better size. With most lenses, if you’re close enough to your subject to get macro scale, you’re too close to actually focus the shot. Macro lenses, therefore, are capable of focusing at incredibly short distances.
As you get closer to your subject, though, your depth of field drops off tremendously. For example, when shooting with a 1x macro lens at f/4, your depth of field will probably be around half a millimeter! Read the full article: Macro Photography with Deep Depth of Field by Ben Long.

![]()
How To Create Your Own High Resolution Wood Textures
 Here's the latest tutorial from Photoshop Daily: Shoot hi-res wood textures. High resolution wood textures are readily available on line. However you may not want to purchase the rights to use these in commercial works. In that case you’ll want to take your own photos.
Here we show you how. We explore ways to set up and shoot in the studio and outdoors. You’ll also discover which cameras to use to capture the perfect megapixel image and the settings to shoot with for the clearest clarity for first-class results.
Capture perfect outdoor textures — Use the right camera
A camera that supplies a minimum of 24-megapixels in size, whether shooting inside or out, will provide the best-quality texture shots. This means you can edit and retouch considerably before sizing your image down. Cameras such as the Nikon D600 and Sony a99 are exemplary choices as these also include full-frame sensors.
External lighting
When shooting your wood textures, first avoid having hard shadows fall across your subject. Also shoot in soft uniform (neutral) light, on an overcast day not a bright sunny day. This will not just limit the affects of shadows, but also surface light reflection.
Camera shoot settings
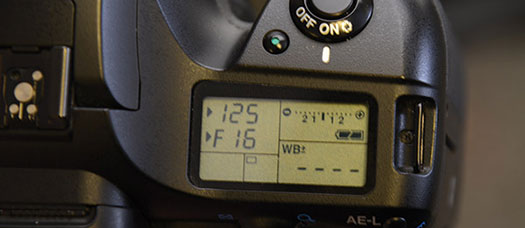
Shoot in RAW format with Auto White Balance activated, setting the ISO between 100 and 400 for better light quality. Use a smaller aperture setting with a higher f-stop number, like f11 or f16, to ensure a good depth of field.
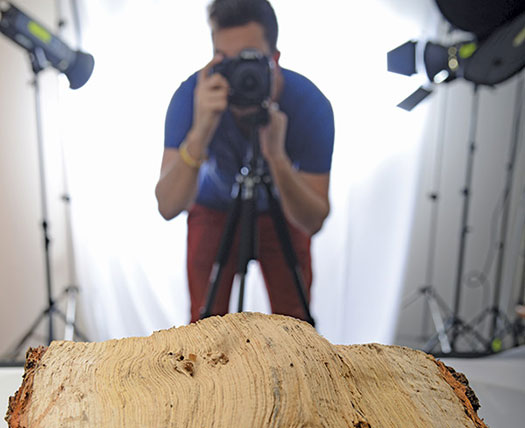
Shoot textures in the studio
Tip 1: One light can be sufficient enough, but keep this near the camera and shoot head-on
Tip2: Introduce a second light near the camera position if you must. Still light the texture head-on
Tip3: Use a tripod to shoot perpendicularly, avoiding lens distortion
Tip4: A low ISO and smaller aperture may cause a slow shutter speed. A tripod will solve any issues
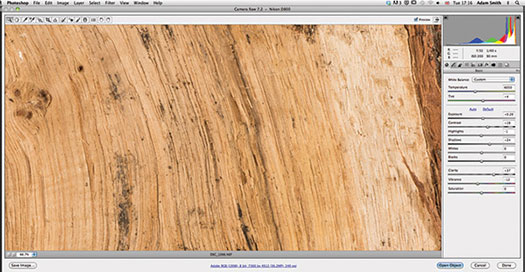
Fix hi-res wood textures in Photoshop — Work with RAW
Following the previous shoot settings will let you easily adjust colour and contrast. When inside the RAW interface (now standard with Photoshop CS6) edit the Exposure, Contrast, Highlights, Shadows and Clarity sliders to define clearer contour and stronger detail.
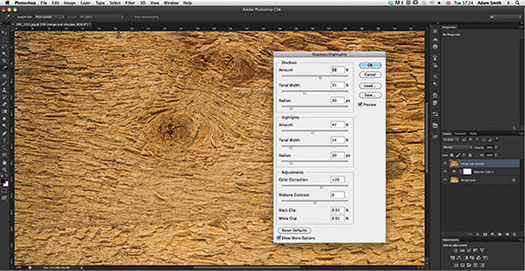
Quick retouch
For those who fail to shoot in RAW, Photoshop can still solve your post-production needs. Lighting and exposure can be easily manipulated using Levels, or more intuitively with the Shadow/Highlights options. Wield the Selective Color adjustment to make intuitive tonal changes. Sharpen filters also help.
Fix skewed angles
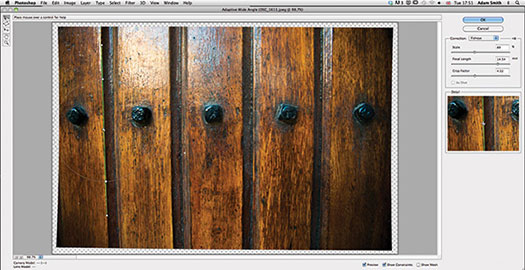
We recommend that you shoot perpendicular, but no one’s fool-proof. If you do recognise curved distortions, don’t despair, you can simply fix this with CS6’s Adaptive Wide Angle option. Apply the Constraint tool to visible image curves, then edit further using control points and sliders to straighten your photo.
![]()
Ten Things You Need To Know About Responsive Design
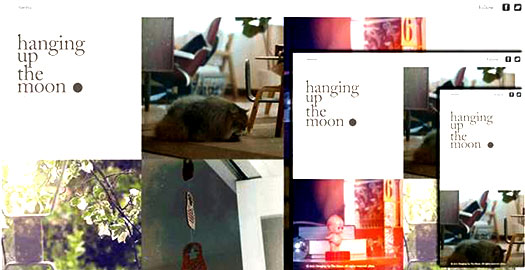
Responsive design is an approach to web design that adjusts to the user, from varying browser sizes to changes in device. The concept has been around for a few years, but 2013 is the year responsive design is really expected to have a huge affect as it is implemented on an exponentially growing number of sites. So what do you need to know about responsive design? This article covers ten important concepts.
Responsive websites work by using media queries to detect the device or the resolution of the device being used to access them. Once this determination has been made, a combination of flexible images, type, and grids adjust to fit the screen on which the site is being viewed. Responsive design is popular now because of the number of tablets and smartphones in the market. The number of users accessing the Internet via a device other than a desktop computer is rapidly increasing, making it necessary for developers to think about all the different ways their information is being viewed. Read the full article, Ten things you need to know about responsive design.
![]()
Using Advanced Editing Techniques for Video in Photoshop - Tips
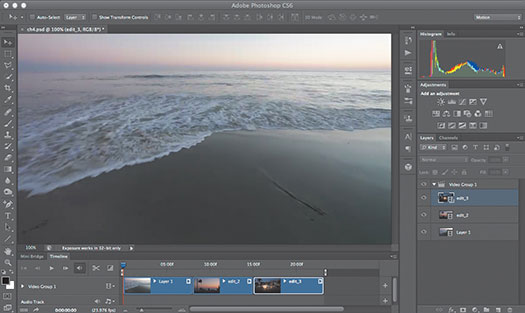
From Peachpit: This chapter shows you how to add the cool Photoshop effects that make your videos look more polished. You will learn about multi-track editing, how layers and Blend modes work with video, and how to mix different types of media on a Timeline. But don’t worry; the learning curve is not difficult.
![]()
Exclusive 15% Discount On Topaz Plugins, Bundles And Upgrades
 Enter our exclusive discount coupon code PHOTOSHOPSUPPORT during the checkout process at Topaz Labs for an instant 15% discount on any Topaz product, including bundles and upgrades.
Topaz Labs Photoshop plug-ins are specifically designed to expand a photographer's creative toolbox by harnessing powerful image technology developments. Photographers everywhere are now taking advantage of the creative exposure effects, artistic simplification, unique edge manipulation, and top-of-the-line noise reduction offered in Topaz products. The Topaz Photoshop Plugins Bundle is a super powerful Photoshop plugins package that includes the following Topaz products:
Topaz Adjust
Deliver stunning and dynamic images with this uniquely powerful plug-in that features HDR-like abilities and enhances exposure, color and detail.
Topaz InFocus
 Topaz InFocus uses the latest advancements in image deconvolution technology to restore, refine and sharpen image detail.
Topaz Detail
A three-level detail adjustment plug-in that specializes in micro-contrast enhancements and sharpening with no artifacts.
Topaz ReMask
The fastest and most effective masking and extraction program with one-click mask refining.
Topaz DeNoise
Highest-quality noise reduction plug-in that removes the most noise and color noise while preserving the most image detail.
Topaz Simplify
Provides creative simplification, art effects, and line accentuation for easy one-of-a-kind art.
Topaz Clean
Take control of the detail depth of your images with extensive smoothing, texture control and edge enhancement tools.
Topaz DeJPEG
Drastically improves the quality of web images and other compressed photos.
Learn more about the Topaz Photoshop Plugins Bundle. Download a free trial version.
![]()
Site Grinder Web Design Tool
 There often seems to be a strict division of labor within the world of web design and development. Creative professionals tend to stick to the Photoshop domain, while those well-versed in scripting are left to the task of implementing their work. Indeed, the two realms are quite different from each other, to which any of us even vaguely familiar with either can easily attest.
Essentially, Photoshop is a no-holds-barred design studio, offering the artist a seemingly endless array of creative options. On the other hand, HTML, CSS, Java and the like follow strict rules of engagement, requiring the developer to take any number of esoteric concerns into consideration in order to ensure that designs are properly displayed on the web.
Turn Photoshop Into A Complete Web Design Tool
SiteGrinder seeks to bridge this gap between design and development. Basically, SiteGrinder turns Photoshop into an easy-to-use and fully functional web design tool. With SiteGrinder, designers will now have the freedom to totally let their creativity loose and then, without skipping a beat, transfer their designs to the web. Bringing esthetic concerns together with more practical considerations, SiteGrinder is an amazingly powerful tool that would make a fantastic addition to any web designer's bag of tricks. Mac OS X and Windows versions of the SiteGrinder unlockable demo are available now via download.
 WordPress Photoshop Plug-in Creates Wordpress Blogs & Sites
Designers can now create PSD to WordPress Themes in Photoshop with Media Lab's NEW SG3xpress for Wordpress Photoshop plug-in. In addition, Media Lab has released the SG3xpress Add-on for its SiteGrinder 3 for users who wish to add advanced blog and WordPress Theme-building to the already powerful SiteGrinder 3 website creation software.
If you know Photoshop then you already know enough to start creating WordPress themes and blogs for yourself and your clients. Creating a blog or a WordPress site in Photoshop is easy with SG3xpress. Now you can go directly to WordPress with your design saving even more time and money for yourself and your clients.
![]()
Photoshop Masking Plugin Fluid Mask - Exclusive Instant Discount
 The 4 1/2 out of 5 star review of Fluid Mask at MacWorld begins by saying that this "Photoshop plug-in takes the pain out of extracting backgrounds," and goes on to recommend the latest version, stating that "Fluid Mask is a very effective tool for separating objects from their backgrounds. It offers a variety of useful features for tackling almost any difficult image, from wispy hair to complex foliage. Online video tutorials and live training sessions help ease the learning curve."
Our friends at Vertus, the makers of Fluid Mask Photoshop Plugin, have set up a special exclusive discount for PhotoshopSupport.com. Go to our Fluid Mask page for a special, exclusive discount link.
Fluid Mask is designed for photographers, image editors, graphic designers and all those who take digital image editing seriously. In a streamlined interface and workflow, Fluid Mask instantly shows key edges in the image and provides comprehensive easy to use tools that work with difficult-to-see edges and tricky areas like trees & lattices. Fluid Mask will also preserve all-important edge information for a professional quality cut out. Go to our Fluid Mask page for more info.![]()
lynda.com Online Training Library - View Free Video Clips
 Subscriptions to the lynda.com Online Training Library provide anytime access to tens of thousands of video tutorials covering Photoshop, Illustrator, Dreamweaver, web design, digital imaging, 3D, digital video, animation, and many other topics. View free video clips.
For less than a dollar a day, members have the opportunity to stay current and keep skills sharp, learn innovative and productive techniques, and gain confidence and marketability - all at their own pace. Premium subscriptions include instructors’ exercise files so that members can follow along with the exact examples onscreen. Customers learn at their own pace and may stop, rewind, and replay segments as often as necessary. View some free video clips (high resolution).
![]()
A Thank You To Our Friends, Partners & Sponsors!
![]() We'd like to thank our friends, partners and sponsors: Adobe, Google, Hostway, Apple, Brusheezy, Janita, Heathrowe, onOne Software, Obsidian Dawn.
We'd like to thank our friends, partners and sponsors: Adobe, Google, Hostway, Apple, Brusheezy, Janita, Heathrowe, onOne Software, Obsidian Dawn.
![]()
![]()


