![]()
![]() Try before you buy. Download any Adobe product for a free 30 day trial.
Try before you buy. Download any Adobe product for a free 30 day trial.
![]()
![]() The Photoshop Blog offers the latest Photoshop news and software updates, Photoshop tips and tutorials, and random thoughts from graphic artist and Photoshop expert Jennifer Apple.
The Photoshop Blog offers the latest Photoshop news and software updates, Photoshop tips and tutorials, and random thoughts from graphic artist and Photoshop expert Jennifer Apple.
![]()
Six Ways To Speed Up Lightroom And Improve Digital Workflow
JULY 28, 2012
 From Peachpit Press: Six Ways to Speed Up Lightroom By Michael Clark.
Having issues with Lightroom? Does it feel like it is running slow? In this article, Michael Clark discusses six ways to speed up Lightroom's performance so that you can get the most out of this software. These tips and techniques will save you a lot of time and will also improve your overall digital workflow.
It seems many people are finding Lightroom to be a bit slow, which I find rather curious. I have had the opposite experience, especially when I compare my current Lightroom workflow to my older Adobe Camera Raw workflow, which seemed glacially slow by comparison.
In Lightroom 4, Adobe engineers have really worked hard to make the software run faster than ever before, and I can see it. Even so, in this article I’ll offer up a few insider tricks, tips, and techniques that will enable Lightroom to run as smoothly as possible.
Download A 30-day Free Trial Of Any Adobe Creative Suite
 Photoshop Extended integrates the state-of-the-art editing, compositing, and graphic design capabilities of Adobe Photoshop, and features advanced tools for 3D design, image and video editing.
Photoshop and Photoshop Extended can be purchased as stand-alone applications, as components of the Adobe Creative Suite family, or as part of Adobe's new Creative Cloud offering. Upgrade pricing is also available to eligible customers.
Download
the 30-day Photoshop free trial, or a trial of any Adobe product, including the Master Collection. See our Photoshop CS6 Tutorials Page for a collection of free tutorials and videos. Visit the Adobe Coupons & Special Offers Page to see the latest deals from Adobe. Get up to 80% off at the Adobe Education Store.
posted by Jennifer Apple | facebook | RSS feed | bookmark | comment | twitter
![]()
Free Set Of Scratched Metal Brushes From Bittbox
JULY 28, 2012
Another nice set of free Photoshop brushes, this time four scratched metal images. Download and use for personal use for free, but read their policy as their are restirictions concerning commercial use. (Download a free trial of Photoshop CS6.)

Adobe Photoshop CS6 & Photoshop CS6 Extended
 Photoshop CS6 and Photoshop CS6 Extended can be purchased as stand-alone applications or as components of the Adobe Creative Suite 6 family. Upgrade pricing is available to eligible customers. You can also download
a 30-day Photoshop CS6 free trial.
See our Photoshop CS6 Tutorials Page for free training. Visit the Adobe Coupons & Special Offers Page to see the latest deals from Adobe.
posted by Jennifer Apple | facebook | RSS feed | bookmark | comment | twitter
![]()
Photoshop Eerie Eye Effects Tutorial
JULY 27, 2012
Here's a new tutorial from Photoshop Daily:
Photoshop eye effects by Adam Smith.
This tutorial will show you how to create eerie effects in your photo manipulations. (Download a free trial of Photoshop CS6.)
Burn in the shadows
Duplicate your layer, working on the newly duplicated layer only. Select the Burn tool set to Midtones and 50% Exposure in the top Options bar. Paint over the pupil, iris edge and around the edge of the eye with a small soft brush.
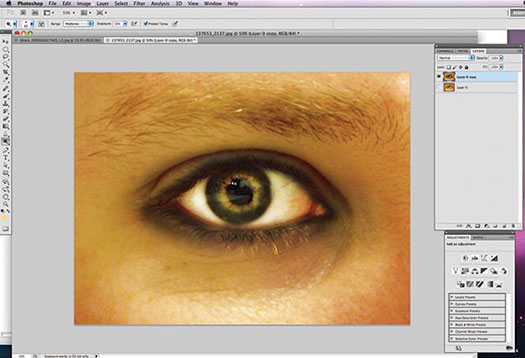
Keep working up the eye
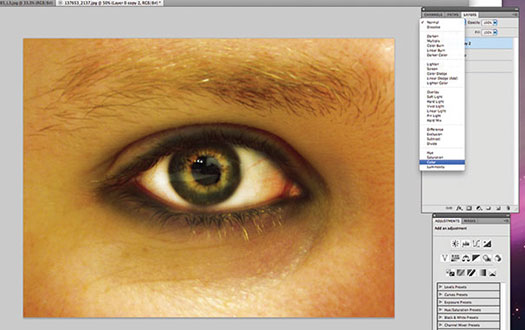
Increase the brush size, darken the lashes and area around the eye, then create a vignette effect to frame the image. Switch to the Dodge tool set to Midtones at 50% Exposure, paint over the whites to brighten them. Add a new layer to the top of the stack and set its blending mode to Color.
Finish with a few adjustments
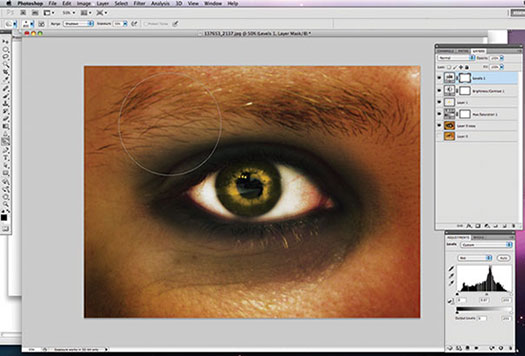
Select a murky yellow, hard-edged brush and paint the iris. Add a Hue/Saturation adjustment layer under the iris colour layer, and desaturate slightly. Add a Brightness/Contrast adjustment layer to the top and boost the image. Lastly add a Levels adjustment layer and reduce the reds.
Adobe Photoshop CS6 & Photoshop CS6 Extended
 Photoshop CS6 and Photoshop CS6 Extended can be purchased as stand-alone applications or as components of the Adobe Creative Suite 6 family. Upgrade pricing is available to eligible customers. You can also download
a 30-day Photoshop CS6 free trial.
See our Photoshop CS6 Tutorials Page for free training. Visit the Adobe Coupons & Special Offers Page to see the latest deals from Adobe.
posted by Jennifer Apple | facebook | RSS feed | bookmark | comment | twitter
![]()
Making Skin And Eye Color Adjustments In Photoshop
JULY 26, 2012
Here's a tutorial from Photoshop Daily: Master retouching with simple techniques.
Smoothing artefacts
Skin is full of pores and blemishes, so to relieve these duplicate your model image and apply Filter>Noise>Median>3 pixels and a 5px Gaussian Blur. Apply a layer mask, invert and apply softening with a 30% soft white brush.
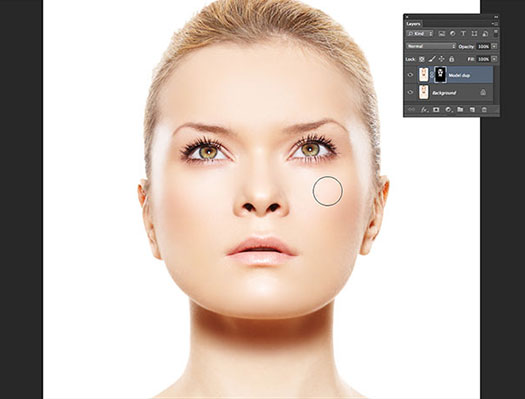
Play with Curves
Begin altering colour by applying a Curves layer. Select all three Red, Green and Blue curves channels – slightly darkening the first two and lightening the last. This should create a more pinkish skin tone.
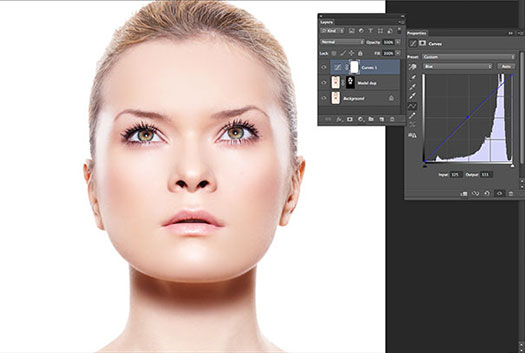
Selective Color for lips
Apply Selective Color, then decrease Red to -55, 0, 0, 0 and Neutrals to -40, 15, -40, 5. Invert the layer mask. Paint to this with a 30% Opacity white brush, on the lips to show through pinker lips.
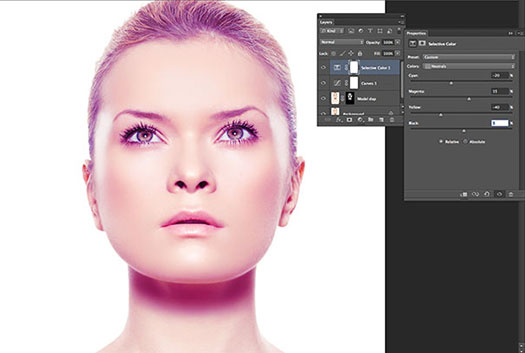
Selective Color for eyes
Apply another Selective Color layer and set Neutrals at 20, -10, -50, 10. This will reorientate eye colour to blue. To improve greens increase the value of the Neutrals Yellows slider. Again invert your layer mask. Now paint to this to reveal bluer eyes.
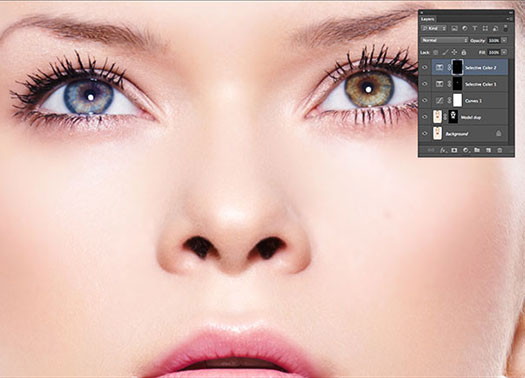
Adobe Photoshop CS6 & Photoshop CS6 Extended
 Photoshop CS6 and Photoshop CS6 Extended can be purchased as stand-alone applications or as components of the Adobe Creative Suite 6 family. Upgrade pricing is available to eligible customers. You can also download
a 30-day Photoshop CS6 free trial.
See our Photoshop CS6 Tutorials Page for free training. Visit the Adobe Coupons & Special Offers Page to see the latest deals from Adobe.
posted by Jennifer Apple | facebook | RSS feed | bookmark | comment | twitter
![]()
How To Create Interlocking Olympic-style Rings in Illustrator - Video Tutorial
JULY 24, 2012
Four years ago, Deke found out it was possible to create interlocking rings in Illustrator, thanks to advice from our own Mordy Golding. In the spirit of the upcoming Olympic games, this week’s Deke’s Techniques documents the start to finish creation of five interlocking rings in Illustrator CS6. (Download a free trial of Illustrator CS6.)
Of course, since he figured out how to do this four years ago, it will also work in earlier versions of Illustrator, as well. The key feature you need to accomplish this technique is Live Paint, which helps you make all the appropriate overlappings (and underlappings) necessary to create the effect properly.
To give you a proper idea of why the Live Paint tool is so cool, it’s important to remember that in Illustrator one object has to be either in front of or in back of another object—objects can’t be woven into each other. So to get the effect of the Olympic rings overlapping over and under one another, we need to simulate the overlapping affect using Live Paint.
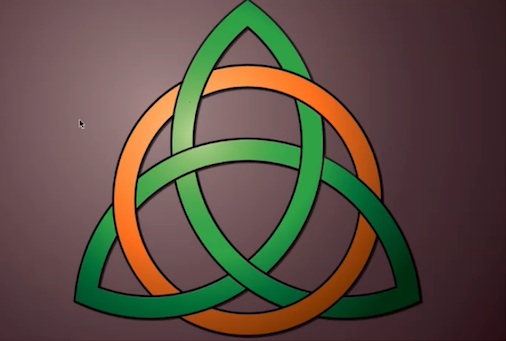
The Live Paint feature sees your drawing as a coloring book or stained glass structure rather than a series of overlapping shapes. This allows Illustrator to easily detect color intersections within an illustration, and allows you to select intersections and fill them with the color you desire—all without having to create elaborate subpaths. Even cooler, as you move objects around, Illustrator still “sees” those areas of overlap, so if you want to turn your rings into a chain, the interlocking effect will remain.
Deke begins this tutorial by creating the rings themselves with the Ellipse tool, and cutting out the centers by converting the shapes into compound paths. He then uses the Reflect tool in order to copy and position the rings appropriately without having to measure and move each one into place, and adds appropriate stroke and fill colors to give you five properly colored, but decidedly not intertwined, Olympic-style rings:

Finally, to finish the effect, he demonstrates how to apply Live Paint to all the intersections, so that the rings go under or over their interlocking neighbors as appropriate. He’ll even make sure you grab the borders around the rings.

This ability to create dynamically updating intersections has a multitude of applications. In fact, in Chapter 17 of Illustrator CS5 One-on-One Advanced, Deke shows you how to apply this technique to create a Celtic knot.
You can get a free 7-day trial to the lynda.com Online Training Library. The trial membership entitles you to 7 days of access to all 986 courses in the lynda.com Online Training Library for free. Click sign up on the subscription plan of your choice to get started.
Adobe Photoshop CS6 & Photoshop CS6 Extended
 Photoshop CS6 and Photoshop CS6 Extended can be purchased as stand-alone applications or as components of the Adobe Creative Suite 6 family. Upgrade pricing is available to eligible customers. You can also download
a 30-day Photoshop CS6 free trial.
See our Photoshop CS6 Tutorials Page for free training. Visit the Adobe Coupons & Special Offers Page to see the latest deals from Adobe.
posted by Jennifer Apple | facebook | RSS feed | bookmark | comment | twitter
![]()
onOne Plugins Bundle Perfect Photo Suite Sale - Get $100 Off Plus 2 Free DVDs
JULY 24, 2012
 onOne Software currently has a sale available on Perfect Photo Suite 6.1. This sale will begin on July 24th and last until July 27th.
You will be able to purchase the software for
$199.95 instead of $299.95. All purchases will also include two free DVDs — the Best of onOne University and Adobe Photoshop Lightroom 4 Crash Course.
Perfect Photo Suite 6.1 includes seven integrated products for photography workflow:
- Perfect Effects: Create images with impact
- Perfect Portrait: Simply powerful retouching
- Perfect Resize: Enlarge your images for print
- Perfect Layers: The power of layers without Photoshop
- Perfect Mask: The essential cut-out tool
- FocalPoint: Put the focus where you want
- PhotoFrame: Borders, backgrounds, textures and adornments
- Works as a plug-in for Lightroom, Aperture, and Photoshop! The program also
works as a stand alone application.
Adobe Photoshop CS6 & Photoshop CS6 Extended
 Photoshop CS6 and Photoshop CS6 Extended can be purchased as stand-alone applications or as components of the Adobe Creative Suite 6 family. Upgrade pricing is available to eligible customers. You can also download
a 30-day Photoshop CS6 free trial.
See our Photoshop CS6 Tutorials Page for free training. Visit the Adobe Coupons & Special Offers Page to see the latest deals from Adobe.
posted by Jennifer Apple | facebook | RSS feed | bookmark | comment | twitter
![]()
Adobe Special Deals For July - Save On Elements And Premiere
JULY 24, 2012
 Here are some just announced Adobe Specials for the end of July:
· $69.99 for full version of Adobe Photoshop Elements 10.
· $69.99 for full version of Adobe Premiere Elements 10
· $99.99 for full version of Photoshop Elements 10 and Premiere Elements 10 bundle
Save $50 on Photoshop Elements 10- now only $69.99
Offer code SummerElements, ends August 6.
Save $50 on Premiere Elements 10- now only $69.99
Offer code SummerElements, ends August 6.
Save $50 on Photoshop Elements 10 and Premiere Elements 10- now $99.99
Offer code SummerElements, ends August 6.
Adobe Photoshop CS6 & Photoshop CS6 Extended
 Photoshop CS6 and Photoshop CS6 Extended can be purchased as stand-alone applications or as components of the Adobe Creative Suite 6 family. Upgrade pricing is available to eligible customers. You can also download
a 30-day Photoshop CS6 free trial.
See our Photoshop CS6 Tutorials Page for free training. Visit the Adobe Coupons & Special Offers Page to see the latest deals from Adobe.
posted by Jennifer Apple | facebook | RSS feed | bookmark | comment | twitter
![]()
Free Textures - Organic Texture Pack - 15 Free Textures
JULY 23, 2012
Nice free gift from Photoshop Daily:
Photo manipulators and mixed media artists are always on the look out for good texture. Here we’ve supplied a host of high res samples for you to play with – 15 to be exact with a combined size of over 70MB. Go to this page and click the link for the Organic texture pack to download them now. These images should only be used in non-commercial projects.

![]()
Why Does a Photograph’s Preview Change in Lightroom and Bridge? - Video Tutorial
JULY 23, 2012
In this video tutorial Julieanne explains one of the great mysteries of Lightroom and Bridge – why Lightroom (or Bridge) displays a photograph one way and then changes the way it looks a moment later. It will all become clear with just a little information about how digital camera files are captured and displayed by different applications. (Download a free trial of Photoshop Lightroom 4.)
![]()
CS6 Lighting Effects Filter - What's New
JULY 21, 2012
 Here's a tutorial from Photoshop Daily on the new CS6 Lighting Effects filter by Adam Smith.
Find out how this Photoshop filter has been completely redesigned for the latest version.
(Download a free trial of Photoshop CS6.)
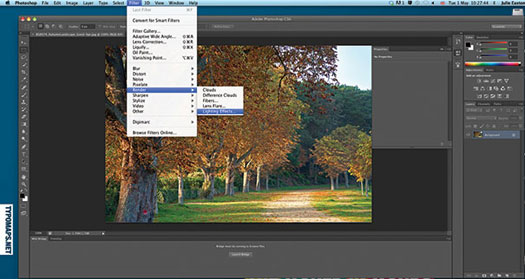
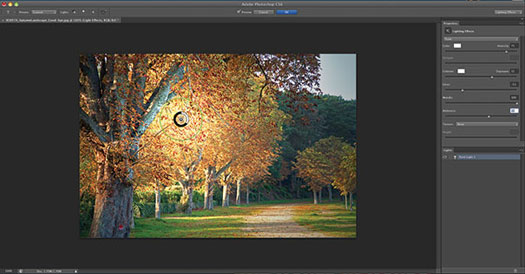
The Lighting Effects Filter is hardly a new addition to Photoshop, but it has been completely redesigned and rebuilt for PS CS6. You access the filter from Filter>Render>Lighting Effects, which takes you to the new dialog. In the new interface, you have an Options bar along the top, from which you can access Preset options for lighting, as well as the different types of light on offer: Spot, Point and Infinite.
Spot Lights give a ‘spot’ of light, which you can customise to alter the intensity, location and direction, as well as the Hotspot location, which is where the light hits your subject. Point Lights are like a light bulb and you can alter its location and intensity, but not the direction. Finally, Infinite Lights are more distant light sources, and you can only change their intensity or colour.
The Properties panel down the right-hand side of the screen has lots of different sliders that you can adjust to tweak and customise your lighting. You can also add multiple lights to any one scene as needed.
step 1: Enter the filter
Open the photo that you want to work on. If you want to be able to re-edit the effect, then duplicate your photo layer and turn the duplicate into a Smart Object. Next, go to Filter>Render>Lighting Effects to open the newly designed Lighting Effects interface, where we can start adding lights.
step 2: Pick a light type
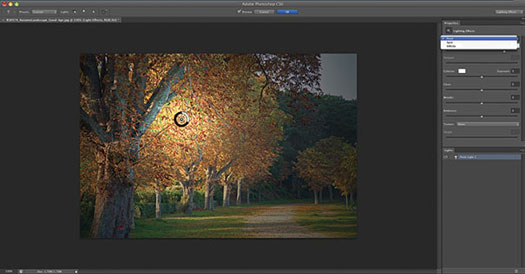
You can add a new light from the drop-down menu at the top of the Properties panel, or using the Lights in the Options bar at the top of the screen. We are going for a Point light in this particular scene, which brings up a control ring with an Intensity Ring in the centre. Adjust the Intensity to suit the amount of the image you wish to affect.
step 3: Adjustments
We’re not going to play with options in the Properties panel to change the way our lighting effect looks. We have increased the Exposure, lowered the Gloss and increased the Metallic and Ambiance. You can save presets for future use if you wish, though trial and error works well to get the right look for individual images. The faster processing of Photoshop CS6 means alterations are made in real-time.
Adobe Photoshop CS6 & Photoshop CS6 Extended
 Photoshop CS6 and Photoshop CS6 Extended can be purchased as stand-alone applications or as components of the Adobe Creative Suite 6 family. Upgrade pricing is available to eligible customers. You can also download
a 30-day Photoshop CS6 free trial.
See our Photoshop CS6 Tutorials Page for free training. Visit the Adobe Coupons & Special Offers Page to see the latest deals from Adobe.
posted by Jennifer Apple | facebook | RSS feed | bookmark | comment | twitter
![]()
Get Inspired - Creative Billboard Collection
JULY 19, 2012
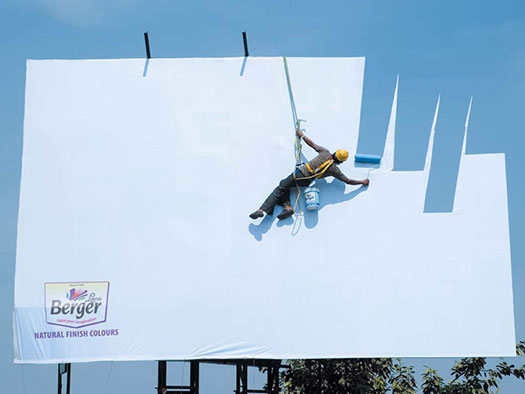
Wow, this is a good collection of creative billboards. A few of my favorites:


Adobe Photoshop CS6 & Photoshop CS6 Extended
 Photoshop CS6 and Photoshop CS6 Extended can be purchased as stand-alone applications or as components of the Adobe Creative Suite 6 family. Upgrade pricing is available to eligible customers. You can also download
a 30-day Photoshop CS6 free trial.
See our Photoshop CS6 Tutorials Page for free training. Visit the Adobe Coupons & Special Offers Page to see the latest deals from Adobe.
posted by Jennifer Apple | facebook | RSS feed | bookmark | comment | twitter
![]()
How To Create Dynamic Lighting Effects In Photoshop
JULY 19, 2012
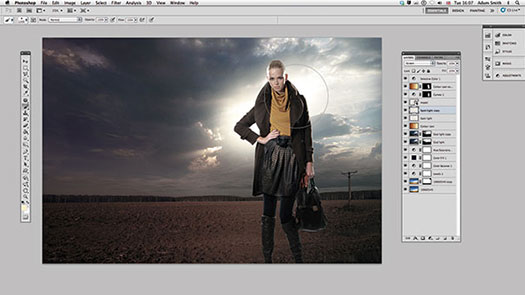
 Here's a Photoshop tutorial by Adam Smith from Photoshop Daily: Learn how to use simple brush and blending mode techniques to achieve stunning effects. Here we’re showing you how to create dynamic lighting, using the simplest of Photoshop tools.
(Download a free trial of Photoshop CS6.)
See how you can achieve a striking effect through concise layering effects, applying Photoshop brushes and blending modes. Effects become straightforward with precise application, offering you exciting results first time.
Spot light
Create a new layer, titled Spotlight, placed directly beneath your model layer. Set this layers blending mode to Overlay. Next, choose a light yellow tone in the Color Picker (#fdeeca) and select a large soft brush, applying twice in behind the crook of your model’s right arm. Duplicate this layer, setting the blending mode to Screen. Also apply your soft brush twice behind your models left shoulder, on this Screen based layer.
Fringe light
Create a new layer on top of your stack, titled Fringe light. With this layer active Cmd/Ctrl+click your model layer thumbnail, creating an active selection. Press Cmd/Ctrl+H to hide this, selecting a soft edged brush at 80%, still with the same light yellow tone. Apply this to the outside edges of your model where strong highlights are noticeable, heightening exposure and overall effects. To a lesser extent apply the same brush at 10% to the edges of your models inner and outer legs, as well as left hand and bag.
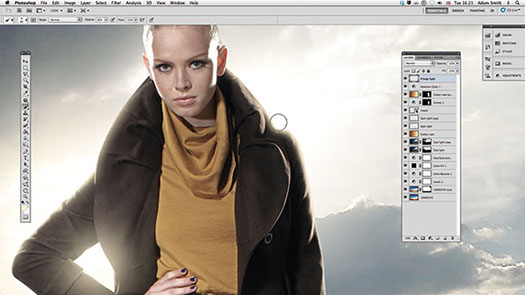
Flare effect
Activate your Spot light copy layer and select the Smudge tool, set at 65% Strength. Apply this to the layer several times, creating discreet light rays. Apply Filter>Noise>Add Noise to his layer, Amount set at 30%. Next, create a new layer on top of your stack filled with solid black, titled Lens flare. Select Filter>Render>Lens Flare, applying a 105mm Prime at 120% Brightness. Descale to a fifth the size and rotate 90-degrees before applying a Screen blending mode.
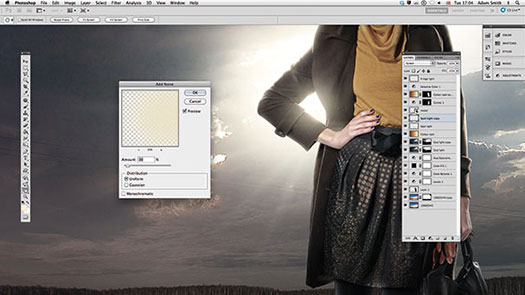
Flare effect part II
Position your flare in the centre of your model bent arm and mask away any apparent edges. Select Blending Options from the layer style options (layer palette>fx). Holding Alt drag and split the Blend If This Layer black slider, to a value of 0/110. Drop layer opacity to 80% before apply filter>blur>Gaussian Blur, 4 Pixels Radius. Next, create a new layer placed directly beneath your original Colour cast layer, titled Floor light. Set the layer’s blending mode to Overlay.
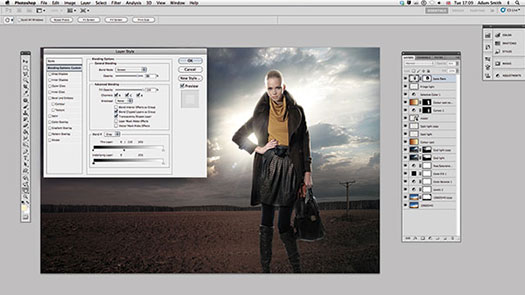
Adobe Photoshop CS6 & Photoshop CS6 Extended
 Photoshop CS6 and Photoshop CS6 Extended can be purchased as stand-alone applications or as components of the Adobe Creative Suite 6 family. Upgrade pricing is available to eligible customers. You can also download
a 30-day Photoshop CS6 free trial.
See our Photoshop CS6 Tutorials Page for free training. Visit the Adobe Coupons & Special Offers Page to see the latest deals from Adobe.
posted by Jennifer Apple | facebook | RSS feed | bookmark | comment | twitter
![]()
Alien Skin Exposure 4 - New Version Of Photo Effects Plugin
JULY 19, 2012
 Alien Skin's Exposure 4 is the new version of their photo effects plug-in for Photoshop, Photoshop Elements, and Photoshop Lightroom. Exposure 4 provides accurate film simulation and a wide range of creative effects. With a completely redesigned user interface and new controls that help you quickly explore its wide range of effects or develop your own custom looks, Exposure 4 is faster and easier to use.
Here's a quick review from Photoshop Daily:
There are plenty of apps and add-ons out there, which let you add various filters and effects to your photos and images. But we have come across few as adaptable as Exposure 4. The Photoshop and Lightroom edition offers a huge range of filters to add to your image, each one of them totally customisable to your needs. The user interface has seen a major overhaul since Exposure 3 and the result is a much more streamlined experience.
The left side of the window offers you a range of preset filters and a small thumbnail preview. Your image sits in the centre of the window, with Preferences along the bottom. The right-hand side is where you can customise your image, using sliders to alter the levels for Colour, Tone, Grain and more.
Adding textures, borders and light-leaks are simple thanks to drop-down menus, and the result is that no two images need ever look the same. The biggest advantage of this add-on is it’s sheer simplicity; adding filters is just a couple of clicks away, and everything can be edited with the sliders on the right. The results were impressive for the most part, and the ability to save your own combinations of settings as presets is welcome.
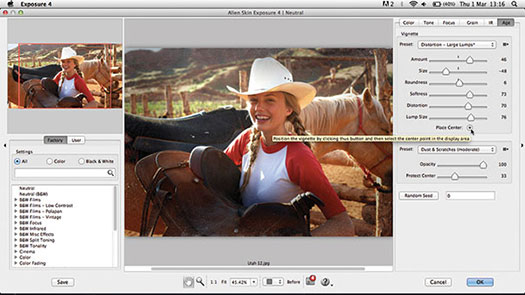
Our biggest problems were the price, which is surprisingly high in comparison to similar plug-ins, and that a few of the preset filters needed some serious tweaking to look professional. That said the majority of our final images were impressive, with a distinctive look that was strongly reminiscent of old-school photography effects.
Improved User Interface
A redesigned user interface makes Exposure 4 much easier to use.
Everything is faster and more interactive.
Unified Filters. Black and White and Color filters are combined so you can find all the effects in one place.
Group presets let you explore custom effects easily.
Thumbnail Preview. Hover over a setting to preview it in the thumbnail.
Fast text search. Find settings based on name or description.
New Controls and Effects
New controls let you create custom looks quickly and intuitively.
Texture Effects (light leaks, dust and scratches, borders)
New controls let you create Black and White effects more easily (more color channels, B/W Color Filter, Split Toning Control).
New controls let you create custom color effects more easily (more saturation channels, color split toning).
Color infrared film provides psychedelic color shifts.
New Presets
Many presets have been improved and new ones added. Visit our examples page for a sampling of some of the hundreds of presets.
New textures help you recreate historical photographic processes like Cyanotype, Lith printing and Wet Plate Photography.
Lo-Fi toy camera presets are now more realistic using light leaks and organic textures.
Adobe Photoshop CS6 & Photoshop CS6 Extended
 Photoshop CS6 and Photoshop CS6 Extended can be purchased as stand-alone applications or as components of the Adobe Creative Suite 6 family. Upgrade pricing is available to eligible customers. You can also download
a 30-day Photoshop CS6 free trial.
See our Photoshop CS6 Tutorials Page for free training. Visit the Adobe Coupons & Special Offers Page to see the latest deals from Adobe.
posted by Jennifer Apple | facebook | RSS feed | bookmark | comment | twitter
![]()
Mobile Photoshop: Basic Retouching In Adobe Photoshop Touch
JULY 19, 2012
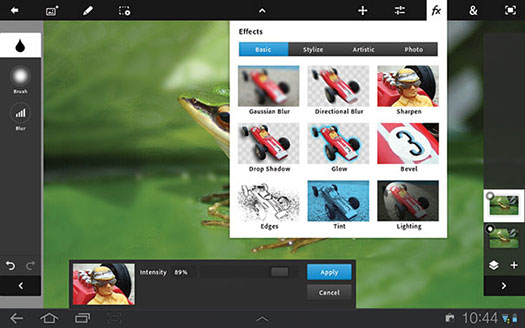
Here's a tutorial from Photoshop Daily: Basic Retouching in Adobe Photoshop Touch. (Find out more about Photoshop Touch here.) (To access the image of the frog click here.)
Step 1: Select the Clone Stamp
We are going to touch up this great frog image. We’ll start by cleaning up some of the dark spots on the leaves to tidy things up a bit. To do this, select the Clone Stamp tool from the main toolbar. In the same menu you will also find the Healing Brush tool, which is great for working on skin. Selecting this tool will open up the main brush options. We’re going to work on a duplicate layer too, so that we can always revert to the original if things go wrong.
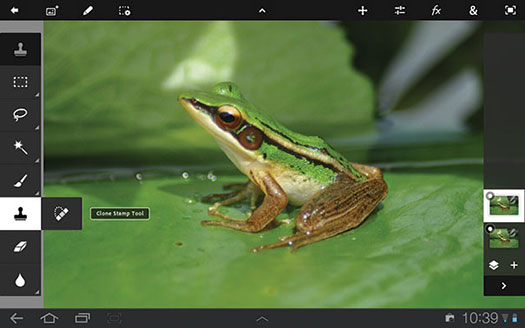
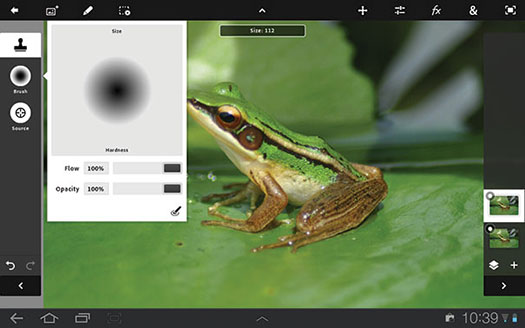
Step 2: Set your brush size
There are two main options when using the Clone Stamp tool. The first is the Brush, which brings out the Brush palette. Here you can alter the Size and Hardness of the brush by dragging with your finger watching the values that appear on-screen to get the right brush settings. You can also alter the Opacity and Flow values here, just as you would in Photoshop by dragging the slider bars from left to right. The little icon in the bottom right has Stylus Pressure controls.
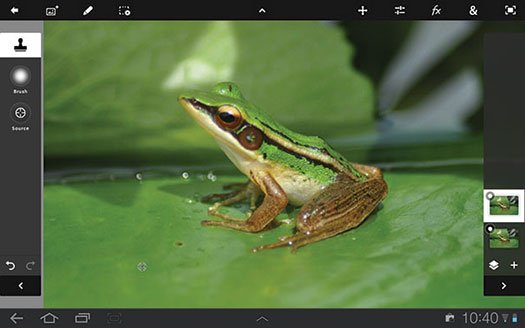
Step 3: Pick source and start cloning
The second option that you need to set is the Source. When this icon is active, you can click anywhere on the photo to set the source for the cloning. You need to make sure that you switch back to Brush before you start to work over the area that you want to clone. You can keep switching between the two to select new sources as you work over the photo, removing any blemishes from the leaves.
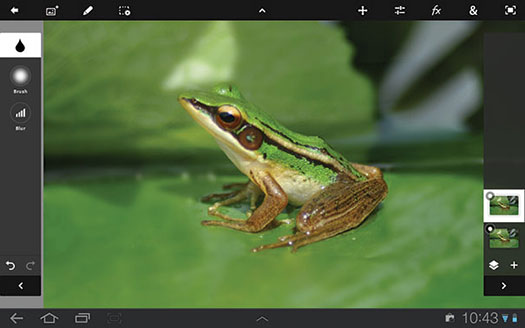
Step 4: Add depth of field with blur
We’re now going to enhance the depth of-field effect that is already present in the shot by blurring the background more. You could make a selection of the background and apply a Gaussian Blur to it, but we wanted a little more control, so we’re using the Blur tool from the toolbar to selectively add blur where we need it. Again, you can set the brush up as you need, and the Blur option sets the strength of the effect.
Step 5: Sharpen up
Now that we have the image looking the way that we want, we are going to sharpen it up as a final touch. There is a Sharpen filter in the Effects menu, from the Basic options. This brings up an Intensity slider, which you can drag to increase the effect. The image is instantly updated with the results, but it isn’t set in stone until you hit Apply. Our image is quickly and easily improved with a few controls.
Adobe Photoshop CS6 & Photoshop CS6 Extended
 Photoshop CS6 and Photoshop CS6 Extended can be purchased as stand-alone applications or as components of the Adobe Creative Suite 6 family. Upgrade pricing is available to eligible customers. You can also download
a 30-day Photoshop CS6 free trial.
See our Photoshop CS6 Tutorials Page for free training. Visit the Adobe Coupons & Special Offers Page to see the latest deals from Adobe.
posted by Jennifer Apple | facebook | RSS feed | bookmark | comment | twitter
![]()
Adobe Creative Week UK - Free Recordings
JULY 18, 2012
 If you love creativity, this is for you.
Last week Adobe Creative Week UK offered some live programming covering Photography and Digital Imaging, and Design and Publishing. Recordings of each of these shows are now available for viewing. Thjey covered every aspect of the creative industry with the help of creative luminaries, industry experts, Adobe evangelists and many members of the creative community. Here are some teasers:
Let's start with the big picture. Is our creative industry in good health? Is the talent pool growing or shrinking? And what are the strategies needed to ensure the industry prospers in the future? The details can wait; let's look to the horizon.
The design and publishing industry is going through a huge period of change, driven by the explosion in digital publishing and accelerated by the surge in popularity of tablet and mobile devices. Today's sessions will look to the future, considering both the opportunities and threats this revolution brings to a centuries-old industry.
As budgets for both national broadcasting and cinematography have contracted, there's more pressure for programmes and movies to deliver more for less. Wednesday’s sessions will look at whether this is leading to lower standards or driving the industry forward with renewed creativity.
The question of specialism within the digital media industry is more relevant now than ever before. As an industry, how can workers future-proof their careers, by understanding multiple web and mobile technologies? Sessions today will look at how innovations in web and mobile are disrupting the industry and creating demand for new skills and multi-specialist workers.
Has digital technology 'dumbed down' the photography industry or is it in fact opening new doors for creativity and artistic expression? Is traditional photography king or is digital claiming the crown? This and other key issues in the world of photography and digital imaging will be driving the discussion on the closing day of Creative Week. (Want to try PS CS6? You can now download a free 30-day trial of Photoshop CS6 directly from Adobe.)
Adobe Photoshop CS6 & Photoshop CS6 Extended
 Photoshop CS6 and Photoshop CS6 Extended can be purchased as stand-alone applications or as components of the Adobe Creative Suite 6 family. Upgrade pricing is available to eligible customers. You can also download
a 30-day Photoshop CS6 free trial.
See our Photoshop CS6 Tutorials Page for free training. Visit the Adobe Coupons & Special Offers Page to see the latest deals from Adobe.
posted by Jennifer Apple | facebook | RSS feed | bookmark | comment | twitter
![]()
Retouching Eyes - Retouch Professionally For Authentic Results
JULY 17, 2012
 From Photoshop Daily, image Editor Adam Smith shows you how to retouch professionally, obtaining authentic results.
When creating a commercial retouch image that deals with facial reconstruction you must be prepared to dedicate a lot of time to the finest details.
Half the battle is retouching something to the point where it is totally transformed, only for it to look like it hasn’t been retouched at all. Here we focus on the eye region. Taking out bags and crowsfeet is one thing, but entirely without a seconds thought will create horrid synthetic effects.
Addressing size, shape and contour can radically transform your models features, for a more healthy and attractive look. Mastering the illusion of realism is the true skill or any great retoucher. Here we show you how. (Download a free 30-day trial of Photoshop CS6.)
Step 1: Clean the eye area
Many will apply the Patch tool again here to clean up bags under the eyes, which isn’t the wrong tool but many people apply it in the wrong fashion. The best way is to apply the Patch tool to the deepest line, which is usually the hollow where the eye sits, dragging to an area below where the texture matches best. Then work up to the next eye line doing the same. Finish your effect using the Healing Brush tool, applying this in directions that match the patterns of the skin before hand.

Step 2: Expand the eye
Even at this stage the subject’s face has taken on a far more smoother appearance, now enabling us to pull out key features without distracting artefacts. Start by making a selection of the right eye, duplicating this to a new layer. Press Cmd/Ctrl+T to activate your Free Transform handles but don’t do this manually. Instead use the W and H values in the above options bar, so we get symmetrical resizing and don’t go crazy with scaling. Next apply Edit>Transform>Warp handles to open up the eye more, before applying a mask and integrating edges.

Step 3: Shape the eyebrows
Digitally plucking the eyebrows is simple. Just zoom in at around 200%, applying the Healing Brush tool to work out stray hairs. However, at times your subject’s eyebrows may be plucked and uneven, even missing hair through scar tissue. Here you’ll need to work in values and have a whole lot of patience. Grafting is one of the more reliable ways to achieve the perfect eyebrow, which consists of you making selections of the brow and duplicating. Set this duplicate layer’s blending mode to Darker Color, place, warp and integrate with a Layer Mask.

Step 4: Build up eyelashes
Gaps may appear in the eyelash area and you can amend these manually. Simply make a selection of the adjacent eyelash, copy and paste this into a new layer then mask away skin edges, applying a Darken blending mode. You can then reposition and apply Levels (Cmd/Ctrl+L) to blend the eyelash even further. You can also apply the Burn and Doge tools for a more specific lash layer effect, but using Levels enables you to work much faster.

![]()
Adobe Exchange Available On Adobe Labs
JULY 17, 2012
 Here's the latest news about Adobe Exchange from Photoshop Product Manager Jonathan Ferman: I am tremendously excited to announce that today we provided the first public preview of the new Adobe Exchange on Adobe Labs.
What is it?
The new Adobe Exchange is a Creative Suite extension marketplace. It is available as a panel within a variety of CS6 applications. The Adobe Exchange panel provides a new way to search, discover, and install plug-ins, extensions, and other content for Creative Suite products. (Want to try PS CS6? You can now download a free 30-day trial of Photoshop CS6 directly from Adobe.)
Isn’t there already an Adobe Exchange?
Yes, there are various product exchanges here. This new Adobe Exchange is quite different and offers a number of advantages over the existing Adobe Exchange, (detailed here). The Adobe Exchange brand name is great, but the website did not reflect the modern cloud connected world. In my experience, Creative Suite users like to work within the Creative Suite products, not jumping in and out of the browser, so the new Exchange is presented as an in-product panel.
Starting today, anyone with an Adobe ID will be able to submit up to 10 free products to the new Adobe Exchange, free of charge. You can also share products privately. Due to the way Exchange products are packaged it’s a great way for individuals or organisations to share Creative Suite content and it will appear in the user’s My Stuff section of the panel and can automatically provide any new updates.
The potential here is enormous. For example, sharing out an InDesign template, swatches and many other Creative Suite generated content, which you can package in minutes with Adobe Exchange Packager. This goes beyond file sharing, as it can install the content in the correct locations for use with Creative Suite 6 supported products.
Anyone looking to offer paid products via the new Adobe Exchange should sign up for the prerelease program at tinyurl.com/exchangeprerelease. There are no subscription charges for offering paid products while we are in prerelease. We have a lot of developments planned for the new Adobe Exchange, including Creative Cloud integration and much, much more. In the mean time, download the Adobe Exchange panel and it will automatically update as we add new capabilities.
I would really appreciate it if you could help spread the word about the new Adobe Exchange now that it is publicly available. Posting to blogs, social media, etc., anything you can do to help will make a difference and let people try it out for themselves. We want to build up a critical mass of Adobe Exchange users and producers creating great products.
Adobe Photoshop CS6 & Photoshop CS6 Extended
 Photoshop CS6 and Photoshop CS6 Extended can be purchased as stand-alone applications or as components of the Adobe Creative Suite 6 family. Upgrade pricing is available to eligible customers. You can also download
a 30-day Photoshop CS6 free trial.
See our Photoshop CS6 Tutorials Page for free training. Visit the Adobe Coupons & Special Offers Page to see the latest deals from Adobe.
posted by Jennifer Apple | facebook | RSS feed | bookmark | comment | twitter
![]()
Scott Kelby Shows You How to Set Things Up Your Way in Adobe Photoshop Lightroom 4 - Sample Chapter
JULY 14, 2012
 In this sample chapter from Adobe Photoshop Lightroom 4 Book for Digital Photographers, Scott Kelby shows you how to customize Adobe Photoshop Lightroom 4, including how to choose what you see in Loupe View and Grid View, how to work with Panels faster and easier, use two monitors, choose what the Filmstrip displays, and add your studio's name or logo for a custom look.
(Want to try Lightroom 4 or PS CS6? Or borth? You can now download a free 30-day trial of Photoshop CS6 or Lightroom 4 directly from Adobe.)
Read the full free chapter, Scott Kelby Shows You How to Set Things Up Your Way in Adobe Photoshop Lightroom 4.
About the book
 Since Lightroom first launched, Scott Kelby's Adobe Photoshop Lightroom 4 Book for Digital Photographers has been the world's #1 best-selling Lightroom book. In this latest version for Lightroom 4, Scott uses his same step-by-step, plain-English style and layout to make learning Lightroom easy and fun.
Scott doesn't just show you which sliders do what, and he doesn't just cover the newest features of Lightroom (though, of course, he does that, too, with discussions of the improved Clarity feature, White Balance adjustment brush, photo book capabilities, and much more). Instead, by using the following three simple, yet brilliant, techniques that make it just an incredible learning tool, this book shows you how to create your own photography workflow using Lightroom:
1) Scott shares his own personal settings and studio-tested techniques. He trains thousands of Lightroom users every year, and knows first hand what really works and what doesn't.
2) The entire book is laid out in a real workflow order with everything step by step, so you can begin using Lightroom like a pro from the start.
3) What really sets this book apart is the last chapter. This is where Scott dramatically answers his #1 most-asked Lightroom question, which is: "Exactly what order am I supposed to do things in, and where does Photoshop fit in?"
The Adobe Photoshop Lightroom 4 Book for Digital Photographers is the first and only book to bring the whole process together in such a clear, concise, and visual way.
Adobe Photoshop CS6 & Photoshop CS6 Extended
 Photoshop CS6 and Photoshop CS6 Extended can be purchased as stand-alone applications or as components of the Adobe Creative Suite 6 family. Upgrade pricing is available to eligible customers. You can also download
a 30-day Photoshop CS6 free trial.
See our Photoshop CS6 Tutorials Page for free training. Visit the Adobe Coupons & Special Offers Page to see the latest deals from Adobe.
posted by Jennifer Apple | facebook | RSS feed | bookmark | comment | twitter
![]()
Free Brush Set - Cracked Surface Brushes
JULY 14, 2012
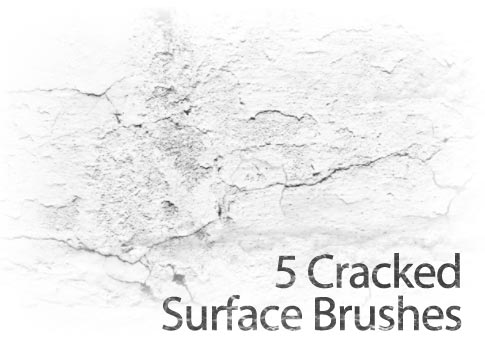
From Bittbox, a set of free cracked surface brushes. Five brush set.
Adobe Photoshop CS6 & Photoshop CS6 Extended
 Photoshop CS6 and Photoshop CS6 Extended can be purchased as stand-alone applications or as components of the Adobe Creative Suite 6 family. Upgrade pricing is available to eligible customers. You can also download
a 30-day Photoshop CS6 free trial.
See our Photoshop CS6 Tutorials Page for free training. Visit the Adobe Coupons & Special Offers Page to see the latest deals from Adobe.
posted by Jennifer Apple | facebook | RSS feed | bookmark | comment | twitter
![]()
Realistic Cloud Text Effect Using Photoshop Brushes - Tutorial
JULY 13, 2012
Design Panoply has a cool new text effect tutorial up — Realistic, Aged Cloud Text Effect Using Photoshop Brushes.
This tutorial will show you how to use some very basic skills, along with high quality Photoshop brushes, to achieve an ethereal cloud text effect. (Want to try PS CS6? You can now download a free 30-day trial of Photoshop CS6 directly from Adobe.)

Every new release of Photoshop includes some kind of tool that automates something we are used to doing manually. Many times it makes tedious tasks go by faster without having much effect on the final outcome of our designs. Sometimes, however, taking the time to do something by hand can yield more interesting results.
Adobe Photoshop CS6 & Photoshop CS6 Extended
 Photoshop CS6 and Photoshop CS6 Extended can be purchased as stand-alone applications or as components of the Adobe Creative Suite 6 family. Upgrade pricing is available to eligible customers. You can also download
a 30-day Photoshop CS6 free trial.
See our Photoshop CS6 Tutorials Page for free training. Visit the Adobe Coupons & Special Offers Page to see the latest deals from Adobe.
posted by Jennifer Apple | facebook | RSS feed | bookmark | comment | twitter
![]()
Turning Illustrator Paths Into Photoshop Shapes - Video Tutorial
JULY 12, 2012
In last week's free episode Deke showed you how to create a shiny star-spangled superhero shield from scratch in Adobe Illustrator. This week, Deke will show you a different approach to the project that brings your illustrator paths into Photoshop as shape layers, and uses Photoshop to give your shield a more realistic, beveled-edge effect. (You can now download a free 30-day trial of Illustrator CS6 directly from Adobe.)
Creating the shapes in Illustrator then importing them into Photoshop allows you to exploit Illustrator’s shape-creating strengths, and then enhance your perfectly aligned star and circles with Photoshop’s layer effects. Once you have the shapes set up properly in Photoshop, a careful application of some Bevel and Emboss effects create a sense of depth and the illusion that your shield is built up from individual discs of evil-resistant metal.

For members of lynda.com, Deke’s also has another member-exclusive movie this week called Creating a photorealistic superhero shield in which he shows you how to continue this Photoshop portion of the shield project using Smart Filters and adjustment layers to take the dimension and realism of your shield to a more photorealistic level:

You can get a free 7-day trial to the lynda.com Online Training Library. The trial membership entitles you to 7 days of access to all 986 courses in the lynda.com Online Training Library for free. Click sign up on the subscription plan of your choice to get started.
Adobe Photoshop CS6 & Photoshop CS6 Extended
 Photoshop CS6 and Photoshop CS6 Extended can be purchased as stand-alone applications or as components of the Adobe Creative Suite 6 family. Upgrade pricing is available to eligible customers. You can also download
a 30-day Photoshop CS6 free trial.
See our Photoshop CS6 Tutorials Page for free training. Visit the Adobe Coupons & Special Offers Page to see the latest deals from Adobe.
posted by Jennifer Apple | facebook | RSS feed | bookmark | comment | twitter
![]()
New Wacom Cintiqs Paint a Pretty Picture -
The Cintiq 24HD Touch and Cintiq 22HD
JULY 12, 2012
Tailored around the increasing demands of creative professionals, Wacom announces two new members of the Cintiq® family of interactive pen displays, the Cintiq 24HD touch and Cintiq 22HD. Artists and designers now have two new options for working directly on screen.
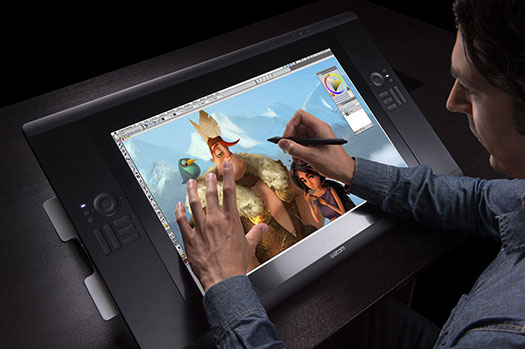
As with the Cintiq 24HD, Wacom's latest Cintiqs feature best-in-class widescreen HD displays, ultra-wide viewing angles and premium color performance. To give professional artists and designers enhanced focus on their work and creativity, Wacom introduces the powerful combination of a precision pen and natural multi-touch. With the addition of these models to the Cintiq lineup, anyone, from freelance industrial designers sketching in a small studio to Hollywood animators creating the next blockbuster movie, can find a Cintiq that best fits their workflow.
To offer users an immersive experience and a more intuitive and natural way to work, the new Cintiq 24HD touch combines Wacom's multi-touch with its renowned pen technology. The Cintiq 24HD touch closely replicates the experience of working with two hands when using traditional materials such as paints, markers and clay while giving the artist powerful capabilities that only exist in today's creative software applications.
Professionals with color-critical workflows, such as photographers, graphic designers, video and film editors as well as animators and game developers will benefit from the Cintiq 24HD's life-like color quality which displays 1.07 billion colors and 97 percent of Adobe's color gamut.

As with the Cintiq 24HD, the Cintiq 24HD touch offers best-in-class ergonomics. Professionals working long hours will appreciate the counter-weighted stand that adjusts to their favorite positions for maximum comfort. For example, one can bring the display surface over the edge of the desk so that it rests comfortably just above the lap or the display can be adjusted to more vertical, easel-like positions.
In addition, frequently used shortcut commands are available at the user's fingertips through the application-specific, customizable ExpressKeys(TM) and Touch Rings of the Cintiq 24HD touch. Employing these shortcuts can save valuable time by minimizing keyboard dependency.
With Wacom's new Cintiq 22HD widescreen interactive pen display, illustrators, designers and artists can interact with their artwork on a more personal level. By offering a pen-on-screen experience that delivers the same natural feel, response and results derived from working with traditional brushes, pencils and pens, the Cintiq 22HD workflow allows users to unleash their creativity and express themselves just like they would with real paint on canvas or real ink on paper. Additionally, the Cintiq 22HD's unique stand is ideal for artists who prefer to rotate their entire display as part of their workflow.
To improve workflow and creative output, the Cintiq 22HD offers eight customizable, application-specific ExpressKeys located on each side of the display's bezel. Additionally, user-defined Touch Strips, conveniently placed on the back of each side of the display, can be used for such functions as zoom, scroll, brush size and canvas rotation.
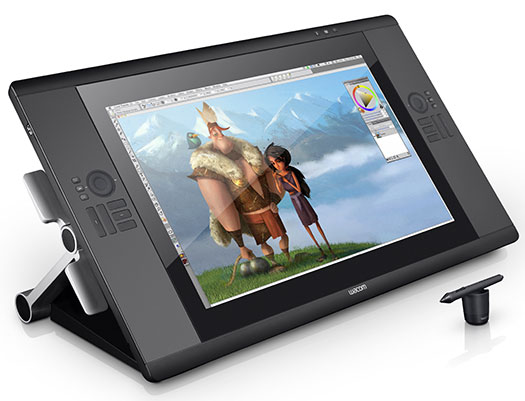
Pen performance remains the key ingredient to the whole interactive pen display experience and Wacom's two new Cintiqs do not disappoint. Delivering virtually the same feel and feedback as traditional brushes and pens, both Cintiqs feature Wacom's professional-level pen performance to produce dazzling artistic effects within creative software applications from Adobe®, Corel®, Autodesk® and many more. Both the Cintiq 24HD touch and Cintiq 22HD support the Art Pen and Airbrush accessory pens to deliver natural brush effects within Adobe® Photoshop® and Illustrator® (CS3 and above) as well as Corel® Painter(TM) (10 and above).
Choosing a CintiqWith four Cintiqs now in the family (Cintiq 12WX, Cintiq 22HD, Cintiq 24HD and Cintiq 24HD touch), Wacom offers a line of interactive pen displays that each have their own set of unique features and characteristics. Choosing the best model ultimately boils down to matching personal workflows with the right Cintiq.
Availability and PricingThe Cintiq 22HD ($1999 USD) will be available in the latter part of July and the Cintiq 24HD touch ($3699 USD) is expected to ship in August.
Adobe Photoshop CS6 & Photoshop CS6 Extended
 Photoshop CS6 and Photoshop CS6 Extended can be purchased as stand-alone applications or as components of the Adobe Creative Suite 6 family. Upgrade pricing is available to eligible customers. You can also download
a 30-day Photoshop CS6 free trial.
See our Photoshop CS6 Tutorials Page for free training. Visit the Adobe Coupons & Special Offers Page to see the latest deals from Adobe.
posted by Jennifer Apple | facebook | RSS feed | bookmark | comment | twitter
![]()
HDR Efex Pro 2 - New Features Get Rave Reviews - Plus 15% Off
JULY 10, 2012
 As many of you know, NIK launched HDR Efex Pro 2. It's a fantastic product that is already getting rave reviews - the new tone mapping engine, revised and simplified user interface, new merge dialog, better performance and more all add up to a great experience and amazing results. HDR Efex Pro 2 sells for $99.95 and upgrades are $49.95, so it's one of the most affordable products from NIK.
Introductory videos, free trial versions, and live online training can be found at www.niksoftware.com/hdrefexpro. (Enter our exclusive discount coupon code - NIKPSS - during the checkout process at Nik Software for an instant 15% discount on any Nik Software product)
Here's some info on HDR Efex Pro 2.
HDR Efex Pro 2 represents the next generation of high dynamic range photography that produces exceptional results. This new version not only adds a wide range of new features, but is also built on a proprietary and even more powerful tone mapping engine, providing unrivaled speed and quality. The company's patented U Point technology enables precise, selective fine-tuning, simplifying and speeding up the process for creating extraordinary high dynamic range images.
Key New Features:
NEW: Improved Tone Mapping Engine - Develop superior results with better color rendering and improved natural styles
UPDATED: Interface, Interaction, and Workflow - Benefit from improvements to the merging interface, tone mapping and enhancement controls, visual presets, and more
NEW: Depth Control - Enjoy added depth and realism in images with the new and proprietary Depth control, which helps counteract the flattened look commonly associated with HDR images
NEW: Full GPU Processing and Multi-Core Optimization - Gain even faster performance with GPU processing that takes full advantage of the processors found on modern display adapters
UPDATED: Ghost Reduction - Improved ghost reduction algorithm ensures that artifacts created by moving objects are removed with a single click
NEW: Chromatic Aberration Reduction - Reduce color fringes around objects
NEW: Graduated Neutral Density Control - Access the full 32-bit depth of the merged image, providing a natural effect especially on images with a strong horizon line
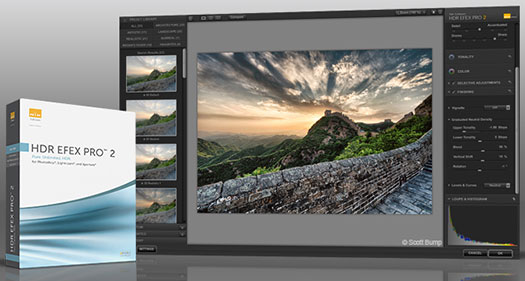
NEW: Full White Balance Control - Take full advantage of the white balance in an image with a new Tint slider, which along with the Temperature slider, can be applied both globally as well as selectively using U Point technology
NEW: History Browser - Easily review adjustments and different HDR looks via the History Browser which records every enhancement used in an editing session
NEW: Extended Language Support - International users benefit by the addition of Brazilian Portuguese and Chinese (Simplified and Traditional) to a list of languages that includes English, French, Spanish, German, Italian, and Japanese
(Enter our exclusive discount coupon code - NIKPSS - during the checkout process at Nik Software for an instant 15% discount on any Nik Software product)
The suggested retail price of HDR Efex Pro 2 is $99.95. Upgrades from the first version are $49.95. Customers in the U.S. who purchased HDR Efex Pro or a Complete Collection bundle after June 9, 2012 are eligible for a free upgrade. HDR Efex Pro 2 is Windows and Mac compatible and installs as a plug-in for Adobe Photoshop CS5 or later, Adobe Photoshop Lightroom 3 or later, and Apple® Aperture 3 or later.
![]()
Photographic Toning Presets in Photoshop CS6 - Video Tutorial
July 10, 2012
The Gradient Map Adjustment layer has over 35 new presets to emulate traditional darkroom techniques for toning and split-toning photographs. In this video you will learn how to load and apply gradient maps to a single image as well as how to download and use Julieanne’s template to quickly see what each preset would look like on your own photograph through the magic of Smart Objects. The files she references can be found here. (Download a free 30-day trial of Photoshop CS6).
Adobe Photoshop CS6 & Photoshop CS6 Extended
 Photoshop CS6 and Photoshop CS6 Extended can be purchased as stand-alone applications or as components of the Adobe Creative Suite 6 family. Upgrade pricing is available to eligible customers. You can also download
a 30-day Photoshop CS6 free trial.
See our Photoshop CS6 Tutorials Page for free training. Visit the Adobe Coupons & Special Offers Page to see the latest deals from Adobe.
posted by Jennifer Apple | facebook | RSS feed | bookmark | comment | twitter
![]()
Creating A Superhero Shield In Adobe Illustrator - Video Tutorial
July 8, 2012
In this week’s Deke’s Techniques tutorial, Deke will guide you through the process of making a shiny superhero shield in Adobe Illustrator, festooned with all the obligatory gloriousness such an object would need to ward off the most nefarious of villains. But before you can add all that freedom-loving, evil-thwarting sparkle, you’ll need to create the properly aligned shape of the shield first. This is one of those things that Illustrator makes slightly more complicated than you might expect. Never fear, you’ve got your Illustrator-superhero mentor Captain Deke at your side. (You can now download a free 30-day trial of Illustrator CS6 directly from Adobe.)
Like any good hero’s journey, this adventure begins with a quest for the elusive center of a standard American-shaped star. Unfortunately, Illustrator’s Find Center command doesn’t help because it only reveals the center of the star’s rectangular bounding box, which—due to the laws of geometry—isn’t the center of the actual star. Undaunted, you’ll have to deconstruct your star, find the center of its five inner points, and then combine that center with a copy of your original star (sound confusing? It’s not that bad—after turning Smart Guides on, Deke walks you through it step by step starting at 1:20 in the movie above). After you’ve overcome that challenge, your path to adding the concentric circles that round out the shape is clear.

Once you’ve got the shape, armed with the Flare tool and an emboss effect, you can make your shield properly reflect light (and repel evil villains). With this technique under your belt, you’ll be well on your way to becoming your own Illustrator superhero.
You can get a free 7-day trial to the lynda.com Online Training Library. The trial membership entitles you to 7 days of access to all 986 courses in the lynda.com Online Training Library for free. Click sign up on the subscription plan of your choice to get started.
Adobe Photoshop CS6 & Photoshop CS6 Extended
 Photoshop CS6 and Photoshop CS6 Extended can be purchased as stand-alone applications or as components of the Adobe Creative Suite 6 family. Upgrade pricing is available to eligible customers. You can also download
a 30-day Photoshop CS6 free trial.
See our Photoshop CS6 Tutorials Page for free training. Visit the Adobe Coupons & Special Offers Page to see the latest deals from Adobe.
posted by Jennifer Apple | facebook | RSS feed | bookmark | comment | twitter
![]()
5 Free Textures From Bittbox - Firepit Ashes
July 3, 2012
Bittbox is offering some more free textures, this time firepit ashes. Some nice ones...

![]()
A Detailed Look at Adaptive Wide Angle - Video Tutorial
July 5, 2012
Learn some advanced tips and techniques for working with Adaptive Wide Angle inside of Adobe Photoshop CS6 (download a free 30-day trial of Photoshop CS6). This tutorial will give you a detailed look at the built-in correction tools that help you adjust the lens distortion in your own images.
![]()
Photoshop CS6 For Dummies - Free Sample Chapter - Painting In Photoshop
July 3, 2012
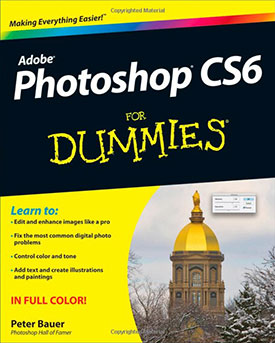 Here is Chapter 14 (Painting In Photoshop - PDF) from Photoshop CS6 For Dummies. Excerpted with permission from John Wiley and Sons, Inc. The book is available in stores and through online retailers nationwide.
In This Chapter
• Discovering the painting tools
• Traversing the panels and selecting colors
• Using your iPad with Photoshop
• Painting the fine-art way with specialty tips and tools
• Adding colors to artwork in other ways
In this chapter, I concentrate on those editing-related painting skills and give you a quick look at painting with the Mixer Brush tool and the airbrush
and erodible (like a pencil that eventually needs sharpening) brush tips. I introduce you to the basic concepts of painting in Photoshop and also walk you through the basic brush-related tools and the Brush panel, concentrating on those features that you most likely need (as well as a few of the other, more artistic features). To wrap up the chapter, I give you a look at other ways to add areas of color to your images, including the very useful Gradient tool. (Download a free 30-day trial of Photoshop CS6 directly from Adobe.)
In this new edition of Photoshop CS6 For Dummies, expert Peter Bauer shows you how to use the latest Photoshop tools to change a background, adjust brightness, improve color, or fix flaws. Richly illustrated in full color, this edition covers all the updates in the newest version of Photoshop, the gold standard for image-editing programs.
![]()
Fluid Mask July 4th Special - 50% Off - Only $74.50
July 3, 2012
There are many options available for creating masks in Photoshop, from the built-in tools to plugins from onOne and Nik and Topaz. As well you can use a standalone called Fluid Mask.
This is a top masking software and they are offeing a super 50% deal for the next week. Here are the details: Follow our link and then get FluidMask at a 50% discount by entering the coupon code: 4July2012 at the checkout (until July 9).
posted by Jennifer Apple | facebook | RSS feed | bookmark | comment | twitter
![]()
PhotoFXlab Now Available, Intro Discount Extended
June 29, 2012
 We are happy to announce the availability of photoFXlab v1.1. This new update simplifies setup
and resolves many of your reported concerns - plus we added a few new features that we think
you will find useful!
If you're looking to streamline your Topaz workflow, you'll enjoy having instant access to your Topaz plug-ins, a searchable effects library, a simple layered workflow, IntelliColor technology, built-in masking and more - all in one user friendly workspace.
As requested, the special introductory discount has also been extended for those that want to add photoFXlab to their Topaz collection. Get the new photoFXlab for only $29.99. (A $50 Savings.) Just enter the coupon code: FXLab when purchasing. Offer expires: July 31, 2012.
![]()
The Newly Redesigned Crop Tool In Photoshop CS6 - Video Tutorial
June 28, 2012
From Julieanne Kost's Blog: There are several advantages to the newly redesigned Crop tool in Photoshop CS6. In this video tutorial (The Newly Redesigned Crop Tool in Photoshop CS6), Julieanne demonstrates the refined interface, new features, customizable presets, enhanced tools and essential shortcuts that will make cropping easier than ever. (Don't have PS CS6? You can follow along by downloading a free 30-day trial of Photoshop CS6 from Adobe.)
![]()
The New Adobe Exchange - Promote And Monetize CS6 Solutions
June 28, 2012
 If you're an Adobe developer, here's some intresting news from the Creative Suite SDK Team blog: Adobe is creating a brand new Adobe Exchange, which will enable developers, trainers, and community experts to promote, distribute, monetize and track their CS6 solutions.
These products will be made visible to potential CS6 customers within the ‘Adobe Exchange’ panel in most CS6 applications. The initial CS6 products which will support the Exchange panel are:
Dreamweaver
Fireworks
Flash Professional
Illustrator
InDesign
Photoshop
Premiere
This program is appropriate for developers who are seeking effective and efficient ways to market and distribute free, paid, and trial items as well as deliver updates of those items to Creative Suite users. We are actively seeking launch partners for this program and are taking applications now for partners who would like to be added into our beta program. Launch partners that commit to providing distributable CS6 content in the next 8 to 10 weeks will receive valuable benefits as charter members of the new Adobe Exchange.
Read more at the Creative Suite SDK Team blog.
![]()
5 Free Textures From Bittbox
June 27, 2012
Bittbox has five free textures for download. Some rust and some wood. Read their terms before use.

Adobe Photoshop CS6 & Photoshop CS6 Extended
 Photoshop CS6 and Photoshop CS6 Extended can be purchased as stand-alone applications or as components of the Adobe Creative Suite 6 family. Upgrade pricing is available to eligible customers. You can also download
a 30-day Photoshop CS6 free trial.
See our Photoshop CS6 Tutorials Page for free training. Visit the Adobe Coupons & Special Offers Page to see the latest deals from Adobe.
posted by Jennifer Apple | facebook | RSS feed | bookmark | comment | twitter
![]()
The Photoshop Blog - Earlier Posts
![]() The Photoshop Blog offers the latest Photoshop news and software updates, Photoshop tips and tutorials, and random thoughts from graphic artist and Photoshop expert Jennifer Apple.
The Photoshop Blog offers the latest Photoshop news and software updates, Photoshop tips and tutorials, and random thoughts from graphic artist and Photoshop expert Jennifer Apple.
PHOTOSHOP NEWS — JUNE 2012
35- PhotoFXlab Now Available, Intro Discount Extended
34- The Newly Redesigned Crop Tool In Photoshop CS6 - Video Tutorial
33- 5 Free Textures From Bittbox
32- The New Adobe Exchange - Promote And Monetize CS6 Solutions
31- How To Build A Sci-fi Structure In Photoshop CS6 Extended 3D
30- Should I Use Lightroom Or Bridge - Video From Julieanne Kost
29- Photoshop Lightroom 4 Joins The Creative Cloud
28- Photoshop CS6 Bible - Free PDF Chapter - Exploring The Photoshop Workspace
27- How To Add A Stroke Or Fill To A Photo In Illustrator
26- Photoshop CS6 Performance Tips
25- How To Disable Tabbed Windows In Photoshop CS6, CS5, CS4
24- Create A Car Illustration From Scratch In Photoshop
23- A Free Set Of 4 Abstract Grunge Brushes For Photoshop
22- Create A Cookie Text Effect In Photoshop - Tutorial
21- Getting Started with HDR - Create Unique and Dramatic HDR Images - 5 Free Videos
20- Getting Started With Photoshop Lightroom 4 - Adobe Tutorial
19- How To Add Photographic Texture To Vector Type In Illustrator - Video Tutorial
18- Free Photoshop Brushes - 8 Different Screws And 7 Dynamic Brushes
17- Configuring Photoshop For Optimal Performance - Tips And Tricks
16- Battleship Text Effect Using Photoshop Layer Styles
15- Powerful Perfect Layers 2 Plugin Now Free For Download
14- Six Hi Res Bokeh Brushes For Photoshop
13- Free Photoshop Textures And Patterns - Argyle Set
12- Free Textures - Abstract Blue Crystals
11- New Topaz photoFXlab - Intro Special $50 Off
10- Creating A Composite Image In Photoshop CS6 - PS Tutorial
09- Free Dirt And Stone Photoshop Brush Pack From Brusheezy
08- Photoshop CS6 Little Secrets with Scott Kelby - Video Overview
07- LevelUp For Photoshop - Game Of Missions With Weekly Prizes
06- Changing Proportions Selectively In With Liquify in Photoshop - Video Tutorial
05- Free Photoshop Brush Set - Film Noise
04- June 2012 Newsletter
03- Camera Raw 7.1 And DNG Converter 7.1 Now Available
02- Retouching Photos To Improve Skin Surface In Photoshop - HD Video Tutorial
01- Learning Photoshop CS6 Tutorial DVD - Video Training - 16 Sample Video Tutorials
See Earlier Posts From The Photoshop Blog - JUNE 2011.
![]()
Exclusive 15% Discount On All Topaz Plugins - Use Coupon Code PHOTOSHOPSUPPORT - Includes Bundles And Upgrades
 Enter our exclusive discount coupon code PHOTOSHOPSUPPORT during the checkout process at Topaz Labs for an instant 15% discount on any Topaz product, including bundle deals and upgrades.
Topaz Labs Photoshop plug-ins are specifically designed to expand a photographer's creative toolbox by harnessing powerful image technology developments.
Photographers everywhere are now taking advantage of the creative exposure effects, artistic simplification, unique edge manipulation, and top-of-the-line noise reduction offered in Topaz products. The Topaz Photoshop Bundle includes the following Topaz plugins:
Topaz Adjust optimizes image exposure, color, and detail strength for stunning image results.
 Topaz DeNoise offers a complete noise reduction solution that removes far more noise and preserves far more detail than other solutions.
Topaz Detail gives full control over all aspects of detail manipulation and micro-contrast adjustment without creating any edge artifacts or halos.
Topaz Simplify provides creative simplification, art effects, and line accentuation for easy one-of-a-kind art.
Topaz Clean integrates unique smoothing capabilities with stylized detail manipulation to add refreshing flair to photos.
Topaz ReMask quickly creates detailed masks and extractions from even the most difficult images.
Topaz DeJPEG drastically improves the quality of web images and other compressed photos.
READ ABOUT THE TOPAZ BUNDLE OFFER.
![]()
Exclusive onOne Software 10% Instant Discount Coupon
 Enter our exclusive discount coupon code - PSSPPT06 - during the checkout process at onOne Software for an instant 10% discount on any onOne product. This includes Genuine Fractals and their amazing Photoshop Plug-In Suite.
onOne Software's Plug-In Suite combines full versions of six essential software tools — Genuine Fractals Print Pro, PhotoTools Pro, PhotoFrame Pro, Mask Pro, PhotoTune and FocalPoint — an affordable combination that includes everything a photographer needs to make their images look their best.
Why do you need plugins? Photoshop is an amazing image editing application that has forever changed graphic design and digital photographic editing, but like any tool, if you don't have time to fully learn it, you can't get the most out of it.
Plugins for Photoshop allow you to either do something that you cannot do with the features included in Photoshop or they allow you to do something easier, faster or better than you could do in Photoshop without the plug-in. Whether it is color correction, resizing, masking or creating an effect, you can find a Photoshop plug-in that can help you be more efficient with your time.
![]()
Photoshop Masking Plugin Fluid Mask 3 - Price Drop And Exclusive $20 Instant Discount - Now Only $129
 The 4 1/2 out of 5 star review of Fluid Mask 3 at MacWorld begins by saying that this "Photoshop plug-in takes the pain out of extracting backgrounds," and goes on to recommend the latest version, stating that "Fluid Mask 3.0.2 is a very effective tool for separating objects from their backgrounds. It offers a variety of useful features for tackling almost any difficult image, from wispy hair to complex foliage. Online video tutorials and live training sessions help ease the learning curve."
Our friends at Vertus, the makers of Fluid Mask 3 Photoshop Plugin, have set up a special exclusive discount for PhotoshopSupport.com. Buy now for only $129. Just follow this discount link and instantly get $20 off your purchase of Fluid Mask 3.
Fluid Mask 3 is designed for photographers, image editors, graphic designers and all those who take digital image editing seriously. In a streamlined interface and workflow, Fluid Mask 3 instantly shows key edges in the image and provides comprehensive easy to use tools that work with difficult-to-see edges and tricky areas like trees & lattices. Fluid Mask will also preserve all-important edge information for a professional quality cut out. Simply follow this discount link and pay only $129 for Fluid Mask 3.
![]()
Special Deals On Nik Software Photoshop Plugins - Viveza, Complete Collection - 15% DISCOUNT COUPONS
Follow the links below and the 15% discount will be AUTOMATICALLY APPLIED to any purchase you make, or use our exclusive discount coupon code - NIKPSS - during the checkout process at Nik Software for the instant 15% discount. This exclusive discount coupon code can be applied to all the latest Nik Software Photoshop plugins, including Silver Efex Pro, Color Efex Pro, Viveza, HDR Efex Pro, and The Complete Collection (big savings).
Nik Software The Complete Collection (Plugins Bundle)
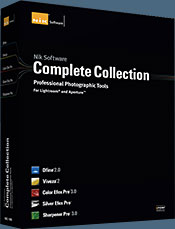 The Complete Collection includes all of Nik Software's latest award-winning plug-in software titles for Photoshop, Lightroom and Aperture including: Dfine, Viveza, HDR Efex Pro, Color Efex Pro, Silver Efex Pro, and Sharpener Pro.
The Complete Collection features products with Nik Software's patented U Point® technology, giving photographers the most powerful tools for precise and natural photographic enhancements and corrections without the need for complicated selections or layer masks.
The Complete Collection is offered in two editions: (1) the Complete Collection Ultimate Edition includes support for every plug-in to work in Photoshop, Lightroom, and Aperture, and offers Color Efex Pro 3.0 to work in Capture NX 2 as well. (2) the Complete Collection for Lightroom and Aperture includes support for each plug-in to only work in Lightroom and Aperture. Click here to compare both editions
Color Efex Pro 3.0
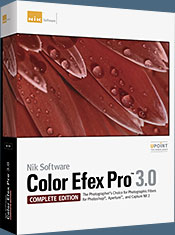 52 photographic filters with over 250 effects for professional quality images.
Completely Original. Completely Indispensable.
Nik Software Color Efex Pro 3.0 filters are the leading photographic filters for digital photography. The award-winning Color Efex Pro 3.0 filters are widely used by many of today's professional photographers around the world to save time and get professional level results. Whether you choose the Complete Edition, Select Edition, or Standard Edition, you’ll get traditional and stylizing filters that offer virtually endless possibilities to enhance and transform images quickly and easily.
Patented U Point technology provides the ultimate control to selectively apply enhancements without the need for any complicated masks, layers or selections. Control color, light and tonality in your images and create unique enhancements with professional results. With 52 filters and over 250 effects found in Color Efex Pro 3.0, you can perform high quality retouching, color correction, and endless creative enhancements to your photographs. Download a free Trial version.
Viveza
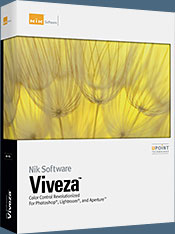 The most powerful tool to selectively control color and light in photographic images without the need for complicated selections or layer masks.
Two of the most important factors in creating great photography are color and light. Mastering the art of selectively correcting or enhancing each of these is now possible for every photographer without the need for complicated masks or selections, or expert-level knowledge of Photoshop. Integrating award-winning U Point technology, Viveza is the most powerful and precise tool available to control light and color in photographic images.
U Point powered Color Control Points, placed directly on colors or objects in an image (such as sky, skin, grass, etc.), reveal easy-to-use controls that photographers can use to quickly adjust brightness, contrast or color in a fraction of the time needed by other tools. With Viveza you’ll spend more time shooting photographs and save hours of image editing. Download a free Trial version.
Silver Efex Pro
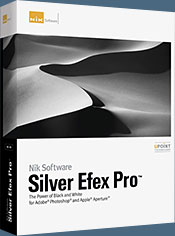 Complete power and control to create professional quality black and white images in one convenient tool.
Silver Efex Pro from Nik Software is the most powerful tool for creating professional quality black and white images from your photographs. For the first time, all the advanced power and control required for professional results have been brought together in one convenient tool.
Featuring Nik Software’s patented U Point technology to selectively control the tonality and contrast of the image, Silver Efex Pro includes advanced imaging algorithms to protect against unwanted artifacts, a comprehensive collection of emulated black and white film types, a variable toning selector for adding traditional toning techniques, over 20 one-click preset styles, and a state-of-the-art grain reproduction engine that help produce the highest quality black and white images possible from your color images while providing more freedom to experiment. Download a free Trial version to use Silver Efex Pro.
HDR Efex Pro
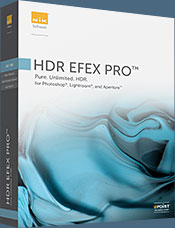 Experience the power, control, and creative expression of HDR. This all in one toolkit lets you achieve your best HDR images ever, ranging from the realistic to artistic.
HDR Efex Pro is the essential new standard for creating amazingly high quality realistic to artistic HDR images with a revolutionary new all-in-one workflow. HDR Efex Pro includes a vast selection of one-click visual presets for incredibly fast results, advanced tone mapping algorithms, powerful and detailed HDR controls, and patented U Point® technology
Follow our discount coupon links, or enter our exclusive discount coupon code - NIKPSS - during the checkout process at Nik Software for the instant 15% discount. This exclusive discount coupon code can be applied to all the latest Nik Software Photoshop plugins, including Silver Efex Pro, Color Efex Pro, Viveza, HDR Efex Pro, and The Complete Collection (big savings).
![]()


