![]()
![]() Try before you buy. Download any Adobe product for a free 30 day trial.
Try before you buy. Download any Adobe product for a free 30 day trial.
![]()
Welcome To The January 2013 Photoshop Newsletter
![]()
Simplified Guide To Getting Started in Photoshop - Free PDF
 From the intro: When photographer Devon Mikale was in high school, he created this lengthy manual for his newspaper class to help others learn how to get started in Photoshop. The high school’s faculty loved it so much that they ended up purchasing it for re-distribution in future classes. Mikale has graciously allowed us to publish the guide here for free.
It’s a lot of images and information, but if you’re just starting out and have been overwhelmed by all the different things you need to learn, this guide will walk you through the fundamentals. You can bookmark this page for future reference. If you’d like a copy to print out or carry along with you, here’s a PDF version of the same guide! Be sure to share it with people you know who are just learning the ropes!
![]()
Automated Lens Correction - Photoshop Tutorial
See how to use this powerful tool to correct a cathedral image in this tutotial by Adam Smith from Photoshop Daily.
Begin with Auto Correction
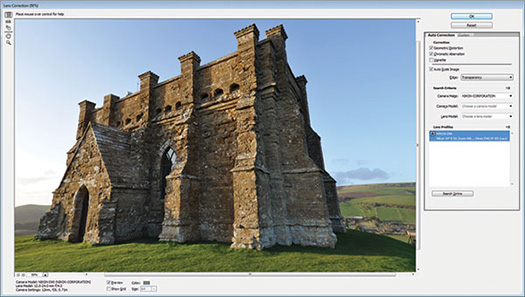
Retrieve the ‘Cathedral.jpg’ image supplied in this issue (or use any image). Go to Filter>Lens Correction and in the Auto Correction tab ensure that the Lens Profiles box is populated with at least one lens profile. In the Correction area check the Geometric Distortion and Chromatic Abberation checkboxes, but clear the Vignette box. Engage the Auto Scale Image box and set the edge to Transparency. To see the effect of the lens correction compared to the original image toggle the Preview checkbox at the bottom of the screen.
Manual adjustments
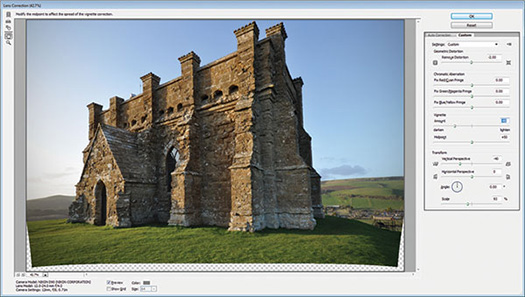
Switch to the Custom tab for additional adjustments to set by hand. Begin with the Transform area, setting the Vertical Perspective to -40. This removes the exaggerated vertical perspective in the image. To compensate for some of the other distortions introduced, set the top Remove Distortion slider to -2. Then set the Vignette amount to -45 for a more artistic appearance. These corrections will push the top of the structure out of frame. To recover it, reduce the Scale to 93%.
Corner Treatment
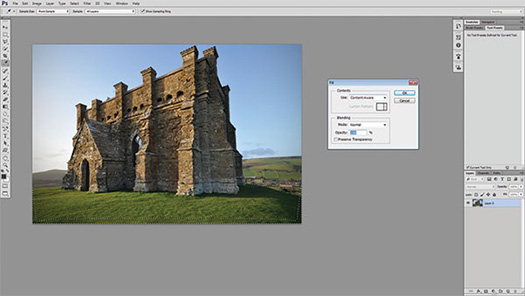
Click OK and Photoshop applies the lens correction to the image. To address the hole at the bottom of the image, first create a selection of the layer by Ctrl/Cmd-clicking on the layer thumbnail. Invert the selection by hitting Shift+Cmd/Ctrl+I, then go to Edit>Fill and set the Use to Content-Aware. Photoshop fills in the hole with resampled pixels from the rest of the image. Press Cmd/Ctrl+D to cancel the selection. If there are further visible lens distortion issues, you can run the Lens Correction filter again to further refine the image.
Download A 30-day Free Trial Of Any Adobe Creative Suite
 Photoshop Extended integrates the state-of-the-art editing, compositing, and graphic design capabilities of Adobe Photoshop, and features advanced tools for 3D design, image and video editing.
Photoshop and Photoshop Extended can be purchased as stand-alone applications, as components of the Adobe Creative Suite family, or as part of Adobe's new Creative Cloud offering. Upgrade pricing is also available to eligible customers.
Download
the 30-day Photoshop free trial, or a trial of any Adobe product, including the Master Collection. See our Photoshop CS6 Tutorials Page for a collection of free tutorials and videos. Visit the Adobe Coupons & Special Offers Page to see the latest deals from Adobe. Get up to 80% off at the Adobe Education Store.
![]()
Fluid Mask Pro Cutout Plugin Updated - Plus 33% Off All Versions
 Vertus have released new versions (Mac and PC) of Fluid Mask, v3.2.5. This fixes the issue that 64-bit PC users were having installing Fluid Mask as a plug-in and also includes some bug fixes relating to the licensing aspect of the software, as well as a small tweak to the 'show object edges' tick box (now user defined). This is a free update for exisitng users, who can download the new version.
Vertus is also running a promotion with this release. Use coupon code FM3UPDATE at checkout. This gets you a 33% discount. This coupon code is not valid with any other promotional discount and is good until January 15.
The 4 1/2 out of 5 star review of Fluid Mask 3 at MacWorld begins by saying that this "Photoshop plug-in takes the pain out of extracting backgrounds," and goes on to recommend the latest version, stating that "Fluid Mask 3.0.2 is a very effective tool for separating objects from their backgrounds. It offers a variety of useful features for tackling almost any difficult image, from wispy hair to complex foliage. Online video tutorials and live training sessions help ease the learning curve."
Fluid Mask 3 is designed for photographers, image editors, graphic designers and all those who take digital image editing seriously. In a streamlined interface and workflow, Fluid Mask 3 instantly shows key edges in the image and provides comprehensive easy to use tools that work with difficult-to-see edges and tricky areas like trees & lattices. Fluid Mask will also preserve all-important edge information for a professional quality cut out.
![]()
Adobe InDesign CS5 Bible - Free Chapter PDF - Inside The Interface
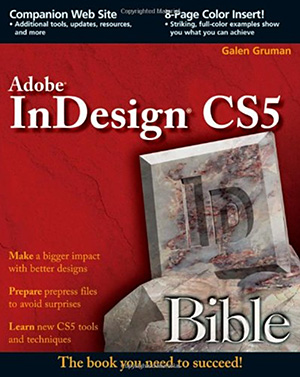 Here is a free PDF of chapter 1 from the InDesign Bible. Excerpted with permission from the publisher, Wiley, from Adobe InDesign CS5 Bible by Galen Gruman. Copyright © 2010.
InDesign (free trial) is a powerful publishing tool that serves as the standard program for professional layout and design. The latest version boasts a variety of updates and enhancements.
Packed with real-world examples and written by industry expert Galen Gruman, InDesign CS5 Bible is an in-depth resource that clearly explains how InDesign CS5 (free trial) allows for better typography and transparency features, speedier performance, and more user control than any other layout program.
Whether you are aiming to produce ad campaigns, magazines, interactive PDF files, or other forms of media, InDesign CS5 Bible offers everything you need to know to quickly get up to speed with the latest version of InDesign.
![]()
Unpack High Dynamic Range - Merge To HDR Pro Tutorial
In this tutorial by Adam Smith from Photoshop Daily, you'll see how best to make use of this Photoshop hidden gem (30-day free trial of Photoshop).
Merge to HDR Pro
To use this tool you need to have several images to combine. These images should be identical except for the exposure settings. You can launch the Merge to HDR Pro application from Bridge, Mini Bridge, or through Photoshop proper with File>Automate>Merge to HDR Pro.

Start with a preset
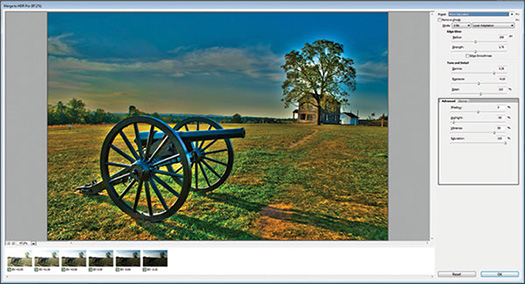
Once Photoshop has assembled the photos into the HDR image, you will get the large Merge to HDR Pro dialog box. The main window hosts the preview, the images used for assembly are shown as thumbnails along the bottom, and the settings are to the right.
Adjust the final effect
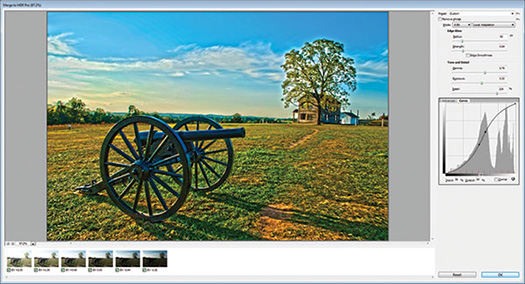
Begin customising your image by adjusting the several sliders available. Explore each set of options as they work together in groups. In the lower portion, switching to the Curve tab gives more access to tonal adjustments similar to the way the standard Curves adjustment layer works.
![]()
PERFECT PHOTO SUITE 7 NOW IN 3 VERSIONS - GET 15% OFF
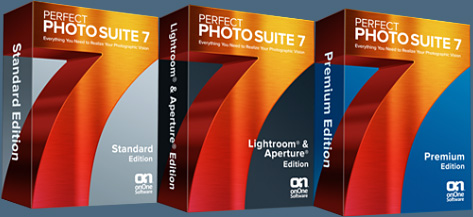
 You can choose from three different versions of Perfect Photo Suite 7, making it easy to match it up with your own workflow needs and budget. The three versions are Perfect Photo Suite 7 Premium Edition, Lightroom and Aperture Edition, and Standard Edition. (Use discount code PSSPPT06 to get 15% off any onOne product.)
The Premium Edition is the version of Perfect Photo Suite 7 that has been available since October 31, 2012. It offers photographers the greatest flexibility and seamless integration of Perfect Photo Suite 7 with their workflow of choice. The Premium Edition provides all of the functionality of the Lightroom & Aperture and Standard Editions—offering direct access to modules from Lightroom, Aperture, and as a standalone.
It also works as a plug-in to Photoshop and Elements which allows users to create or refine layer masks, resize CMYK, Grayscale, or LAB color mode images, use a dedicated batch processing module in Perfect Resize, use modules as re-editable Smart Objects, incorporate within Photoshop actions, and get direct access to module presets in a dedicated onOne Panel.
The Lightroom and Aperture Edition of Perfect Photo Suite 7 is designed for the photographer who does not use Photoshop but uses Lightroom or Aperture as the hub of their photo management and editing workflows. It provides powerful image editing tools that do not exist in those products and gives them the ability to extend their image editing power, maximize their creativity, and solve the most common problems in photo editing.
With the Perfect Photo Suite 7, users can work with a variety of image format including RAW, JPG, PNG, and TIFF, create and edit multi-layered files, and access any of the Perfect Photo Suite 7 modules directly from Lightroom or Aperture. After adjustments are made, edited images may be saved as a .PSD, .TIF, .PNG, or .JPG right next to the original image in their Lightroom or Aperture library, providing true non-destructive editing. This edition of the Suite also works as a standalone application for quick touch ups and edits.
The Standard Edition allows usage of the entire Perfect Photo Suite 7 as a standalone application. This edition is ideal for those who don't shoot RAW or use Adobe Photoshop, Photoshop Elements, Lightroom, or Apple Aperture but still want to enhance, stylize, and retouch their JPG images with a professional touch, and create and edit multi-layered files without Photoshop.
(Use discount code PSSPPT06 to get 15% off any onOne product.)
![]()
Open File As Smart Object - Photoshop Video Tutorial
In this episode of The Complete Picture (The Difference Between “Edit in Photoshop” and “Open as Smart Object”), Julieanne Kost show you the difference between opening a raw file as a pixel based layer verses a Smart Object and compares the advantages of both approaches.
![]()
How to Paste into a Layer Mask in Photoshop CS6 - Video Quick Tip
In this Quick Tip, Julieanne Kost reveals a simple technique to paste content directly into a layer mask in Photoshop CS6 (free trial).
![]()
Hobbit-inspired Text - Photoshop Video Tutorial
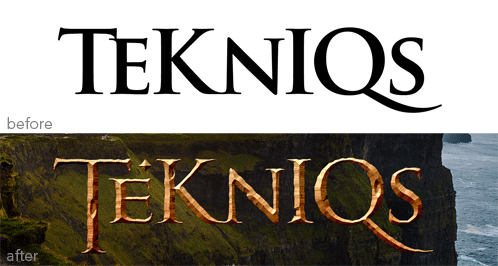
In this week’s free Deke’s Techniques video—inspired by the movie poster for The Hobbit: The Unexpected Journey — Deke McClelland starts with the unsuspecting, decidedly unheroic text and takes it on a Middle Earth–inspired adventure into the lands of Adobe Illustrator and Photoshop (free trials).
The result is that this ordinary-ish text in the before image below, ends up looking as though it’s been chiseled and chewed all the way there and back again, with all the seasoned character one would expect, and as you can see in the after image:
Deke starts his project in Illustrator, where it’s easier to manipulate the shapes and sizes of the letterforms. The first step is to turn the text into outlines with editable paths that can be manipulated by Deke’s wizardry. He stretches the T, shrinks and adds an embellishment to the E, and adjusts the Q’s swash:

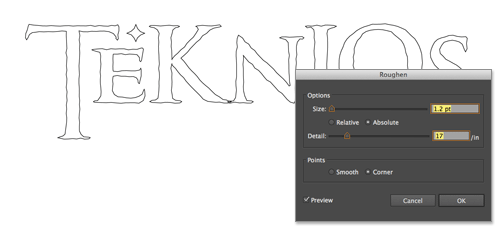
After swapping the stroke and fill colors and reducing the stroke width, Deke roughs up the edges with the aptly named Roughen effect. Choosing Effect > Distort and Transform > Roughen, he sets the Size set to an Absolute 1.2 points and the Detail (i.e., the number of roughening wiggles) to 17 per inch:
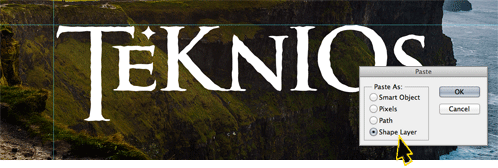
Having suitably stylized the text shapes, Deke copies the outlines and pastes them into Photoshop. Note that when you bring this path in from Illustrator and use the Paste command, Photoshop gives you four choices for the type of Paste you want to perform. For this project, picking the Shape Layer option means you will retain the path outlines.
If the task of Illustrator is to help create the shapes, then the destiny of Photoshop is to provide the texture. After changing the fill to white to improve visibility, Deke applies a layer effect, Gradient Overlay, using a couple of orangish shades for the gradient:
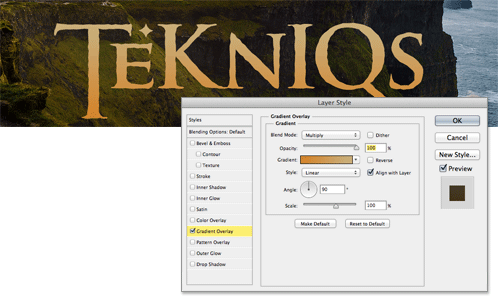
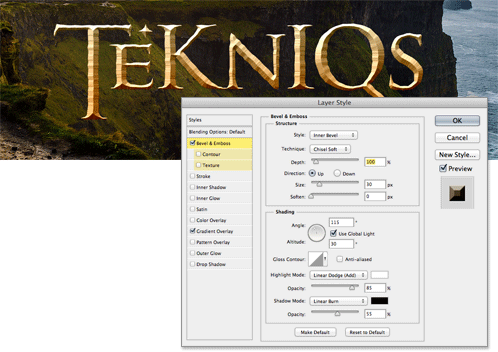
To give the letterforms some volume, the next step is to add a Bevel & Emboss layer effect using the Chisel Soft technique option and appropriately adjusting the blend modes of the highlights and shadows (to Linear Burn and Linear Dodge, respectively.)
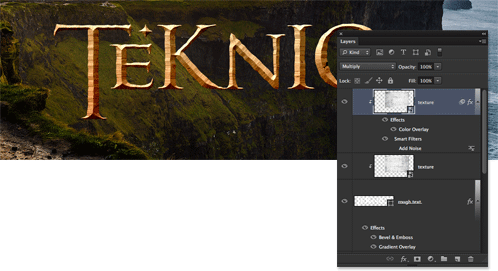
The chiseling effect is a good start, but to really sell effect, Deke adds a texture layer (created from a photograph) and clips it inside the letters. Then he duplicates the texture, flips it around, and creates another clipping mask. After supplying a Color Overlay effect and dose of the Noise filter, along with some blend mode tweaking, the result is letters that look like they’ve survived a battle or two:
To really distress the text, Deke uses the Pen tool to draw some paths that look like proper battle scarred, dwarf-bitten divots, then uses the Subtract Front Shape command in the options bar to remove those areas from the shape layer.

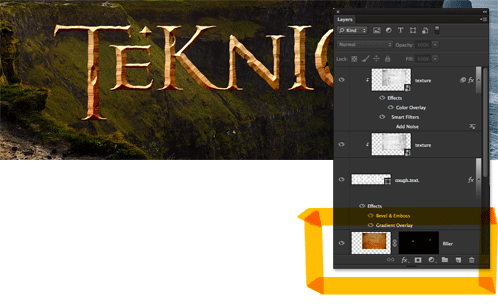
To keep the larger holes from boring all the way through the letters, Deke fills in the backs of the letters with a perfectly registered layer of colored texture, masked to take care of the letters’ more violent wounds:
Finally, Deke adds in some supplementary, self-deprecating text, and voila:

The background of this image, by the way, is not Middle Earth or even the stand-in for Middle Earth known as New Zealand. It’s actually the Cliffs of Moher on the west coast of Ireland (which stood in for the Cliffs of Insanity in the movie The Princess Bride, so it’s still a motion picture worthy locale).
In this week’s member-exclusive video, Deke demonstrates how he enhanced a regular vacation photo to make this cinematic background. You can get a free 7-day trial to the lynda.com Online Training Library. The trial membership entitles you to 7 days of access to all 986 courses in the lynda.com Online Training Library for free. Click sign up on the subscription plan of your choice to get started.
![]()
Perfect Effects 4 Pugins Free Edition And Premium Edition Released - Get 15% Off Premium With Coupon
 onOne has announced the availability of Perfect Effects 4 Premium Edition and Perfect Effects 4 Free Edition. Both software programs offer a library of photographic effects and powerful tools for image enhancement and creative stylization.
Each may be used as a standalone application, as an external editor for Apple Aperture, Adobe Lightroom, or as a Photoshop plug-in. Use our discount code PSSPPT06 to get 15% off any onOne product.
Perfect Effects 4 Premium Edition provides photographers with a robust library of more than 400 photographic effects that instantly add professional looks to photos. Effects are sorted into more than 40 categories, such as HDR, Movie Looks, and Vintage.
Also included are effects that recreate the look of film and darkroom techniques, add glows, vignettes, and borders, and correct common photography problems. Effects may be added with a single click or combined to create unique looks.
Perfect Effects 4 Free Edition includes 70 photographic effects found in the Premium Edition, while maintaining core functionality and usage without restrictions of a traditional 30-day timed trial, or the addition of watermarks to images.
![]()
Create Colorful Collages In Photoshop Tutorial: Part One
Learn how to use Photoshop tools to build vibrant images, using stock and shapes in this tutorial by Adam Smith from Photoshop Daily. (See part two here.)
Your narrative
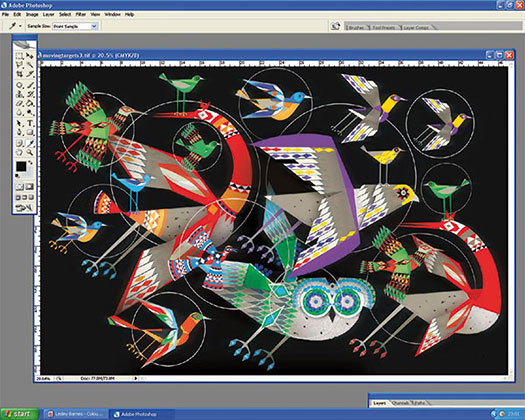
Decide upon the story you want to tell. Moving Target represents a tension between the idea of some fantastical brightly coloured birds that could come from a child’s book or animation, and the idea that they were prey to some unseen hunter’s gun.
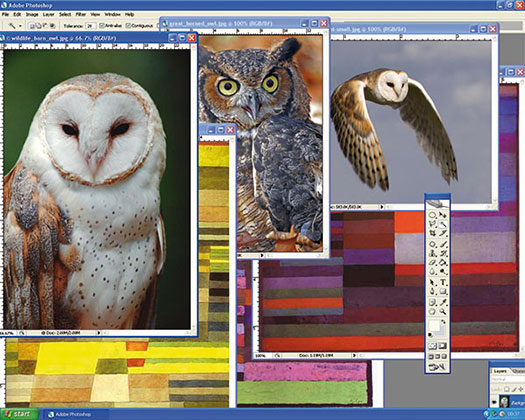
Cut, cut, cut
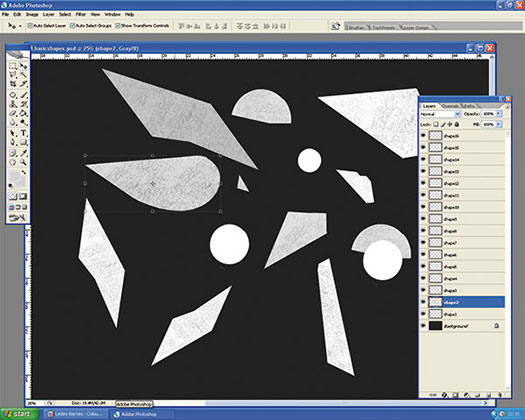
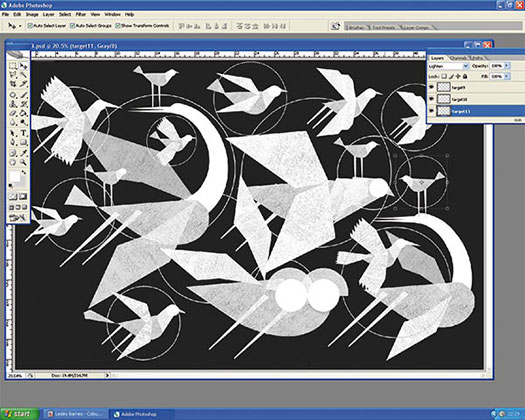
All the birds in this illustration are created from really simple shapes that are cut from paper (sketch them if you find that easier). The birds’ bodies, for example, are all created from a single teardrop shape. Once you are happy, scan your shapes, and then import them into Photoshop. (They don’t have to be perfect as you can clean them up later).
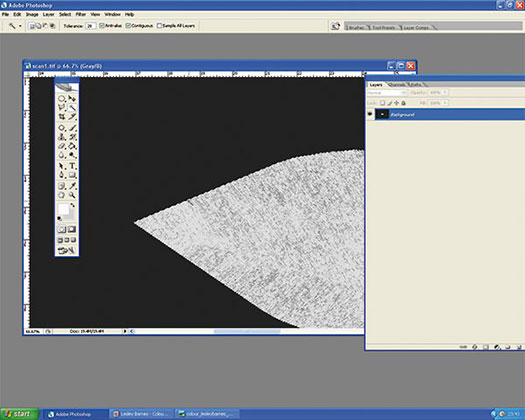
Define your shape
Once you have your shape in Photoshop, use the Magic Wand tool to select the area around it and then delete the selected area. If there are any rough edges or you want to change the shape, just use the Circle or Straight Line tool to select areas and then use the eraser to delete the unwanted sections.
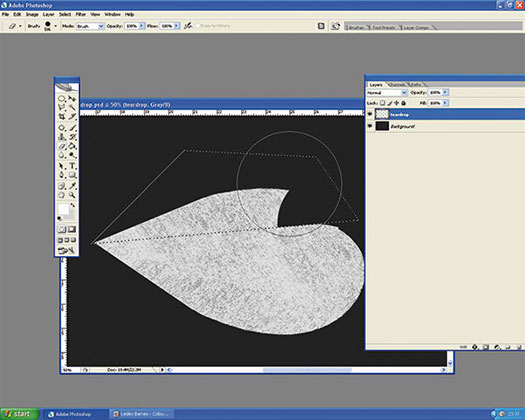
Gather your shapes
Gather all your shapes together as different layers in one Photoshop document. This makes it much easier for you to play around until you find the right combination of shapes to create your birds. As well as the teardrop shape, I also created circles, rectangles, and some other simple abstract shapes.
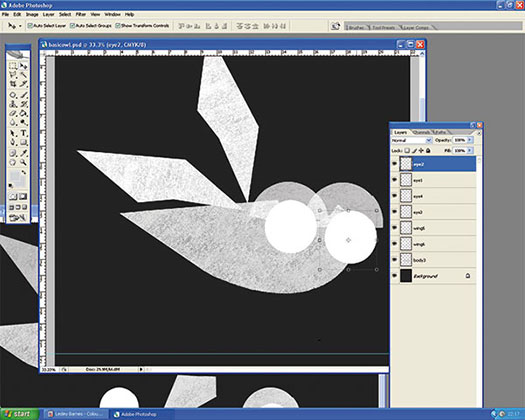
Make your birds
To create the owl, I took the basic teardrop shape and simply added two circles for eyes and cut out a diamond-shaped hole in the body for the beak. The wings were just abstract shapes. By using these simple shapes, you can easily create all sorts of different birds.
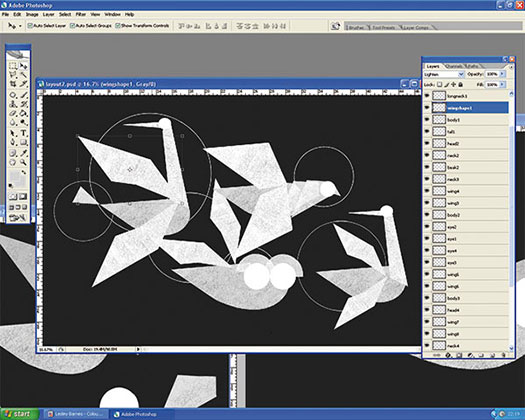
Layout
I based my layout on four bird shapes, which I balanced out across the page. I then added some circles (or targets) around selected areas to suggest the hunter’s view – lining up the prey with his gun.
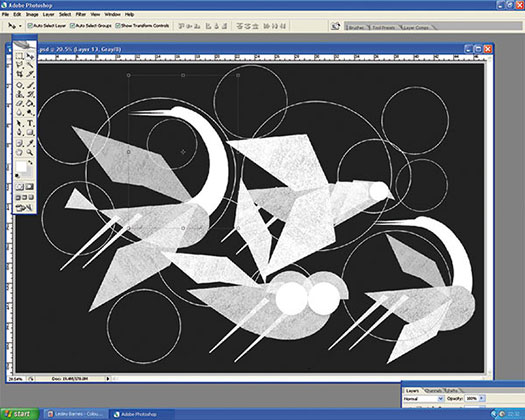
Add some details
Add some details like legs and necks to your bird creations – now is the time to add some character to your birds’ shapes. I added some birds with long curved necks that mirror the curves of the target
circles.
Fill the gaps
There is still lots of empty space in the image and as I wanted to create a busy picture, I simply added some smaller birds. They don’t have to be entirely new creations – you can simply duplicate then resize some of the bird shapes you have already designed.
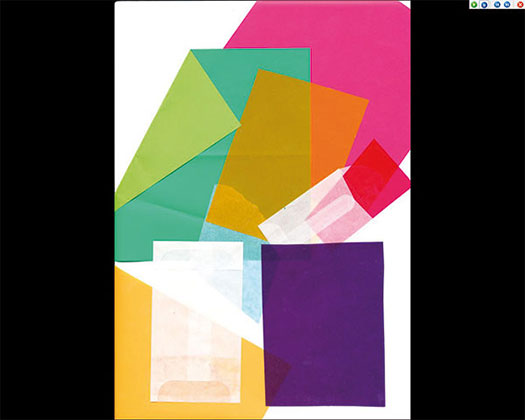
Spread your colours!
One easy way of finding colours and tones that work well together is to collect as many samples of papers of different colours and hues as you can. Spread them out on your desk and play around with them – it’s a great way of finding unusual combinations. We have already decided that we want to use the pairs of complementary colours for this illustration – the bright primary and secondary colours help the child-like feel.
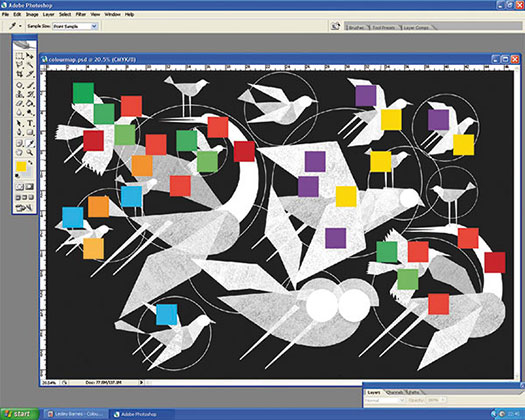
Map your colours
A good way of planning how to use colour in your illustration is to simply drop colour swatches onto it, and see how they work together as a whole. We are going to create clusters of complementary coloured birds in different areas of the illustration and then link them up.
![]()
Create Colorful Collages In Photoshop Tutorial: Part Two
Linking colour combinations
We can use certain birds to help link the different pairs of complementary colours together. The owl, for example, is going to be patterned using blue and green. This links the green from the green and red pairing to the blue of the orange and blue pairing. Blue and green also work well together as they sit next to each other on the spectrum.
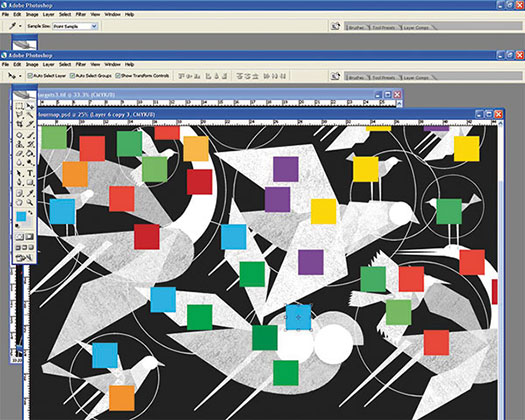
Neutral tones
Another method of harmonising the illustration is to pick some neutral shades which link the birds together. In this illustration we can use some tawny off-white shades as the ‘canvas’ on the birds which works as a foil to the bright colours.
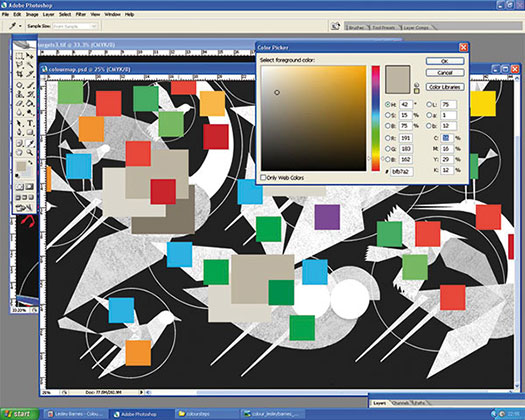
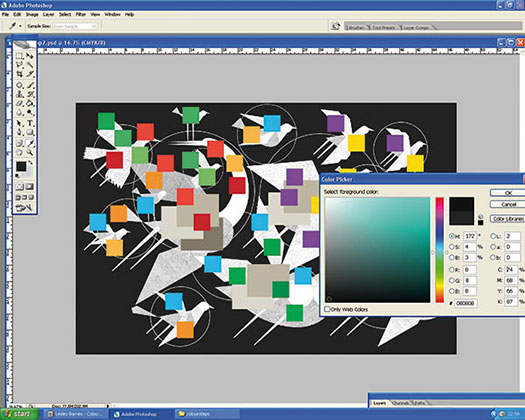
Background
Once you have dropped all your swatches in, it’s time to choose a background colour. Because there are already lots of different colours being used in this illustration, we are going to use a neutral but dramatic black. This will help emphasise both the simple shapes and bright colours.
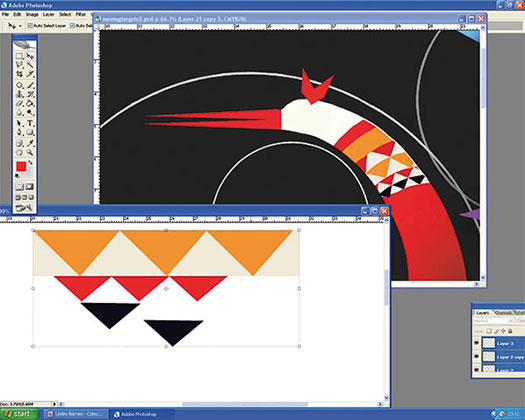
Patterns – triangles
One way of creating simple effective patterns is to line up rows of triangles of a few different colours – some different shades of red for example – against a neutral off-white background. You can then build up ‘stripes’ of different triangles – this is how the pattern on the long bird’s neck was created.
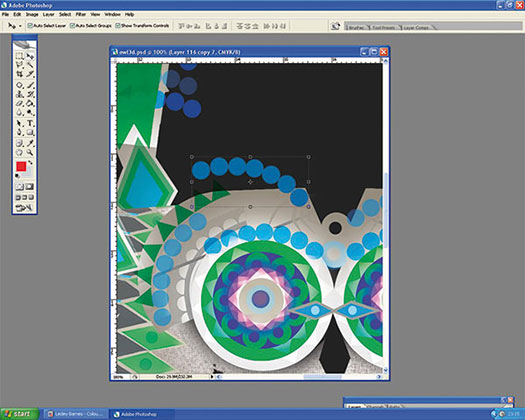
Patterns – circles
On the owl I wanted to create some circular patterns on the eyes to emphasise their round shape. So I simply created lots of different circles and semi-circles in blue and green and played about with them until I found a pattern that I was happy with.
Repeat your patterns
Because there are already quite a lot of different things going on in this illustration, we don’t need to create too many different patterns. The patterns on the wings of the birds, for example, are repeats, just in different colours. This again helps to unify the illustration.
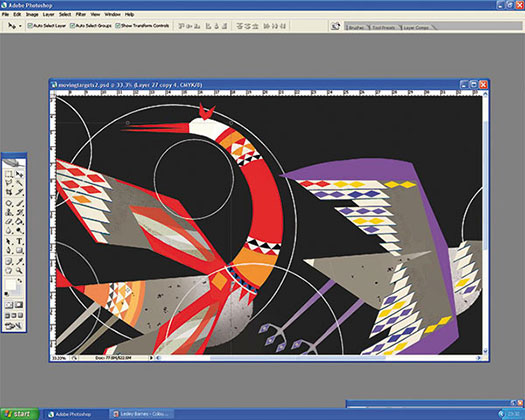
Add eyes
Once the birds have been coloured, you can add a bit more character with eyes and other small details. Sometimes it can be good to introduce a contrasting or new colour into the eye so they really stand out.
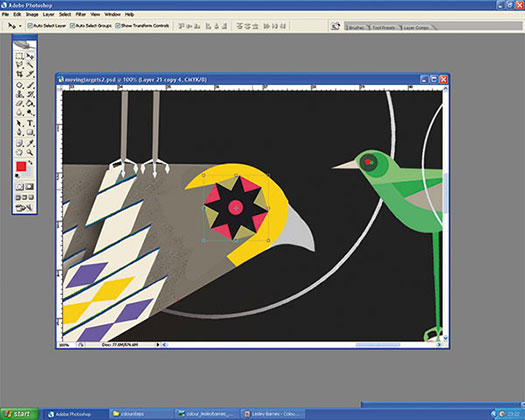
Add shadows
To give the illustration a sense of depth I added some shadows between layers. On the owl, for example, I added some circular shadows to emphasise the eyes and I also added a shadow under the front wing to make it stand out against the owl’s body.
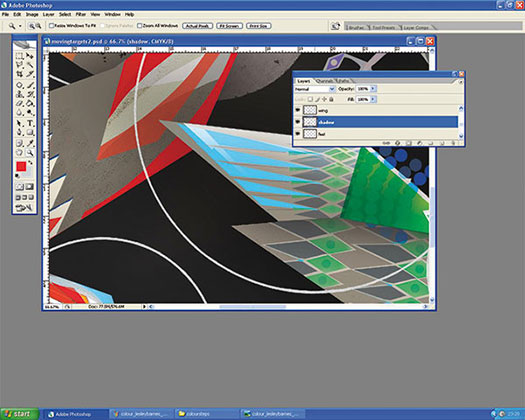
Blur
As the illustration was capturing some birds in flight, I used the Blur tool in selected areas so that the edges were not too defined and sharp. You don’t want to overdo the Blur as it might become distracting.
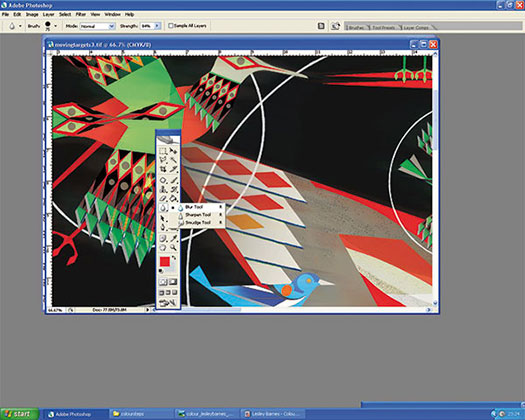
Step Back
Take a step back and look at your finished illustration – does it feel ‘right’? Sometimes it is good to leave the work alone for a while and come back to it with fresh eyes.
w![]()
Special Deals On Nik Software Photoshop Plugins - Viveza, Complete Collection - 15% DISCOUNT COUPONS
 Follow the links below and a 15% discount will be AUTOMATICALLY APPLIED to any purchase you make, or use our exclusive discount coupon code - NIKPSS - during the checkout process at Nik Software for the instant 15% discount. This exclusive discount coupon code can be applied to all the latest Nik Software Photoshop plugins, including Silver Efex Pro, Color Efex Pro, Viveza, HDR Efex Pro, and The Complete Collection (big savings).
The Complete Collection features products with Nik Software's patented U Point® technology, giving photographers the most powerful tools for precise and natural photographic enhancements and corrections without the need for complicated selections or layer masks.
The Complete Collection is offered in two editions: (1) the Complete Collection Ultimate Edition includes support for every plug-in to work in Photoshop, Lightroom, and Aperture, and offers Color Efex Pro 3.0 to work in Capture NX 2 as well. (2) the Complete Collection for Lightroom and Aperture includes support for each plug-in to only work in Lightroom and Aperture. Click here to compare both editions
Color Efex Pro
 52 photographic filters with over 250 effects for professional quality images.
Completely Original. Completely Indispensable.
Nik Software Color Efex Pro 3.0 filters are the leading photographic filters for digital photography. The award-winning Color Efex Pro 3.0 filters are widely used by many of today's professional photographers around the world to save time and get professional level results. Whether you choose the Complete Edition, Select Edition, or Standard Edition, you’ll get traditional and stylizing filters that offer virtually endless possibilities to enhance and transform images quickly and easily.
Patented U Point technology provides the ultimate control to selectively apply enhancements without the need for any complicated masks, layers or selections. Control color, light and tonality in your images and create unique enhancements with professional results. With 52 filters and over 250 effects found in Color Efex Pro 3.0, you can perform high quality retouching, color correction, and endless creative enhancements to your photographs. Download a free Trial version.
Viveza
 The most powerful tool to selectively control color and light in photographic images without the need for complicated selections or layer masks.
Two of the most important factors in creating great photography are color and light. Mastering the art of selectively correcting or enhancing each of these is now possible for every photographer without the need for complicated masks or selections, or expert-level knowledge of Photoshop. Integrating award-winning U Point technology, Viveza is the most powerful and precise tool available to control light and color in photographic images.
U Point powered Color Control Points, placed directly on colors or objects in an image (such as sky, skin, grass, etc.), reveal easy-to-use controls that photographers can use to quickly adjust brightness, contrast or color in a fraction of the time needed by other tools. With Viveza you’ll spend more time shooting photographs and save hours of image editing. Download a free Trial version.
Silver Efex Pro
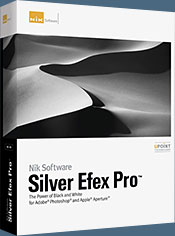 Complete power and control to create professional quality black and white images in one convenient tool.
Silver Efex Pro from Nik Software is the most powerful tool for creating professional quality black and white images from your photographs. For the first time, all the advanced power and control required for professional results have been brought together in one convenient tool.
Featuring Nik Software’s patented U Point technology to selectively control the tonality and contrast of the image, Silver Efex Pro includes advanced imaging algorithms to protect against unwanted artifacts, a comprehensive collection of emulated black and white film types, a variable toning selector for adding traditional toning techniques, over 20 one-click preset styles, and a state-of-the-art grain reproduction engine that help produce the highest quality black and white images possible from your color images while providing more freedom to experiment. Download a free Trial version to use Silver Efex Pro.
HDR Efex Pro
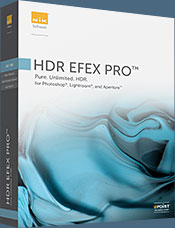 Experience the power, control, and creative expression of HDR. This all in one toolkit lets you achieve your best HDR images ever, ranging from the realistic to artistic.
HDR Efex Pro is the essential new standard for creating amazingly high quality realistic to artistic HDR images with a revolutionary new all-in-one workflow. HDR Efex Pro includes a vast selection of one-click visual presets for incredibly fast results, advanced tone mapping algorithms, powerful and detailed HDR controls, and patented U Point® technology
Follow our discount coupon links, or enter our exclusive discount coupon code - NIKPSS - during the checkout process at Nik Software for the instant 15% discount. This exclusive discount coupon code can be applied to all the latest Nik Software Photoshop plugins, including Silver Efex Pro, Color Efex Pro, Viveza, HDR Efex Pro, and The Complete Collection (big savings).
![]()
onOne Ships Perfect Photo Suite 7 - 15% Exclusive Discount Code
 onOne today announced the availability of Perfect Photo Suite 7. Improved to give photographers even more ways to maximize their creativity and solve common problems in digital photography.
Exclusive Discount Code - 15% Off
Use our exclusive discount code PSSPPT06 to get 15% off any onOne product, including the new Perfect Photo Suite 7.
Perfect Photo Suite 7 provides easy-to-use and powerful tools to develop stunning black and white photographs, enhance the look and feel of images with professionally-designed effects, beautifully retouch portraits, replace unwanted backgrounds, control depth-of-field after the shot has been taken, as well as resize and prepare images for print, in robust layered file workflow—in one affordable package.
For those who have purchased Perfect Photo Suite 6 on or after August 1, 2012, onOne Software will issue a complimentary upgrade to Perfect Photo Suite 7 via download
Perfect Photo Suite 7 introduces five new products—Perfect B&W, Perfect Portrait 2, Perfect Layers 3, Perfect Effects 4 and Perfect Resize 7.5 Pro, integrated with existing favorites Perfect Mask 5.2 and FocalPoint 2.
Photographers can effortlessly move between all of the modules while editing their photos using Perfect Photo Suite 7 as a standalone application. Photographers can also use Perfect Photo Suite to extend the image editing power of Adobe Photoshop Lightroom and Apple Aperture, and as a plug-in to Adobe Photoshop and Adobe Photoshop Elements.
Perfect Photo Suite 7 features a redesigned user interface with a new browser, search functionality, and the ability to flag and access favorite effects and presets. It also includes the powerful new edge-detecting Perfect Brush, presets that give users instant results alongside manual controls that offer photographers the option to fine-tune adjustments and create the images they envision.
![]()
Exclusive 15% Discount On Topaz Plugins, Bundles And Upgrades
 Enter our exclusive discount coupon code PHOTOSHOPSUPPORT during the checkout process at Topaz Labs for an instant 15% discount on any Topaz product, including bundles and upgrades.
Topaz Labs Photoshop plug-ins are specifically designed to expand a photographer's creative toolbox by harnessing powerful image technology developments. Photographers everywhere are now taking advantage of the creative exposure effects, artistic simplification, unique edge manipulation, and top-of-the-line noise reduction offered in Topaz products. The Topaz Photoshop Plugins Bundle is a super powerful Photoshop plugins package that includes the following Topaz products:
Topaz Adjust
Deliver stunning and dynamic images with this uniquely powerful plug-in that features HDR-like abilities and enhances exposure, color and detail.
Topaz InFocus
 Topaz InFocus uses the latest advancements in image deconvolution technology to restore, refine and sharpen image detail.
Topaz Detail
A three-level detail adjustment plug-in that specializes in micro-contrast enhancements and sharpening with no artifacts.
Topaz ReMask
The fastest and most effective masking and extraction program with one-click mask refining.
Topaz DeNoise
Highest-quality noise reduction plug-in that removes the most noise and color noise while preserving the most image detail.
Topaz Simplify
Provides creative simplification, art effects, and line accentuation for easy one-of-a-kind art.
Topaz Clean
Take control of the detail depth of your images with extensive smoothing, texture control and edge enhancement tools.
Topaz DeJPEG
Drastically improves the quality of web images and other compressed photos.
Learn more about the Topaz Photoshop Plugins Bundle. Download a free trial version.
![]()
Site Grinder Web Design Tool
 There often seems to be a strict division of labor within the world of web design and development. Creative professionals tend to stick to the Photoshop domain, while those well-versed in scripting are left to the task of implementing their work. Indeed, the two realms are quite different from each other, to which any of us even vaguely familiar with either can easily attest.
Essentially, Photoshop is a no-holds-barred design studio, offering the artist a seemingly endless array of creative options. On the other hand, HTML, CSS, Java and the like follow strict rules of engagement, requiring the developer to take any number of esoteric concerns into consideration in order to ensure that designs are properly displayed on the web.
Turn Photoshop Into A Complete Web Design Tool
SiteGrinder seeks to bridge this gap between design and development. Basically, SiteGrinder turns Photoshop into an easy-to-use and fully functional web design tool. With SiteGrinder, designers will now have the freedom to totally let their creativity loose and then, without skipping a beat, transfer their designs to the web. Bringing esthetic concerns together with more practical considerations, SiteGrinder is an amazingly powerful tool that would make a fantastic addition to any web designer's bag of tricks. Mac OS X and Windows versions of the SiteGrinder unlockable demo are available now via download.
 WordPress Photoshop Plug-in Creates Wordpress Blogs & Sites
Designers can now create PSD to WordPress Themes in Photoshop with Media Lab's NEW SG3xpress for Wordpress Photoshop plug-in. In addition, Media Lab has released the SG3xpress Add-on for its SiteGrinder 3 for users who wish to add advanced blog and WordPress Theme-building to the already powerful SiteGrinder 3 website creation software.
If you know Photoshop then you already know enough to start creating WordPress themes and blogs for yourself and your clients. Creating a blog or a WordPress site in Photoshop is easy with SG3xpress. Now you can go directly to WordPress with your design saving even more time and money for yourself and your clients.
![]()
Photoshop Masking Plugin Fluid Mask - Exclusive Instant Discount
 The 4 1/2 out of 5 star review of Fluid Mask at MacWorld begins by saying that this "Photoshop plug-in takes the pain out of extracting backgrounds," and goes on to recommend the latest version, stating that "Fluid Mask is a very effective tool for separating objects from their backgrounds. It offers a variety of useful features for tackling almost any difficult image, from wispy hair to complex foliage. Online video tutorials and live training sessions help ease the learning curve."
Our friends at Vertus, the makers of Fluid Mask Photoshop Plugin, have set up a special exclusive discount for PhotoshopSupport.com. Go to our Fluid Mask page for a special, exclusive discount link.
Fluid Mask is designed for photographers, image editors, graphic designers and all those who take digital image editing seriously. In a streamlined interface and workflow, Fluid Mask instantly shows key edges in the image and provides comprehensive easy to use tools that work with difficult-to-see edges and tricky areas like trees & lattices. Fluid Mask will also preserve all-important edge information for a professional quality cut out. Go to our Fluid Mask page for more info.![]()
lynda.com Online Training Library - View Free Video Clips
 Subscriptions to the lynda.com Online Training Library provide anytime access to tens of thousands of video tutorials covering Photoshop, Illustrator, Dreamweaver, web design, digital imaging, 3D, digital video, animation, and many other topics. View free video clips.
For less than a dollar a day, members have the opportunity to stay current and keep skills sharp, learn innovative and productive techniques, and gain confidence and marketability - all at their own pace. Premium subscriptions include instructors’ exercise files so that members can follow along with the exact examples onscreen. Customers learn at their own pace and may stop, rewind, and replay segments as often as necessary. View some free video clips (high resolution).
![]()
A Thank You To Our Friends, Partners & Sponsors!
![]() We'd like to thank our friends, partners and sponsors: Adobe, Google, Hostway, Apple, O'Reilly Media, Brusheezy, Janita, Heathrowe, The Photoshop Roadmap, Power Retouche Plugins, Wacom, onOne Software, Obsidian Dawn, BittBox.
We'd like to thank our friends, partners and sponsors: Adobe, Google, Hostway, Apple, O'Reilly Media, Brusheezy, Janita, Heathrowe, The Photoshop Roadmap, Power Retouche Plugins, Wacom, onOne Software, Obsidian Dawn, BittBox.
![]()
![]()


