![]()
![]()
![]() Buy. Download. Create. Get Photoshop now at the Adobe Store.
Buy. Download. Create. Get Photoshop now at the Adobe Store.
![]() Try before you buy. Download any Adobe product for a free 30 day trial.
Try before you buy. Download any Adobe product for a free 30 day trial.
![]()
![]() The Photoshop Blog offers the latest Photoshop news and software updates, Photoshop tips and tutorials, and random thoughts from graphic artist and Photoshop expert Jennifer Apple.
The Photoshop Blog offers the latest Photoshop news and software updates, Photoshop tips and tutorials, and random thoughts from graphic artist and Photoshop expert Jennifer Apple.
![]()
![]()
Controlling Contrast And Detail With Curves And Levels - Photoshop Tutorial
February 08, 2010
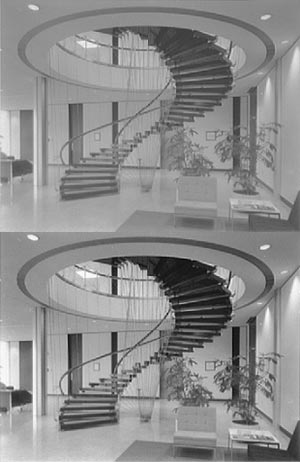 Here is a very comprehensive tutorial that will guide you through how to use levels and curves to control contrast and detail in your digital photos.
Increasing contrast is one of the best ways to improve images, often dramatically. Images with good contrast can seem to “pop” off the page and appear to have more detail. There are a few things to beware of.
The main thing is to be careful not to over-lighten or overdarken any area to the point that your image loses detail in areas that are important to you or that need to be preserved for reproduction on its destination device.
For example, the lightest areas in images destined for print need to be a little darker than pure white and the darkest areas a little lighter than pure black to maintain print quality in a typical image. This is because of the limitations of the output device, such as a printing press or printer.
Limiting lights and darks is not as much of an issue when you are preparing images for Web, since monitors don’t usually have as many tonal limitations as printing devices. However, displays can vary significantly in how they display images.
Using Curves to Increase Contrast
All of the following techniques require a Curves adjustment layer. To make a Curves adjustment layer, do the following:
1 - Activate the layer that you want to be just below the Curves adjustment layer you are about to make. (An adjustment layer can affect only the layers below it.) You can activate a layer by clicking once on it in the Layers palette — clicking next to the right side of the layer name is best.
2 - Do one of the following: Click the Create a new fill or adjustment-layer button (the half-black, half-white circle) at the bottom of the Layers palette and choose curves. Click the curves button in the Adjustments palette.
3 - You can then perform the techniques described below. For some of the tasks, you need to activate the Curves adjustment layer and adjust it in the Adjustments palette. For other tasks, you need to activate the Curves adjustment layer and work with it in the Layers palette.
Note that the color mode of the image determines whether you need to move the curve up or down to lighten or darken the image. Color mode can be changed in the Image > Mode menu. You can preserve more colors in an image by adjusting it in RGB or Lab color mode. When you convert an image to CMYK color mode, which is eventually necessary for full-color images destined for print, you lose some of the colors. Sometimes the loss of colors is noticeable, and sometimes it’s not. So it’s best, although not absolutely necessary, to convert to CMYK only when you are nearly finished with the image.
Increasing Contrast in Broad Areas with Curves
You can increase contrast in broad areas of an image by adjusting the curve in a Curves adjustment layer so that the majority of the curve is steeper than its original straight, 45-degree-angle line. When the curve has a steeper angle than it had originally, you are either lightening the lights and darkening the darks or at least increasing the difference in some of the light and dark intensities within the image. The part of the image that corresponds to the steeper-angled part of the curve will have increased contrast.
If the adjusted curve has parts that are at a less-steep angle than the original 45-degree-angle of the curve, the corresponding parts of the image will have decreased contrast.
The illustration below shows a before-and-after image in Grayscale color mode and the curve that increased contrast in a broad area of the image. Note that the curve has an angle that is steeper than it was originally.
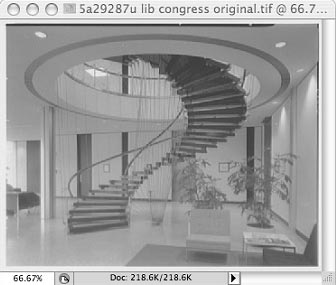
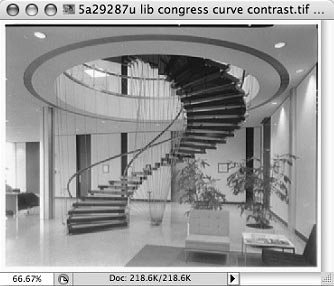
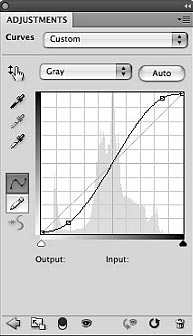
A Grayscale mode image that uses a curve to increase contrast in broad areas of the image. Note that the majority of the curve angle is steeper than it was.
Increasing Contrast in Specifically Targeted Areas with Curve
You can increase contrast in a more targeted area of an image by making a smaller section of the curve angle steeper. You need to decide where in the image you want to add more contrast and find out which part of the curve corresponds to that part of the image. Pressing the I key on your keyboard activates the Eyedropper tool, and if you drag back and forth over an area in the image when the curves dialog box is open, it shows you which part of the curve corresponds to that part of the image.
You can also click the Click and drag in image to modify curves button (the hand with a double arrows symbol) in the Curves adjustment dialog box to drag in the image and affect the corresponding part of the curve directly.
New feature: When you click the Click and drag in image to modify curves button (the hand with a double arrows symbol) in the Curves adjustment dialog box, you can drag on the image and it puts a point on the corresponding part of the curve and moves the curve.
The illustration below shows an RGB image and the curve that increases contrast in a generally targeted area of the image.
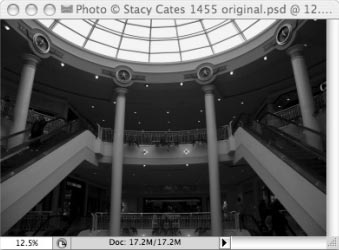
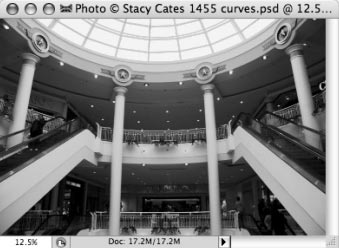
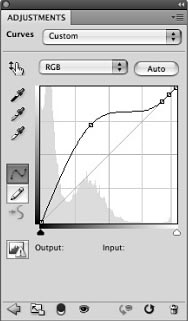
An RGB mode image that uses a curve to increase contrast in the shadow areas of the image while keeping the highlights in the image the way they were originally. Note that the composite color RGB channel is active in the curves dialog box.
Increasing Contrast in Specific Colors with Curves
You can make a Curves adjustment in a Curves adjustment layer affect certain colors rather than the composite full color. To target a certain color, you would select the color channel you want to adjust from the drop-down list just above the curves grid. You can access the menu and grid in the Adjustments palette when a Curves adjustment layer is active.
Sometimes it gives a better result to increase contrast in each color channel than to increase contrast in a composite channel. If you decide to try that, you may also try targeting the area in the image that is most important to you when you have each color channel active. You can use the Eyedropper tool in the Toolbox to find out which part of the curve corresponds to that area of the image.
Pressing the I key on your keyboard activates the Eyedropper tool, and if you drag back and forth over an area in the image when the curves dialog box is open, it shows you which part of the curve corresponds to that part of the image. You will then have an idea of which part of the curve to steepen in the active color channel.
You can also click the Click and drag in image to modify curves button in the Curves adjustment dialog box to drag in the image and affect the corresponding part of the curve directly. If you use this method, you would drag in the image to lighten the lighter area and drag again to darken the darker area.
In RGB and Lab modes, each color channel can be used to adjust two colors. In RGB mode, you use the R channel to adjust red and cyan, the G channel to adjust green and magenta, and the B channel to adjust blue and yellow. In Lab mode, you use the a channel to adjust green and magenta and the b channel to adjust blue and yellow.
In these dual color channels, you can make an S-shaped curve with the center of the curve at a steeper angle or a straight curve with a steeper angle and it will add more of each color and give the appearance of increased contrast between the two colors. It has a similar effect to saturating both of the colors.
The Lightness channel in Lab mode adjusts the luminosity, or light and dark values only, without affecting the color. If you steepen part of the Lightness channel, it is similar to steepening a Curves adjustment layer that is using the Luminosity blending mode. In CMYK mode, each color channel can be used to adjust just one color: cyan, magenta, yellow, or black (K).
The illustration below shows a curve that increases the intensity of yellow and blue in an RGB mode image.
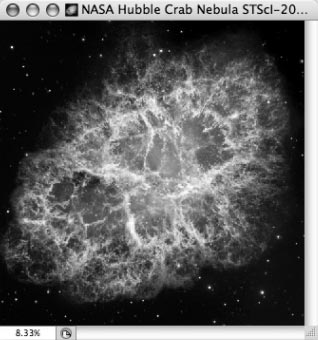
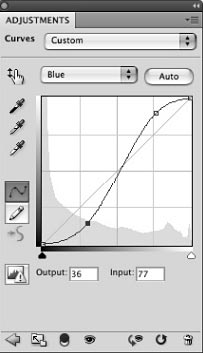
A curve that increases the intensity of yellow and blue in an RGB mode image. Note that the blue channel is selected. In RGB mode, you can use the blue channel to adjust yellow and blue.
Increasing Contrast with Curves Eyedroppers and Color Numbers
You can use the Curves eyedroppers to increase contrast in an image with just a couple of clicks. You can use the curves dialog box’s Set White Point and Set Black Point eyedroppers to make a part of the image you click on with them change to the color that is assigned to them, and the other colors in the image adjust proportionally.
If the image lacks contrast, often the lightest area will be too dark and the darkest area may be too light. If the Set White Point eyedropper is set to a lighter color and you click on what should be the lightest point in the image, and the Set Black Point eyedropper is set to a darker color and you click on what should be the darkest point in the image, the contrast is automatically adjusted. The other values in the image adjust proportionally. To set the eyedroppers’ colors, you can doubleclick the eyedroppers and enter color numbers.
You can also increase contrast in an image by entering specific color numbers in the boxes in the curves dialog box. To do this, select a point on a curve and enter a new output color number in the Output number box. The numbers should be chosen so that they lighten the lighter targeted area and darken the darker targeted area.
Changing a Curves Contrast Adjustment by Readjusting Curves Settings
Say you have used a Curves adjustment layer to increase contrast in part of your image. You can change a Curves adjustment layer’s curve by double-clicking the adjustment layer’s thumbnail in the Layers palette and changing the shape of the curve in the Adjustments palette.
Reducing a Curves Contrast Adjustment by Reducing Opacity
If you don’t want to bother with fiddling with the curve and want to reduce the Curves adjustment layer’s effect, you can simply reduce the opacity of the Curves adjustment layer at the top of the Layers palette.
Confining a Curves Contrast Adjustment to a Specific Layer or Set of Layers
Adjustment layers can affect all the layers below it in the Layers palette but none of the layers above it. If you want a Curves adjustment layer to affect only the layer below it, Alt+click/ Option+click the line in between the Curves adjustment layer and the layer directly below it when you see a double-circle symbol pop up as you hover the cursor over the line while holding down the Alt key. This puts the two layers in a Clipping Group, and the layer on the bottom of the group becomes a Clipping Mask.
In the Clipping Group with two layers, the Curves adjustment layer affects only the layer below it. In the Clipping Group with three layers, the Curves adjustment layer affects two layers below it.
Increasing Contrast with Curves without Shifting Color
If the color is just right in your image and you only want to increase contrast in the image without shifting the color, you can apply the Luminosity blending mode to the Curves adjustment layer. The Luminosity blending mode tells Photoshop to use only the light and dark values on the layer (or the adjustments to the light and dark values, in this case) and not affect the color of the image.
Increasing Contrast with an Original, Unadjusted Curve and the Soft Light Blending Mode
You can also increase contrast in an image with an unadjusted Curves adjustment layer that is using the Soft Light blending mode, applied from the drop-down list near the top of the Layers palette. An unadjusted curves layer has a curve that hasn’t been changed from its original 45-degree-angle line. This technique has the same effect as duplicating a layer and applying the Soft Light blending mode to it, but it doesn’t increase the file size.
When you duplicate a layer, it can increase the file size significantly. If the Soft Light effect is too dark, you can reduce the opacity of the adjustment layer that is using the Soft Light blending mode. If it doesn’t provide enough contrast, you can duplicate the Soft Light layer (you can merge the duplicate layers later if you need to reduce file size).
The illustration below shows an image with increased contrast, a Curves adjustment layer and its unadjusted curve, and the Soft Light blending mode that has been applied in the Layers palette.


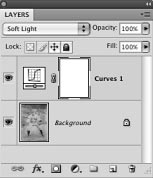
An image with increased contrast, a Curves adjustment layer and its unadjusted curve, and the Soft Light blending mode that has been applied in the Layers palette. Soft Light blending mode adds contrast to the image.
Using Levels to Increase Contrast
You can use Levels adjustment layers to increase contrast in images, but you have less control with Levels than you have with curves. To increase contrast with Levels, you can create a Levels adjustment layer and drag the upper white and black sliders toward the center. You can do this in the composite channel or individual color channels, whichever gives you the best result. Levels also has eyedroppers and color number boxes that can be used in the same way as in the curves dialog box.
Using the Clone Tool to Add Contrast
One way you can try increasing contrast in certain parts of images is with the Clone tool. If the Clone tool is set to Soft Light blending mode, you can clone an image exactly on top of itself while increasing contrast at the same time. To Clone an image on top of itself, start painting in the exact spot you Alt+click/Option+click on when you sample with the Clone tool, and make sure Aligned is checked in the Options Bar. Note that this technique may not give the desired result on every image. It depends on the image’s tones.
Using the Dodge and Burn Tools to Increase Contrast
The Burn tool can be used to darken parts of images by simply painting over an image with it, and the Dodge tool can be used in the same way to lighten parts of an image. If you lighten lighter areas and darken darker areas that are relatively close to each other, it results in increased contrast. The best part about these tools is that you can set them to affect mostly highlights, midtones, or shadows in the drop-down list in their Options Bars.
It’s also a good idea to reduce the Exposure in the Options Bar and slowly build up the effect by painting the same spot over and over until you get the effect you want. The illustration below shows a before-and-after of an image that has an area with increased contrast that was applied by using the Dodge and Burn tools.
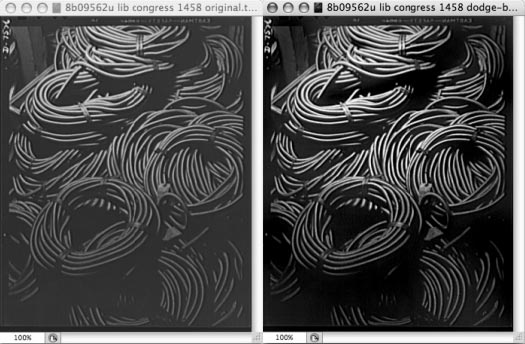
This image has an area with increased contrast that has been applied with the Dodge and Burn tools.
Using a Brightness/Contrast Adjustment to Increase Contrast
Increasing the Contrast setting in a Brightness/Contrast adjustment layer is a simple way to increase contrast in an image but it gives you less control than other methods, such as curves. If you leave Legacy unchecked, it gives a smoother result. Increasing contrast with the Legacy box checked can cause the image to have a posterized look, or have a reduced tonal range so that it develops solid-color areas.
Decreasing Contrast and Detail
Sometimes you need to lower contrast in images, as odd as that may sound. Let’s say you’re making a collage and want a low-contrast image in the background and a high-contrast image in the foreground, or you need to create a very subtle, low-contrast pattern or photo to put behind text. The good news is that you can use most of the same techniques as those mentioned in the previous section that increase contrast—just in reverse.
Lowering contrast often means darkening the lights and lightening the darks, which is the opposite of what you do when you increase contrast. Images usually look like they contain less detail when their contrast is reduced. Images like this can help nearby high contrast and highly detailed images stand out.
The next sections talk about the differences in the techniques to lower contrast and the techniques discussed in the previous section that increase contrast. You can refer to the techniques to increase contrast for more details about how to use these methods.
Decreasing Contrast with Curves
You can lower contrast in images by making a curve in a Curves adjustment layer less steep than it was originally. The parts of the image that correspond to the less-steep part of the curve will have reduced contrast. Just as when you are increasing contrast, you can decrease contrast in the fullcolor composite channel or the individual color channels by selecting them from the drop-down list near the top of the curves dialog box. You can see the curves dialog box in the Adjustments palette when a Curves adjustment layer is active in the Layers palette.
The illustration below shows a before-and-after version of an image with decreased contrast that was applied by using a less steep curve in a Curves adjustment layer.
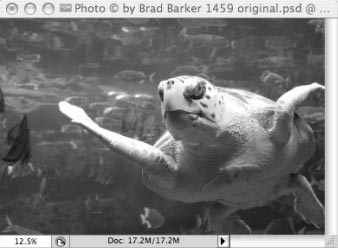
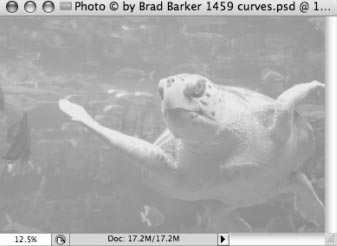
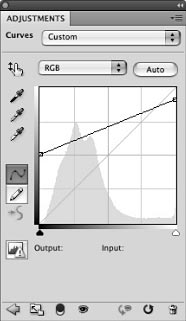
This image has decreased contrast that has been applied with a less steep curve in a Curves adjustment layer.
Decreasing Contrast with Levels
You can lower contrast with a Levels adjustment layer by dragging the bottom set of sliders (Output Levels) inward instead of the top set of sliders (Input Levels) that you use when you are increasing contrast. You can also enter color numbers in the Output Levels boxes instead of dragging the sliders. The numbers you enter to lower contrast would usually be values that darken a lighter part of an image and lighten a darker part of an image.
Just as when you are increasing contrast, you can decrease contrast in the full-color composite channel or the individual color channels by selecting them from the drop-down list near the top of the Levels dialog box.
Using Layers with Different Content to Decrease Contrast
Fill layers, gradient layers, and layers with lower-contrast objects and image pixels can be used to lower the contrast of layers underneath them. You can reduce the opacity of one of those kinds of layers in the Layers palette to let the layers underneath show through. You can also simply reduce a layer’s opacity to reduce the contrast of the same layer’s content.
Using a Brightness/Contrast Adjustment to Decrease Contrast
 Decreasing the Contrast setting in a Brightness/Contrast adjustment layer is a simple way to decrease contrast in an image but it gives you less control than other methods, such as curves. There is a check box called Legacy in the Brightness?Contrast dialog box that you can select. If you leave the Legacy check box deselected, it limits the amount of contrast that the contrast adjustment can make.
For example, it won’t allow you to reduce contrast so much that the image becomes completely gray, and it won’t allow you to increase contrast so make that it makes the image very posterized (converted to solid blocks of color). This can be an advantage, so I recommend leaving this check box deselected.
Adapted with permission from Photoshop CS4 Bible (Wiley Publishing) By Stacy Cates, Simon Abrams, Dan Moughamian.
 Buy Directly From Adobe's Online Store
Find upgrade options and CS5 deals at the Adobe USA Store. Visit the Adobe Special Offers Page to find the latest offers. Get up to 80% off at the Adobe Education Store.
Photoshop CS5 Tutorials & CS5 Resources
See our Photoshop CS5 Resource Center for free Photoshop CS5 Tutorials & Videos, and the Free Photoshop CS5 Trial Download.
posted by Jennifer Apple | permalink | RSS feed | bookmark | comment | twitter
![]()
![]()
Photoshop CS5 & Photoshop CS5 Extended - Best Deals From Adobe
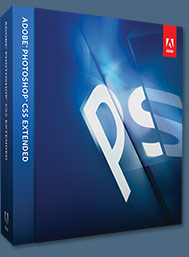 Adobe Photoshop CS5 delivers breakthrough capabilities to help you create images with impact. Refine your
images with reengineered photography tools for removing noise, adding grain, and creating high dynamic
range (HDR) images. Get precise results when making complex selections. Remove any image element and
see the space fill in almost magically. Paint with naturally textured brushstrokes and realistic color blends. Learn more about Photoshop CS5.
Adobe Photoshop CS5 Extended software helps you create the ultimate images
for print, the web, and video. Enjoy all the state-of-the-art editing, compositing,
and painting capabilities in industry-standard Photoshop CS5, and experience
fast performance thanks to cross-platform 64-bit support. Also create 3D extrusions
for logos, artwork, and motion graphics; edit 3D objects with advanced tools; and create and enhance motion-based content. Learn more about Photoshop CS5 Extended.
Find CS5 upgrade options and Creative Suite 5 deals at the Adobe Store. See CS5 pricing in UK currency at the Adobe UK Store. Visit the Adobe Special Offers page to find the latest deals. Save 80% on Adobe Student Editions. Try before you buy — download a free Photoshop CS5 trial.
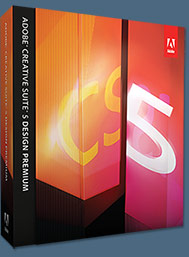 Adobe Creative Suite 5 Design Premium
Adobe Creative Suite 5 Design Premium software gives you fresh new creative tools, along
with the ability to deliver ideas faster in print and create interactive content without writing
code. Plus Design Premium integrates with Adobe CS Live online services to maximize
your design time by streamlining critical nondesign tasks.
Adobe Creative Suite 5 Design Premium combines Adobe InDesign CS5, Photoshop CS5 Extended, Illustrator CS5, Flash CS5 Professional, Dreamweaver CS5, Fireworks CS5, and Acrobat Pro with additional tools and services. Download a free CS5 Design Premium 30 day trial.
Photoshop CS5 Tutorials & CS5 Resources
See our Photoshop CS5 Resource Center for Free Photoshop CS5 Tutorials, and the Free Photoshop CS5 Trial Download. See our Photoshop CS4 Resource Center for Free Photoshop CS4 Tutorials.
![]()
Exclusive 15% Discount On All Topaz Plugins - Use Coupon Code PHOTOSHOPSUPPORT - Includes Bundles And Upgrades
 Enter our exclusive discount coupon code PHOTOSHOPSUPPORT during the checkout process at Topaz Labs for an instant 15% discount on any Topaz product, including bundles and upgrades.
Topaz Labs Photoshop plug-ins are specifically designed to expand a photographer's creative toolbox by harnessing powerful image technology developments. Photographers everywhere are now taking advantage of the creative exposure effects, artistic simplification, unique edge manipulation, and top-of-the-line noise reduction offered in Topaz products. The Topaz Photoshop Plugins Bundle is a super powerful Photoshop plugins package that includes the following Topaz products:
Topaz Adjust
Deliver stunning and dynamic images with this uniquely powerful plug-in that features HDR-like abilities and enhances exposure, color and detail.
 Topaz Detail
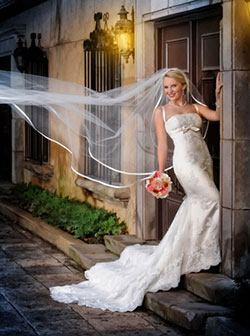
A three-level detail adjustment plug-in that specializes in micro-contrast enhancements and sharpening with no artifacts.
Topaz ReMask
The fastest and most effective masking and extraction program with one-click mask refining.
Topaz DeNoise
Highest-quality noise reduction plug-in that removes the most noise and color noise while preserving the most image detail.
Topaz Simplify
Provides creative simplification, art effects, and line accentuation for easy one-of-a-kind art.
Topaz Clean
Take control of the detail depth of your images with extensive smoothing, texture control and edge enhancement tools.
Topaz DeJPEG
Drastically improves the quality of web images and other compressed photos.
Learn more about the Topaz Photoshop Plugins Bundle. Download a free trial version.
![]()
Exclusive onOne Software 15% Instant Discount Coupon
 Enter our exclusive discount coupon code - PSSPPT06 - during the checkout process at onOne Software for an instant 15% discount on any onOne product. This includes Genuine Fractals and their amazing Photoshop Plug-In Suite.
OnOne’s new Plug-In Suite solves six of the most frequent problems photographers will encounter in Photoshop. This suite has been granted American Photos Magazine’s Editor’s Choice award for Top Image Editing Software. The Plugin Suite includes:
Genuine Fractals Pro is renowned by both photographers and printers for its finesse at increasing images to more than ten times their original size while maintaining the sharpness and detail you started with. Think of this as the industry standard for image resizing.
Mask Pro is used to remove the tough stuff — such as hair, smoke and glass — while retaining the fine detail. You choose what colors to keep, then paint away what you don’t need.
 PhotoTools Pro packs hundreds of high-calibre photographic effects into one user-friendly plug-in. It’s fast and easy to use. Gives your photos that pro quality look.
PhotoFrame Pro lets you enhance your pictures with hundreds of such design effects, or simply drop your image into a pre-fab layout in Photoshop, Lightroom or Aperture.
FocalPoint helps to control focus and minimize visual noise. Draw the eye to specific points in your images by using selective focus, depth-of-field and vignette effects.
PhotoTune lets you can compare images side-by-side and easily color correct and enhance them. PhotoTune optimizes the dynamic range, color and sharpness of your image without the need to know all the complicated controls in Photoshop like levels and curves.
Simply enter our exclusive discount coupon code - PSSPPT06 - during the checkout process at onOne Software for an instant 15% discount on any onOne product.
![]()
Nik Software 15% Instant Discount - Exclusive 15% Coupon
Enter our exclusive discount coupon code - NIKPSS - during the checkout process at Nik Software for an instant 15% discount on any Nik Software product. This exclusive discount coupon code can be applied to all the latest Nik Software Photoshop plugins, including Silver Efex Pro, Color Efex Pro, Viveza, Sharpener Pro, and Dfine.
Color Efex Pro
 52 photographic filters with over 250 effects for professional quality images.
Completely Original. Completely Indispensable.
Nik Software Color Efex Pro filters are the leading photographic filters for digital photography. The award-winning Color Efex Pro filters are widely used by many of today's professional photographers around the world to save time and get professional level results. Whether you choose the Complete Edition, Select Edition, or Standard Edition, you’ll get traditional and stylizing filters that offer virtually endless possibilities to enhance and transform images quickly and easily.
Patented U Point technology provides the ultimate control to selectively apply enhancements without the need for any complicated masks, layers or selections. Control color, light and tonality in your images and create unique enhancements with professional results. With 52 filters and over 250 effects found in Color Efex Pro, you can perform high quality retouching, color correction, and endless creative enhancements to your photographs. Download a free Trial version.
Viveza
 The most powerful tool to selectively control color and light in photographic images without the need for complicated selections or layer masks.
Two of the most important factors in creating great photography are color and light. Mastering the art of selectively correcting or enhancing each of these is now possible for every photographer without the need for complicated masks or selections, or expert-level knowledge of Photoshop. Integrating award-winning U Point technology, Viveza is the most powerful and precise tool available to control light and color in photographic images.
U Point powered Color Control Points, placed directly on colors or objects in an image (such as sky, skin, grass, etc.), reveal easy-to-use controls that photographers can use to quickly adjust brightness, contrast or color in a fraction of the time needed by other tools. With Viveza you’ll spend more time shooting photographs and save hours of image editing. Download a free Trial version.
Silver Efex Pro
 Complete power and control to create professional quality black and white images in one convenient tool.
Silver Efex Pro from Nik Software is the most powerful tool for creating professional quality black and white images from your photographs. For the first time, all the advanced power and control required for professional results have been brought together in one convenient tool.
Featuring Nik Software’s patented U Point technology to selectively control the tonality and contrast of the image, Silver Efex Pro includes advanced imaging algorithms to protect against unwanted artifacts, a comprehensive collection of emulated black and white film types, a variable toning selector for adding traditional toning techniques, over 20 one-click preset styles, and a state-of-the-art grain reproduction engine that help produce the highest quality black and white images possible from your color images while providing more freedom to experiment. Download a free Trial version to use Silver Efex Pro.
Enter our exclusive discount coupon code - NIKPSS - during the checkout process at Nik Software for an instant 15% discount. This exclusive discount coupon code can be applied to all the latest Nik Software Photoshop plugins, including Silver Efex Pro, Color Efex Pro, Viveza, Sharpener Pro, and Dfine.
![]()
Photoshop Masking Plugin Fluid Mask - Exclusive Instant Discount
 The 4 1/2 out of 5 star review of Fluid Mask at MacWorld begins by saying that this "Photoshop plug-in takes the pain out of extracting backgrounds," and goes on to recommend the latest version, stating that "Fluid Mask is a very effective tool for separating objects from their backgrounds. It offers a variety of useful features for tackling almost any difficult image, from wispy hair to complex foliage. Online video tutorials and live training sessions help ease the learning curve."
Our friends at Vertus, the makers of Fluid Mask Photoshop Plugin, have set up a special exclusive discount for PhotoshopSupport.com. Go to our Fluid Mask page for a special, exclusive discount link.
Fluid Mask is designed for photographers, image editors, graphic designers and all those who take digital image editing seriously. In a streamlined interface and workflow, Fluid Mask instantly shows key edges in the image and provides comprehensive easy to use tools that work with difficult-to-see edges and tricky areas like trees & lattices. Fluid Mask will also preserve all-important edge information for a professional quality cut out. Go to our Fluid Mask page for more info.
![]()
lynda.com Online Training Library - View Free Video Clips
 Subscriptions to the lynda.com Online Training Library provide anytime access to tens of thousands of video tutorials covering Photoshop, Illustrator, Dreamweaver, web design, digital imaging, 3D, digital video, animation, and many other topics. View free video clips.
For less than a dollar a day, members have the opportunity to stay current and keep skills sharp, learn innovative and productive techniques, and gain confidence and marketability - all at their own pace. Premium subscriptions include instructors’ exercise files so that members can follow along with the exact examples onscreen. Customers learn at their own pace and may stop, rewind, and replay segments as often as necessary. View some free video clips (high resolution).
![]()
Did You Know You Could Create An Entire Website In Photoshop?
SiteGrinder Photoshop Plugin - Create Websites Instantly
 There often seems to be a strict division of labor within the world of web design and development. Creative professionals tend to stick to the Photoshop domain, while those well-versed in scripting are left to the task of implementing their work. Indeed, the two realms are quite different from each other, to which any of us even vaguely familiar with either can easily attest.
Essentially, Photoshop is a no-holds-barred design studio, offering the artist a seemingly endless array of creative options. On the other hand, HTML, CSS, Java and the like follow strict rules of engagement, requiring the developer to take any number of esoteric concerns into consideration in order to ensure that designs are properly displayed on the web.
Turn Photoshop Into A Complete Web Design Tool
SiteGrinder seeks to bridge this gap between design and development. Basically, SiteGrinder turns Photoshop into an easy-to-use and fully functional web design tool. With SiteGrinder, designers will now have the freedom to totally let their creativity loose and then, without skipping a beat, transfer their designs to the web. Bringing esthetic concerns together with more practical considerations, SiteGrinder is an amazingly powerful tool that would make a fantastic addition to any web designer's bag of tricks. Mac OS X and Windows versions of the SiteGrinder unlockable demo are available now via download.
![]()
Photoshop CS4 Essential Skills - By Mark Galer And Philip Andrews
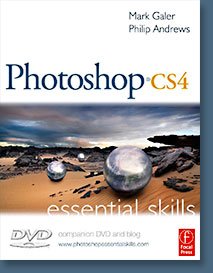 Brimming with beautiful pictures, Photoshop CS4 Essential Skills guides you through a project-based, progressive curriculum so that you can build all the essential skills to enhance photographs creatively and professionally with Photoshop CS4. If you are an aspiring professional or a student learning photography, digital imaging, or design graphics, you'll be amazed at the stunning results you can achieve. A DVD is included free.
The Essential Skills Photography Series from Focal Press uniquely offers a structured learning experience for photographers of all ages, with both the underlying theory and loads of invaluable 'how to' and real-life practice projects - all from the most talented photography practitioners/educators in the world.
Read 2 free sample chapters:
Skin Retouching Tips In Photoshop CS4
Transforming Smart Objects In Photoshop CS4
Find more Photoshop CS4 tutorials on our Photoshop CS4 Tutorials Page.
Read 2 free sample chapters from the Adobe Photoshop CS3 version:
![]() Adjusting Exposure in Adobe Camera Raw CS3
Adjusting Exposure in Adobe Camera Raw CS3
![]() Photoshop CS3 Tutorial High Dynamic Range
Photoshop CS3 Tutorial High Dynamic Range
Find More Adobe Photoshop Books at Amazon.com
Find all the latest bestselling Photoshop books at discount prices at Amazon.com.
![]()


