![]()
![]()
![]() Buy. Download. Create. Get Photoshop now at the Adobe Store.
Buy. Download. Create. Get Photoshop now at the Adobe Store.
![]() Try before you buy. Download any Adobe product for a free 30 day trial.
Try before you buy. Download any Adobe product for a free 30 day trial.
![]()
![]() The Photoshop Blog offers the latest Photoshop news and software updates, Photoshop tips and tutorials, and random thoughts from graphic artist and Photoshop expert Jennifer Apple.
The Photoshop Blog offers the latest Photoshop news and software updates, Photoshop tips and tutorials, and random thoughts from graphic artist and Photoshop expert Jennifer Apple.
![]()
![]()
Using Dreamweaver CS5 with Web Content Management Systems - Adapted From Adobe Dreamweaver CS5 Bible
May 18, 2010
 The following Dreamweaver CS5 tutorial, Using Dreamweaver CS5 with Web Content Management Systems, is adapted from Adobe Dreamweaver CS5 Bible, by Joseph W. Lowery.
The open source nature of the majority of Web CMS applications has greatly enhanced their popularity and usefulness. Not only do the top Web CMS apps—WordPress, Joomla, and Drupal—all enjoy their own vast supportive community, a full spectrum of designs and extensions has emerged as a result. Cross-pollination from one platform to another is quite common; a plugin developed for WordPress frequently inspires a Joomla extension and a Drupal module—and vice versa.
These main Web CMS apps share a structural similarity as well. They are all PHP applications that integrate with a MySQL database. Web development environments are also alike: designers can use the same combination of Apache, PHP language, and MySQL database servers to work in WordPress, Joomla, or Drupal sites. Ultimately, all combine a great many files—a mix of HTML, CSS, JavaScript, and PHP—to dynamically construct their pages, rendered by the browser and presented to the user.
It is this consistent architecture that allows Dreamweaver to work efficiently with a range of CMS applications. The same mechanism is used to discover dynamically related files and navigate directly to styling code regardless of the CMS app. It’s important to realize that the primary goal of CMS applications is to provide user-driven site maintenance, not site creation. The savvy Web designer has a vital role to play in the initial design and on-going customization of any CMS-based site.
Working with WordPress
 WordPress is best known as one of the leading tools for creating and maintaining blogs. Blogs are, of course, composed of a number of individual posts combined with static content to display about the author information and contact details. It’s an easy leap from displaying a series of blog posts on a personal interest to rendering a series of articles in a university’s newspaper or news items concerning the workings of a diplomatic post—all of which is possible, and was done, with WordPress.
Note: although the balance of this article is specifc to Wordpress, the same essential techniques apply to other php-driven CMS applications, such as Drupal and Joomla for installing, integrating with a site, and modifying in Dreamweaver.
A WordPress site comprises content pulled from a MySQL database and presented in a series of templated pages that, overall, are referred to as theme. A WordPress theme, in turn, is made up of PHP files styled with HTML and CSS, frequently combined with JavaScript widgets for expanded functionality. One of the hallmarks of WordPress is the large number of themes available and how easy it is to change from one theme to another. Modifying a specifc theme in WordPress alone can be challenging; luckily this task is made far easier with Dreamweaver.
WordPress may seem overwhelming in its capabilities and complexity, so it’s important to keep in mind that, at its heart, it’s just another PHP application. And, as such, WordPress can be hosted on a site-by-site basis, which makes it an ideal platform for Web designers and developers to share with their clients.
The typical WordPress structure will look very familiar to the modern Web designer. The initially displayed page, index. php, combines a header, sidebar, and footer with the main content area. WordPress code often combines standard HTML with PHP code to pull together the required elements. For example, here’s how the default WordPress theme, Kubrick, defnes the header:
<div id=”header” role=”banner”>
<div id=”headerimg”>
<h1><a href=”<? php echo get_option(‘home’); ?>/”><? php bloginfo(‘name’); ?></a></h1>
<div class=”description”><? php bloginfo(‘description’); ?>
</div> </div>
</div>
Here, a <div> tag with an ID of header encloses another <div>, which holds the header image. In the default template, the header “image” consists of an <h1> tag, which is taken from the name of the site (or blog), and a final <div> with the custom-defined description. Put it all together and a site with the name “Happy Site” and description “The Happiest Site on Earth” renders, as shown below.
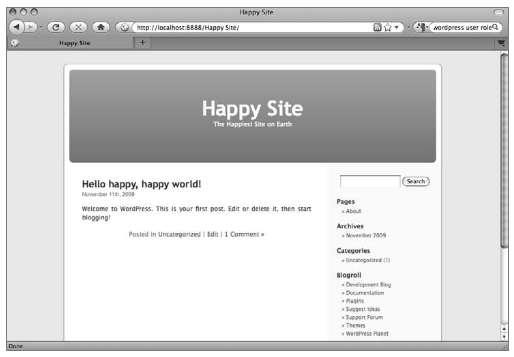
A combination of HTML and custom PHP function calls are used to render the header.
You can use the IDs, tags, and classes to style the WordPress elements however you like. For example, to change the look of the site name in the header, you would use Dreamweaver to change properties for the #headerimg h1 selector.
In the next section, you’ll see how to set up and install WordPress on a local development system such as a Dreamweaver site.
Installing WordPress
One of the features that places WordPress among the most frequently used Web CMS apps is its quick and easy installation. Integrating WordPress into Dreamweaver is just as straightforward. Both procedures, however, require that PHP and MySQL servers be in place and up and running.
Tip: Many developers are finding that all-in-one development packages such as XAMPP for Windows and MAMP for Macs provide a simple route to follow. Both products install and set up an apache Web server, php language server, and MySQL database server. Additional, necessary tools, such as phpMyadmin, are also added and easily accessible. You can fnd XAMPP here and MAMP here.
Once your development environment is working properly, follow these steps to install WordPress and set up a WordPress site in Dreamweaver:
- Open your browser and go to wordpress.org/download.
- Click the Download WordPress (version number) button. As of this writing, the current version is WordPress 2.9.2.
- When the download is finished, double-click to unzip the files.
- Open the just-generated folder and copy all the files. Now you’re ready to create the folder that will contain your local site.
- Make a new folder in the root of your Web server. On PCs, the Web server is located at C:\inetpub\wwwroot; on Macs it is located at [Main Drive]:Users:[username]:Sites.
- Paste all the files you copied in Step 4 into the new site folder.
The next series of steps will confgure your WordPress installation using the local Web server.
- In your browser, enter the Web address to your new site folder. For example, if the site folder name was happy_site, the Web address for a MAMP installation would be http://localhost: 8888/happy_site/. The numbers following localhost refer to the port used by MAMP.
- WordPress detects that this is a new installation and notes that a confguration file named wp-config.php file is needed. Click the Create a Confguration File button. On the next screen, WordPress tells you of the database information you’ll need. Before you proceed, let’s set up the database.
- On a MySQL administrative program, such as phpMyAdmin, create a new database corresponding to the name of your site or client. In the illustration below, I’ve used phpMyAdmin to create a new database called newbienews.
Tip: Both MAMP and XAMPP install phpMyAdmin by default. If you set up your development system using another method, you can download phpMyAdmin. With the database created, you’re ready to complete the WordPress configuration.
- Return to your browser and click the Let’s Go button. WordPress requests needed information for making the proper database connection.
- On the next screen, enter the name of the database you just created, the username and password, and the host (typically localhost). Leave the other values as is and click Submit.
- If WordPress can communicate with your database, you’re ready to complete the operation—click Run the Install.
- On the next screen, enter the name of your site or blog in the Blog Title feld and your e-mail address where indicated. If you want to list your blog with search engines, keep that option selected. Click Install WordPress. If all goes well, WordPress presents you with a username (admin) and program-generated password.
- Copy the password—you’ll be able to change it to a more memorable one shortly—and click Log In.
- Enter admin in the User name field and paste the copied password in the Password feld; click Log In. The WordPress Dashboard is now displayed. It’s best to change your password right away.
- Click the Yes, Take Me to My Profile Page link found in the highlighted box at the top of the page.
- On the bottom of the Profole page, enter a new entry in the New Password feld. Repeat the password to confrm and click Update Profile.
- Click the Visit Site link, located on the upper-left of the Dashboard, to view your WordPress site with the default template (see below).
Your WordPress confguration is complete, now it’s time to make the Dreamweaver connection!
- In Dreamweaver, choose Site > New Site.
- When the Site Setup dialog box appears, enter the name of your site and browse to the folder previously created in the local Web server root. Because Dreamweaver will need a local Web address to render the pages in Live View, let’s enter that now.
- Expand the Advanced Settings section and choose the Local Info category.
- In the Web address feld, enter the same address used in the browser to enter the WordPress site. In my example, it’s http://localhost:8888/newbienews/.
- Choose the Servers category.
- Click Add a New Server (+).
- In the Basics tab, enter a name for your server in the Server Name feld. A standard choice would be Staging.
- Choose Local/Network from the Connect Using list.
- Click the Remote Folder Browse icon and navigate to the site root folder containing all the WordPress files.
- Switch to the Advanced tab.
- From the Server Model list in the Staging Server area, choose PHP MySQL and click Save (see below).
- Confirm that the Staging checkbox is selected in the Servers category and click Save.
More congratulations are in order! You’ve successfully connected Dreamweaver to your WordPress site. Now, let’s verify that claim by opening the home page for the site.
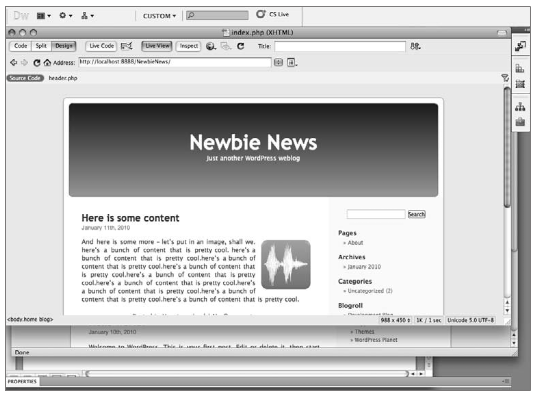
- From the Files panel, open index.php. When the page loads, it appears to be empty in Design view, with very little code displayed in Code view. This is to be expected in CMS-based sites. Because the pages are pieced together from a myriad of related files, you won’t see anything until they are processed by a properly set up server and application—which, in Dreamweaver you can do with the click of a button.
- Click Live View. The same page displayed in the browser as the home page for your WordPress site is now rendered in Dreamweaver, as shown in below. You’re now ready to begin exploring your CMS application in the next section.
Discovering Dynamically Related Files
Related files are external files linked to the HTML source code, either directly or indirectly through another linked file. For example, you might link to an external style sheet, which, in turn, imports another external style sheet. Both CSS files would appear automatically in the Related Files bar located just under the document tab, as would any associated JavaScript or server-side includes.
Note: In Dreamweaver CS5, the related Files feature exploded in functionality by extending its ability to display dynamically related files as well as those statically related. You can’t appreciate the true power and usefulness of the enhanced related Files feature until you open a page from a CMS application such as WordPress in Dreamweaver. Once the new related Files feature has worked its magic, it’s possible you’ll have direct access to literally hundreds of related files.
Open any PHP page and the Info bar appears at the top of Document Window with a message—This page may have dynamically related files that can only be discovered by the server—followed by two links, Discover and Preferences (see below). If you click Discover, Dreamweaver initially warns you that to complete the operation, it will run all the included server-side scripts and asks if you’d like to Continue. Once you’re comfortable with the procedure, feel free to select the Do Not Show Again option. After Dreamweaver has processed the page, it displays any associated files it finds in the Related Files bar. Click on any named file to display it in Code view (or the Code side of Split view if you are in Display view).

The Info bar appears, glowing to attract your attention, to help you discover dynamically related files.
Tip: If you select a related file that has been checked out, a Checkout link is shown in the Info bar; click the link to check out the file and display it. Likewise, if you select a related file that is not stored locally, a Get link is shown; click the link to retrieve the file. You can only get files that are stored on a server to which you have access.
If you click the Preferences link in the Info bar, you’ll have an opportunity to automatically discover dynamically related files. I prefer to keep this option at the default manual settings so I get the related files only when I need them.
To keep you from being overwhelmed with related files, Dreamweaver includes a powerful fltering mechanism. To access the Filter Related Files options, click the funnel icon on the far right of the Related Files bar. A drop-down list of file types—each selected with a checkmark—is displayed. This list is generated on-the-fly by Dreamweaver and represents all of the editable file types associated with the source code. To exclude a file type from the related files list, clear the checkmark; to include it, re-check the file type. For example, if I wanted to just see the external style sheets associated with a page, I would toggle the checkmark off all file types except .css. To access all the files again, choose Show All File Types.
Quite often, you’ll need to be more specific in your fltering. If you’re looking for a PHP file dealing with the header, you might limit the filter to display only PHP documents and still have 60 or so files to wade through. The Custom Filter option makes it possible to filter by full or partial filename. If you know the filename is header.php, you can enter that directly in the Custom Filter dialog box. If, on the other hand, you know only that the filename includes the word “header,” you can use asterisks as wildcards to locate the file; in this situation, you would enter *header*.php. If Dreamweaver cannot find any files that match your custom filter, you’ll see an alert box informing you that Dreamweaver cannot apply a filter that results in no related files.
Tip: Multiple custom flters can be applied at once by separating each flter with a semicolon, like this: *head*; main*; style.css.
Customizing your WordPress Site
Now that you’ve set up your WordPress site in Dreamweaver and understand how to use the Related Files feature, you’re ready to begin customizing your site. Modifying the CSS within WordPress without Dreamweaver is a code-based task and requires a seemingly endless series of trial-and-error attempts. Once the WordPress site has been integrated in Dreamweaver, however, you can customize the CSS quickly and easily through the CSS Styles panel. Of course, if you’d prefer to edit the CSS style sheet by hand, you also have that option.
To show you how it works, let’s change a number of CSS properties from their settings in the default WordPress template.
With index.php from the WordPress site open, click Discover in the Info bar to display the dynamically related files.
When Dreamweaver informs you that it will execute all scripts contained in the pages, click Yes. Dreamweaver quickly processes the pages on your local server and displays the results in the Related Files bar. As there are more files than can fit on the screen, scroll bars appear on either side as well as a Show More button. Click Show More to list all the related files in a drop-down list.
To see the rendered page, click Live View. The home page of the WordPress site is displayed. In Dreamweaver CS5, the CSS Styles panel is accessible in Live View, so you can change rules and properties and have an immediate effect. To demonstrate this, let’s change the page’s font-family.
In the CSS Styles panel, switch to Current mode. Current mode will display whatever CSS rules and properties apply to the currently selected elements on the page.
In the Properties panel, choose Palatino Linotype, Book Antiqua, Palatino, serif from the font-family list.
Notice that the font-family change takes place in Live View immediately. Not only does this change take place on this page but on all associated pages in the site that use the same style sheet. To verify this, you can use Dreamweaver’s Follow Link capabilities.
Press Ctrl (Command) and click About under the Pages category in the sidebar. The About page is loaded with the modifed font-family.
If you’d prefer to navigate more naturally through your site, choose Follow Links automatically from the Live View Options menu button on the Browser navigation toolbar. To return to the previous page, click either the Back button or the Home button in the Browser Navigation bar.
If (or should you be like me, when) you make a CSS change you don’t want to keep, you need to open the style sheet containing the modifed rule and press Ctrl+Z (Command+Z) or choose Edit > Undo. CSS styles are just the beginning of what can be modifed in a WordPress site. In the next section, I’ll show you how to change existing graphics and insert new images.
Adjusting Graphics in a WordPress Site
Adding images to a WordPress blog post is very straightforward: simply choose Insert Image in the WYSIWYG editor, select a local file to upload and set any desired properties. WordPress handles all the coding and file transfer to the server. Should you need to incorporate graphics for your layout, however, you’ll need to take special steps beyond the standard Dreamweaver procedure.
Before we cover adding new images, however, a couple of more common techniques need to be addressed. A good many designers working on WordPress sites start with an existing template and modify it to fit their needs. Part of the modifcation process is customizing or replacing existing images. The CSS Styles panel is an excellent tool for discovering what images are being used and where they are located. Let’s say, for example, you wanted to change the header’s blue background in the default theme. The best technique for identifying which image is used to create the background is to enter into Live View, open the CSS Styles panel in Current mode, click into the header, and then choose from the Tag Selector. The applicable CSS rules are displayed in the CSS Styles panel, including one for the background property. If you select the background property, you’ll see that the path to the graphic used is images/kubrickheader.jpg, shown below.
Now, you can open that image in a graphics program such as Photoshop or Fireworks and change the blue background as you see fit, for example to a more dramatic orange and purple gradient. Save the changed file with the same filename in the same location and refresh the Live View page to display the revised header, shown below.
A modified file with the same filename is a quick and easy way to customize graphics in a WordPress design.
Another approach is to get the dimensions of the image currently used and create an entirely new graphic saved under a new name. If you follow this course, you’ll need to update the background or background-image value to point to the new image.
But what about entirely new images? To add a new image in a WordPress theme, you’ll need to incorporate some custom PHP coding. For example, let’s say you wanted to replace the site name and description used in the default template header with a company logo, linked to the home page. The first task is to locate the code that generates this text. As you might expect, this code can be found in the header.php file. Use the Related Files Custom Filter feature to quickly locate that file.
Once you’ve found and opened header.php, you’ll see the code for the header section at the bottom of the page:
<div id=”header” role=”banner”>
<div id=”headerimg”>
<h1><a href=”<? php echo get_option(‘home’); ?>/”><? php
bloginfo(‘name’); ?></a></h1>
<div class=”description”><? php bloginfo(‘description’); ?></div>
</div>
</div>
The PHP function on the third line inserts the name of the blog in an <h1>, surrounded by a link to the home page, which is also called by PHP function:
<h1><a href=”<?php echo get_option(‘home’); ?>/”><?php bloginfo(‘name’); ?>
</a></h1>
To replace the name of the blog with a logo image, you would delete the <h1> tag pair as well as the following PHP function call:
<? php bloginfo(‘name’); ?>
Within the <a> tag pair, insert a standard <img> tag that references your logo:
<img src=”images/logo.png” width=”189” height=”203” alt=”Mark of the Joe” />
In order to find an image in a given theme, you’ll need to add a bit of PHP code in the src attribute that calls the URL of the currently applied template or theme. Your image tag will now look like this:
<img src=”<? php bloginfo(‘template_url’); ?>/images/logo.png” width=”189” height=”203” alt=”Mark of the Joe” />
The additional code has been bolded so you can see what was added. Finally, the fourth line, which sets up a <div> tag that holds the description text, should be removed:
<div class=”description”><? php bloginfo(‘description’); ?></div>
When you’re done, the revised header code will look like this:
<div id=”header” role=”banner”>
<div id=”headerimg”>
<a href=”<? php echo get_option(‘home’); ?>/” > <img src=”<? php
bloginfo(‘template_url’); ?>/images/logo.png” width=”189” height=”203”
alt=”Mark of the Joe” /></a>
</div>
</div>
Turn on Live View once more to review the results of your combined graphic and coding efforts, as shown below.

Inserting a new image requires a combination of HTML and PHP coding.
Summary
The capability of Dreamweaver CS5 to render complex documents comprising hundreds of external files makes it a great tool for working with sites created for Web content management systems such as WordPress. Use Dreamweaver to discover dynamically related files so you can modify CSS styles, change existing images or insert new ones, and supply the necessary code to customize CMS themes. Key points to remember when working with Web CMS applications in Dreamweaver include:
- Web content management systems are among the fastest-growing Web design techniques because of the ease of site maintenance and open source nature of the leading applications, such as WordPress, Joomla, and Drupal.
- Once you have a proper development environment established with a Web server, PHP language server, and MySQL database server, WordPress is fairly easy to install—and even easier to integrate into a Dreamweaver site.
- CMS apps such as WordPress are highly structured and use numerous external files to construct a page. Dreamweaver can discover these files and make them available in the Related Files bar for your inspection or modifcation.
- When viewing a CMS page in Dreamweaver’s Live View, you can modify any CSS rule or property; all changes are applied to the styles.css file.
- Existing images can be modifed and then resaved with the original filename for a quick transformation. Another technique to update the current theme is to replace one background-image URL in the CSS Styles panel with another.
- Inserting a new image required a combination of HTML and PHP coding. In addition to the standard <img> tag, the src attribute must include PHP code pointing to the current theme file location.
Adapted with permission from Adobe Dreamweaver CS5 Bible (Wiley) by Joseph W. Lowery. Copyright © 2010.
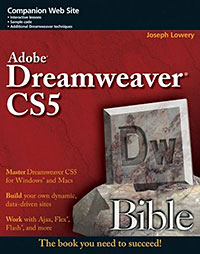
Adobe Dreamweaver CS5 Bible
Packed with hands-on instruction and step-by-step tutorials, the Adobe Dreamweaver CS5 Bible has everything you need to harness the incredible power of this amazing Web development tool. Starting with Dreamweaver basics, expert author and Adobe guru Joe Lowery (Adobe CS4 Web Workflows and Adobe Dreamweaver CS4 Bible) guides you through the ins-and-outs of Dreamweaver showing you how to build dynamic, data-driven sites in no time.
- Details how to use Dreamweaver with PHP, ASP.NET, ColdFusion and more to access and work with live backend data
- Describes designing for and working with popular Content Management Systems (CMS) including WordPress, Joomla, and Drupal
- Includes how-to's on using HTML, CSS, and JavaScript in Dreamweaver to build attractive dynamic websites, as well as comprehensive information on creating and working with both design and code templates to provide consistency across a web site with minimal effort
Dreamweaver has established itself as one of the leading Web development tools and Adobe Dreamweaver CS5 Bible is the must-have learning tool and reference guide for any Web developer using Dreamweaver.
![]() Buy Directly From Adobe's Online Store
Buy Directly From Adobe's Online Store
Find upgrade options and Creative Suite deals at the Adobe USA Store. Visit the Adobe Special Offers Page to find the latest offers. Get up to 80% off at the Adobe Education Store.
Adobe Dreamweaver CS5 Tutorials & Resources
See our Dreamweaver CS5 Resource Center for free Dreamweaver CS5 Tutorials & Videos, and the free Dreamweaver CS5 30-day trial download.
posted by Jennifer Apple | permalink | RSS feed | bookmark | comment | twitter
![]()
![]()
Photoshop CS5 & Photoshop CS5 Extended - Best Deals From Adobe
 Adobe Photoshop CS5 delivers breakthrough capabilities to help you create images with impact. Refine your
images with reengineered photography tools for removing noise, adding grain, and creating high dynamic
range (HDR) images. Get precise results when making complex selections. Remove any image element and
see the space fill in almost magically. Paint with naturally textured brushstrokes and realistic color blends. Learn more about Photoshop CS5.
Adobe Photoshop CS5 delivers breakthrough capabilities to help you create images with impact. Refine your
images with reengineered photography tools for removing noise, adding grain, and creating high dynamic
range (HDR) images. Get precise results when making complex selections. Remove any image element and
see the space fill in almost magically. Paint with naturally textured brushstrokes and realistic color blends. Learn more about Photoshop CS5.
Adobe Photoshop CS5 Extended software helps you create the ultimate images
for print, the web, and video. Enjoy all the state-of-the-art editing, compositing,
and painting capabilities in industry-standard Photoshop CS5, and experience
fast performance thanks to cross-platform 64-bit support. Also create 3D extrusions
for logos, artwork, and motion graphics; edit 3D objects with advanced tools; and create and enhance motion-based content. Learn more about Photoshop CS5 Extended.
Find CS5 upgrade options and Creative Suite 5 deals at the Adobe Store. See CS5 pricing in UK currency at the Adobe UK Store. Visit the Adobe Special Offers page to find the latest deals. Save 80% on Adobe Student Editions. Try before you buy — download a free Photoshop CS5 trial.
 Adobe Creative Suite 5 Design Premium
Adobe Creative Suite 5 Design Premium software gives you fresh new creative tools, along
with the ability to deliver ideas faster in print and create interactive content without writing
code. Plus Design Premium integrates with Adobe CS Live online services to maximize
your design time by streamlining critical nondesign tasks.
Adobe Creative Suite 5 Design Premium combines Adobe InDesign CS5, Photoshop CS5 Extended, Illustrator CS5, Flash CS5 Professional, Dreamweaver CS5, Fireworks CS5, and Acrobat Pro with additional tools and services. Download a free CS5 Design Premium 30 day trial.
Photoshop CS5 Tutorials & CS5 Resources
See our Photoshop CS5 Resource Center for Free Photoshop CS5 Tutorials, and the Free Photoshop CS5 Trial Download. See our Photoshop CS4 Resource Center for Free Photoshop CS4 Tutorials.
![]()
Exclusive 15% Discount On All Topaz Plugins - Use Coupon Code PHOTOSHOPSUPPORT - Includes Bundles And Upgrades
 Enter our exclusive discount coupon code PHOTOSHOPSUPPORT during the checkout process at Topaz Labs for an instant 15% discount on any Topaz product, including bundles and upgrades.
Topaz Labs Photoshop plug-ins are specifically designed to expand a photographer's creative toolbox by harnessing powerful image technology developments. Photographers everywhere are now taking advantage of the creative exposure effects, artistic simplification, unique edge manipulation, and top-of-the-line noise reduction offered in Topaz products. The Topaz Photoshop Plugins Bundle is a super powerful Photoshop plugins package that includes the following Topaz products:
Topaz Adjust
Deliver stunning and dynamic images with this uniquely powerful plug-in that features HDR-like abilities and enhances exposure, color and detail.
 Topaz Detail
A three-level detail adjustment plug-in that specializes in micro-contrast enhancements and sharpening with no artifacts.
Topaz ReMask
The fastest and most effective masking and extraction program with one-click mask refining.
Topaz DeNoise
Highest-quality noise reduction plug-in that removes the most noise and color noise while preserving the most image detail.
Topaz Simplify
Provides creative simplification, art effects, and line accentuation for easy one-of-a-kind art.
Topaz Clean
Take control of the detail depth of your images with extensive smoothing, texture control and edge enhancement tools.
Topaz DeJPEG
Drastically improves the quality of web images and other compressed photos.
Learn more about the Topaz Photoshop Plugins Bundle. Download a free trial version.
![]()
Exclusive onOne Software 15% Instant Discount Coupon
 Enter our exclusive discount coupon code - PSSPPT06 - during the checkout process at onOne Software for an instant 15% discount on any onOne product. This includes Genuine Fractals and their amazing Photoshop Plug-In Suite.
OnOne’s new Plug-In Suite solves six of the most frequent problems photographers will encounter in Photoshop. This suite has been granted American Photos Magazine’s Editor’s Choice award for Top Image Editing Software. The Plugin Suite includes:
Genuine Fractals Pro is renowned by both photographers and printers for its finesse at increasing images to more than ten times their original size while maintaining the sharpness and detail you started with. Think of this as the industry standard for image resizing.
Mask Pro is used to remove the tough stuff — such as hair, smoke and glass — while retaining the fine detail. You choose what colors to keep, then paint away what you don’t need.
 PhotoTools Pro packs hundreds of high-calibre photographic effects into one user-friendly plug-in. It’s fast and easy to use. Gives your photos that pro quality look.
PhotoFrame Pro lets you enhance your pictures with hundreds of such design effects, or simply drop your image into a pre-fab layout in Photoshop, Lightroom or Aperture.
FocalPoint helps to control focus and minimize visual noise. Draw the eye to specific points in your images by using selective focus, depth-of-field and vignette effects.
PhotoTune lets you can compare images side-by-side and easily color correct and enhance them. PhotoTune optimizes the dynamic range, color and sharpness of your image without the need to know all the complicated controls in Photoshop like levels and curves.
Simply enter our exclusive discount coupon code - PSSPPT06 - during the checkout process at onOne Software for an instant 15% discount on any onOne product.
![]()
Nik Software 15% Instant Discount - Exclusive 15% Coupon
Enter our exclusive discount coupon code - NIKPSS - during the checkout process at Nik Software for an instant 15% discount on any Nik Software product. This exclusive discount coupon code can be applied to all the latest Nik Software Photoshop plugins, including Silver Efex Pro, Color Efex Pro, Viveza, Sharpener Pro, and Dfine.
Color Efex Pro
 52 photographic filters with over 250 effects for professional quality images.
Completely Original. Completely Indispensable.
52 photographic filters with over 250 effects for professional quality images.
Completely Original. Completely Indispensable.
Nik Software Color Efex Pro filters are the leading photographic filters for digital photography. The award-winning Color Efex Pro filters are widely used by many of today's professional photographers around the world to save time and get professional level results. Whether you choose the Complete Edition, Select Edition, or Standard Edition, you’ll get traditional and stylizing filters that offer virtually endless possibilities to enhance and transform images quickly and easily.
Patented U Point technology provides the ultimate control to selectively apply enhancements without the need for any complicated masks, layers or selections. Control color, light and tonality in your images and create unique enhancements with professional results. With 52 filters and over 250 effects found in Color Efex Pro, you can perform high quality retouching, color correction, and endless creative enhancements to your photographs. Download a free Trial version.
Viveza
 The most powerful tool to selectively control color and light in photographic images without the need for complicated selections or layer masks.
Two of the most important factors in creating great photography are color and light. Mastering the art of selectively correcting or enhancing each of these is now possible for every photographer without the need for complicated masks or selections, or expert-level knowledge of Photoshop. Integrating award-winning U Point technology, Viveza is the most powerful and precise tool available to control light and color in photographic images.
U Point powered Color Control Points, placed directly on colors or objects in an image (such as sky, skin, grass, etc.), reveal easy-to-use controls that photographers can use to quickly adjust brightness, contrast or color in a fraction of the time needed by other tools. With Viveza you’ll spend more time shooting photographs and save hours of image editing. Download a free Trial version.
Silver Efex Pro
 Complete power and control to create professional quality black and white images in one convenient tool.
Silver Efex Pro from Nik Software is the most powerful tool for creating professional quality black and white images from your photographs. For the first time, all the advanced power and control required for professional results have been brought together in one convenient tool.
Featuring Nik Software’s patented U Point technology to selectively control the tonality and contrast of the image, Silver Efex Pro includes advanced imaging algorithms to protect against unwanted artifacts, a comprehensive collection of emulated black and white film types, a variable toning selector for adding traditional toning techniques, over 20 one-click preset styles, and a state-of-the-art grain reproduction engine that help produce the highest quality black and white images possible from your color images while providing more freedom to experiment. Download a free Trial version to use Silver Efex Pro.
Enter our exclusive discount coupon code - NIKPSS - during the checkout process at Nik Software for an instant 15% discount. This exclusive discount coupon code can be applied to all the latest Nik Software Photoshop plugins, including Silver Efex Pro, Color Efex Pro, Viveza, Sharpener Pro, and Dfine.
![]()
Photoshop Masking Plugin Fluid Mask - Exclusive Instant Discount
 The 4 1/2 out of 5 star review of Fluid Mask at MacWorld begins by saying that this "Photoshop plug-in takes the pain out of extracting backgrounds," and goes on to recommend the latest version, stating that "Fluid Mask is a very effective tool for separating objects from their backgrounds. It offers a variety of useful features for tackling almost any difficult image, from wispy hair to complex foliage. Online video tutorials and live training sessions help ease the learning curve."
Our friends at Vertus, the makers of Fluid Mask Photoshop Plugin, have set up a special exclusive discount for PhotoshopSupport.com. Go to our Fluid Mask page for a special, exclusive discount link.
Fluid Mask is designed for photographers, image editors, graphic designers and all those who take digital image editing seriously. In a streamlined interface and workflow, Fluid Mask instantly shows key edges in the image and provides comprehensive easy to use tools that work with difficult-to-see edges and tricky areas like trees & lattices. Fluid Mask will also preserve all-important edge information for a professional quality cut out. Go to our Fluid Mask page for more info.
![]()
Auto FX Plug-in Suite Offers Amazing Photoshop Plugins At A Special Discount Price
 The Auto FX Plug-in Suite provides a comprehensive selection of visual effects from the world's premier developer of Adobe Photoshop Plug-ins. This suite of products works with Photoshop CS, CS2, CS3, CS4 and CS5.
Auto FX Plug-in Suite includes 165 effect filters and thousands of instant effects to improve your images. Purchased separately, the products in this suite are worth over $1,400. By purchasing the Plug-in Suite for $499 you'll save $900.
Create Beautiful Visual Effects with the Auto FX Plug-in Suite
Whether you're working with photos or graphics, text or logos the Plug-in Suite has something to offer. The interface features and work-flow are consistent across each product and let you get rolling along fast. Each control has full-length onscreen tool-tips to guide you along. Each effect is dynamic and does not change the original until you apply it back into Photoshop.
New 64 bit Support
Now you can use the Auto FX Plug-in Suite on 64 bit operating systems like Windows Vista and Windows 7. Read more about the Auto FX Plugin Suite Bundle, or download a free trial.
![]()
Did You Know You Could Create An Entire Website In Photoshop?
SiteGrinder Photoshop Plugin - Create Websites Instantly
 There often seems to be a strict division of labor within the world of web design and development. Creative professionals tend to stick to the Photoshop domain, while those well-versed in scripting are left to the task of implementing their work. Indeed, the two realms are quite different from each other, to which any of us even vaguely familiar with either can easily attest.
Essentially, Photoshop is a no-holds-barred design studio, offering the artist a seemingly endless array of creative options. On the other hand, HTML, CSS, Java and the like follow strict rules of engagement, requiring the developer to take any number of esoteric concerns into consideration in order to ensure that designs are properly displayed on the web.
Turn Photoshop Into A Complete Web Design Tool
SiteGrinder seeks to bridge this gap between design and development. Basically, SiteGrinder turns Photoshop into an easy-to-use and fully functional web design tool. With SiteGrinder, designers will now have the freedom to totally let their creativity loose and then, without skipping a beat, transfer their designs to the web. Bringing esthetic concerns together with more practical considerations, SiteGrinder is an amazingly powerful tool that would make a fantastic addition to any web designer's bag of tricks. Read full Site Grinder review.
Mac OS X and Windows versions of the SiteGrinder unlockable demo are available now via download. SiteGrinder can be ordered from Media Lab's online store.
![]()
lynda.com Online Training Library - View Free Video Clips
 Subscriptions to the lynda.com Online Training Library provide anytime access to tens of thousands of video tutorials covering Photoshop, Illustrator, Dreamweaver, web design, digital imaging, 3D, digital video, animation, and many other topics. View free video clips.
For less than a dollar a day, members have the opportunity to stay current and keep skills sharp, learn innovative and productive techniques, and gain confidence and marketability - all at their own pace. Premium subscriptions include instructors’ exercise files so that members can follow along with the exact examples onscreen. Customers learn at their own pace and may stop, rewind, and replay segments as often as necessary. View some free video clips (high resolution).
![]()
Photoshop CS5 Essential Skills - By Mark Galer And Philip Andrews
 A practical guide to creative image editing, Photoshop CS5: Essential Skills by Mark Galer and Philip Andrews will help you to master the essential features and tools of this awesome software. Broken into three parts to form a structured, self-study guide, the book covers foundation skills and more advanced techniques, with a complete section of step-by-step imaging projects so you can practice your skills and create professional-looking results.
Written by two internationally recognized authors and Adobe Photoshop Ambassadors, this established book and DVD package is fully updated with the latest CS5 features and contains vital information on optimizing photography and digital imaging workflows. Photoshop CS5: Essential Skills includes a DVD with more than 10 hours of movie tutorials and supporting files.
Read 2 free sample chapters:
Refine Edge - Best New Feature in Photoshop CS5 - Tutorial
New To Photoshop CS5 - Merge To HDR Pro - Tutorial
Find more Photoshop CS5
tutorials on our Photoshop CS5 Tutorials Page.
![]()
Photoshop CS4 Essential Skills - By Mark Galer And Philip Andrews
 Brimming with beautiful pictures, Photoshop CS4 Essential Skills guides you through a project-based, progressive curriculum so that you can build all the essential skills to enhance photographs creatively and professionally with Photoshop CS4. If you are an aspiring professional or a student learning photography, digital imaging, or design graphics, you'll be amazed at the stunning results you can achieve. A DVD is included free.
The Essential Skills Photography Series from Focal Press uniquely offers a structured learning experience for photographers of all ages, with both the underlying theory and loads of invaluable 'how to' and real-life practice projects - all from the most talented photography practitioners/educators in the world.
Read 2 free sample chapters:
![]() Skin Retouching Tips In Photoshop CS4
Skin Retouching Tips In Photoshop CS4
![]() Transforming Smart Objects In Photoshop CS4
Transforming Smart Objects In Photoshop CS4
![]() Find more Photoshop CS4 tutorials on our Photoshop CS4 Tutorials Page.
Find more Photoshop CS4 tutorials on our Photoshop CS4 Tutorials Page.
Read 2 free sample chapters from the Adobe Photoshop CS3 version:
![]() Adjusting Exposure in Adobe Camera Raw CS3
Adjusting Exposure in Adobe Camera Raw CS3
![]() Photoshop CS3 Tutorial High Dynamic Range
Photoshop CS3 Tutorial High Dynamic Range
Find More Adobe Photoshop Books at Amazon.com
Find all the latest bestselling Photoshop books at discount prices at Amazon.com.
![]()