![]()
![]()
![]() Get Photoshop at the Adobe Store, or download a free 30 day trial.
Get Photoshop at the Adobe Store, or download a free 30 day trial.
![]()
Create A Faux Holga Effect In Photoshop
September 27, 2010
The Holga is a cheap (US $30) plastic medium format film camera mass-produced in China. Originally manufactured in the early 80’s for the home consumption, it has now gained cult status amongst bohemian western photographers who are drawn to the grunge ‘art’ aesthetic. The camera represents the antithesis of everything that the modern digital camera manufacturers are striving to achieve. If you are looking for edge-to-edge sharpness and color-fidelity then give the Holga a very wide berth. If, however you are looking to create images that are full of ‘character’, but without the hassle of going back to film, then you may like to look into the wonderful, and weird, world of Holga-style imagery and give this Photoshop workflow a spin (no Holga required).
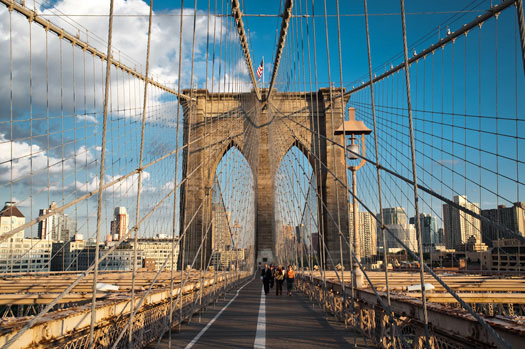
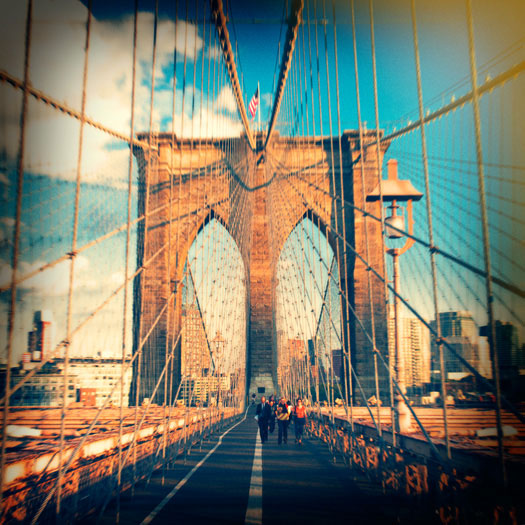
Getting tired of pin-sharp, noise-free, character-free images from your 24 Megapixel Pro DSLR?
Then try this grunge effect to give your images the toy camera aesthetic - think WEIRD – think GRUNGE, think ART! The treatment outlined in this tutorial is also available as an automated Photoshop action that can be downloaded from www.markgaler.com.
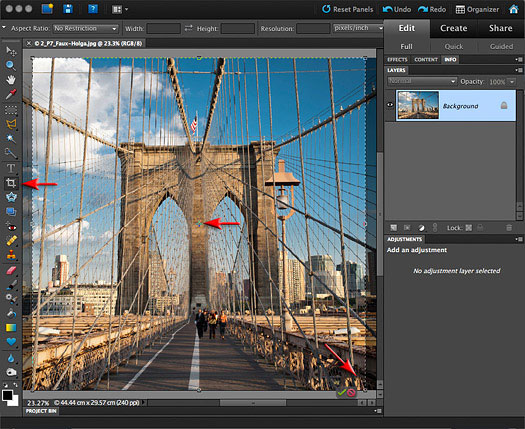
STEP 1
Images produced by the Holga camera are square so grab the Crop Tool from the Tools panel, hold down the Shift key to constrain the crop marquee to a perfect square and drag over the central portion of the start image. Hit the Commit icon or Return/Enter key to get rid of the unwanted pixels.
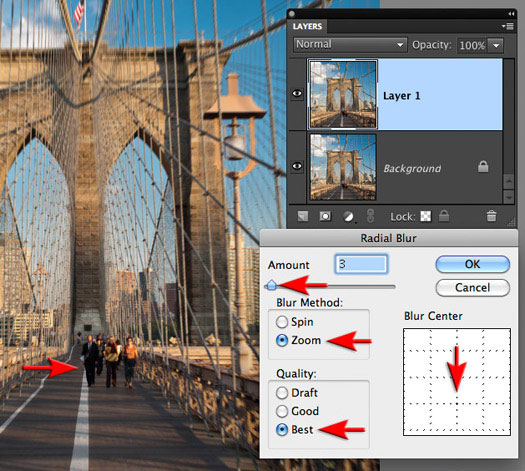
STEP 2
Duplicate the background layer using the keyboard shortcut Ctrl + J (PC) or Command + J (Mac). We will start to degrade the sharpness of your image (the Holga camera has a single simple lens element). With Layer 1 selected in the Layers panel go to Filter > Blur > Radial Blur. In the Radial Blur dialog box set the Amount to 3 and then select the Zoom and Best options. Click where you would like to preserve maximum sharpness in the Blur Center control box (to the right of the Zoom and Best options). There is an element of guesswork in this step but sharpness can be restored later in the process. I have selected the region in the lower centre (where I estimate the pedestrians to be crossing the bridge in the actual image). Select OK to apply the blur to Layer 1.
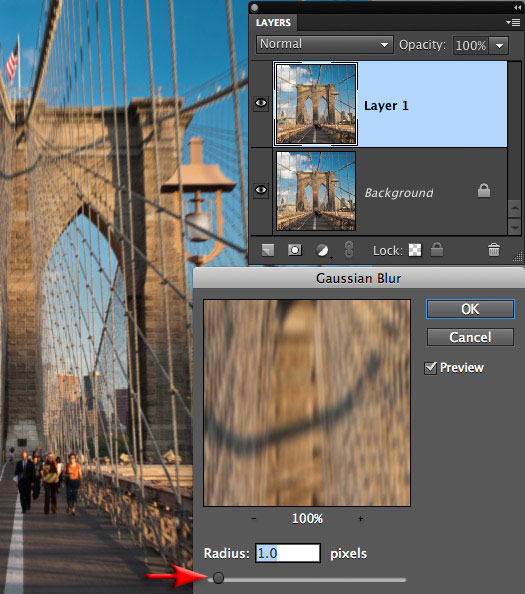
STEP 3
Go to Filter > Blur > Gaussian Blur. Select a Radius of 1.0 pixel and then select OK to apply the blur to Layer 1. Duplicate this blur layer by dragging the layer to the Create a new layer icon in the Layers panel. The next blur is called Diffuse Glow but to make sure the glow is white and not any other color we must set the Foreground and Background Colors to their Default setting (either click on the small Black and White box icon in the Tools panel or press the D key on the keyboard).
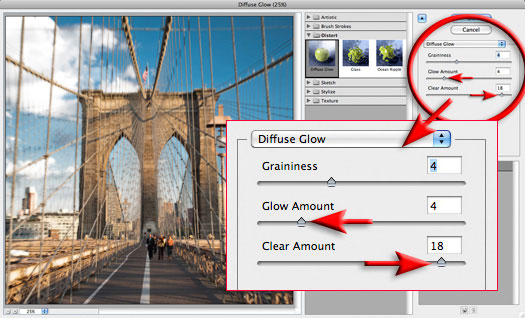
STEP 4
Try setting the Graininess and Glow Amounts to 4 and the Clear Amount to 17 as a starting point. You can increase the Graininess to simulate a high ISO film. Alternatively the grain can be set low in this dialog as we will have more control over how the grain looks if we apply it to a separate layer. Select OK to apply the Diffuse Glow to Layer 1.
STEP 5
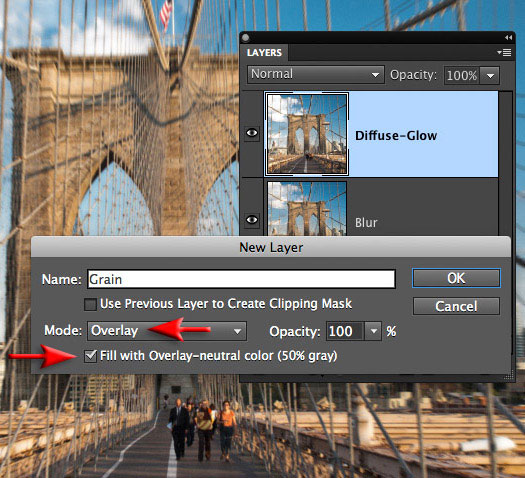
To create a Grain layer, hold down the Alt key (PC) or Option key (Mac) and click on the Create a new layer icon at the base of the Layers panel. Holding down the Alt/Option key while clicking on the icon will open the New Layer dialog. Name the layer ‘Grain’, set the mode to Overlay and check the Fill with overlay-neutral color (50% gray) checkbox. Select OK to create the Layer. The effects of the layer will be invisible at this point in time (courtesy of the blend mode) until the grain is added in the next step.
STEP 6
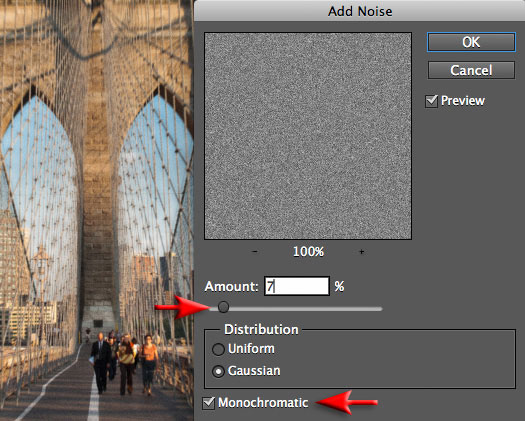
In the Add Noise dialog set the Amount to 7% for a 12-Megapixel image (adjust it higher or lower if you are using a higher- or lower-resolution image). Choose the Gaussian option and select the Monochromatic checkbox before selecting OK to apply the Noise to the Grain layer. Adjust the opacity of the layer if the noise is too prominent.
STEP 7
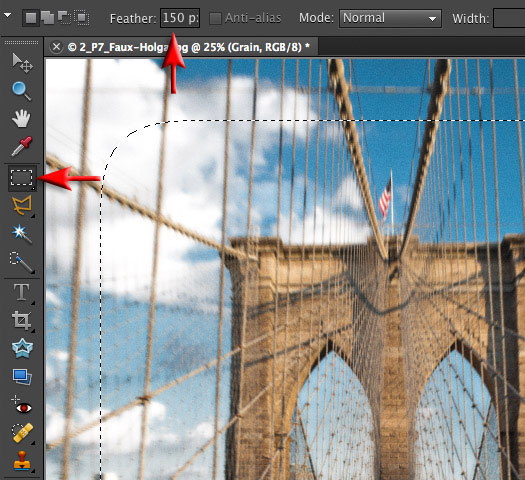
We will now replicate the dark vignette that is a characteristic of Holga images. Select the Rectangular Marquee Tool and set the Feather to 150-pixels (adjust this higher or lower if you are using a higher- or lower-resolution image). Drag a rectangular selection so that the central portion of the image is selected (this will leave a border around the edge of the image that is not selected. From the Select menu choose Inverse and from the Edit menu choose Copy Merged to copy the edge pixels to the clipboard. From the Edit menu choose Paste.
STEP 8
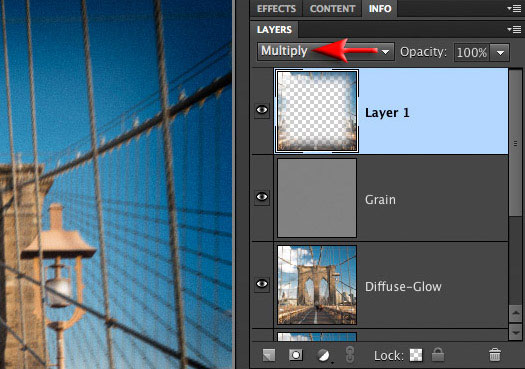
The pixels will be pasted to a new layer (Layer 2). At the moment they are identical to the pixels on Layer 1 but when we select the Multiply mode from the Layers panel they can be used to darken down the edges of the image.
STEP 9
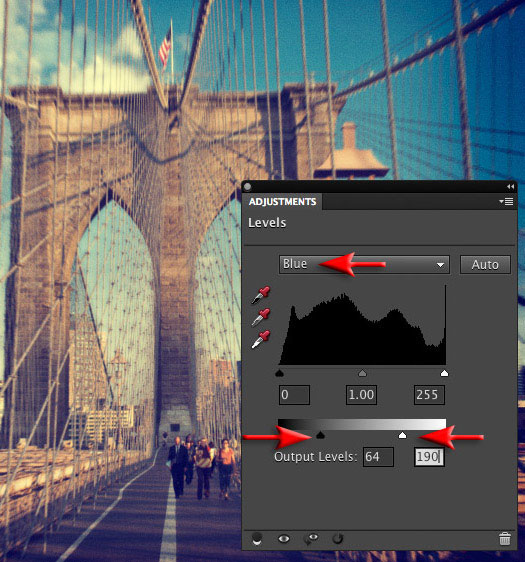
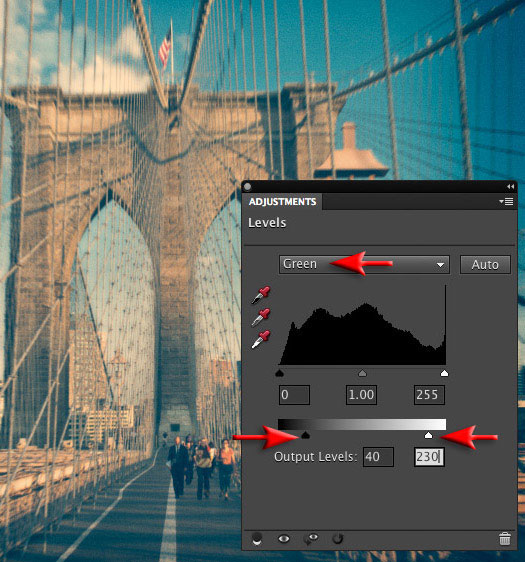
Another characteristic of the Holga image is the surreal color-palette that is present in many (but not all) Holga images. This is a result of either poor processing or cross processing of the film (cross processing intentionally uses the wrong chemicals for the film stock used). We can replicate this look with a just a few Adjustment layers. From the Create new fill or adjustment layer menu (accessed from the Layers panel) choose a Levels adjustment layer. Select the Blue Channel from the drop-down menu in the Levels dialog and then drag the Output Levels sliders to 64 and 190. The Output Levels sliders are located directly underneath the Input sliders. This action will weaken the blacks, render the whites slightly dull and introduce a color cast in both. Select the Green Channel and set the Output sliders to 40 and 230 to increase this effect.
STEP 10
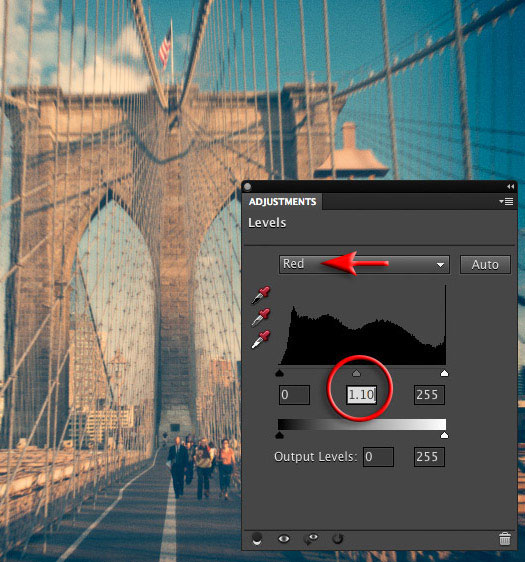
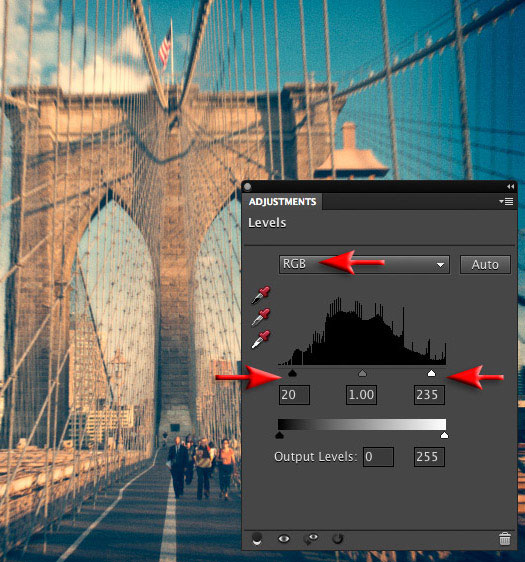
Select the Red channel and drag the central gamma slider (directly underneath the histogram) to the left so that it reads 1.10. Clip the shadow and highlight tones by setting the Black input slider to 30 and the White input slider to 225 (these sliders are located directly underneath the histogram).
STEP 11
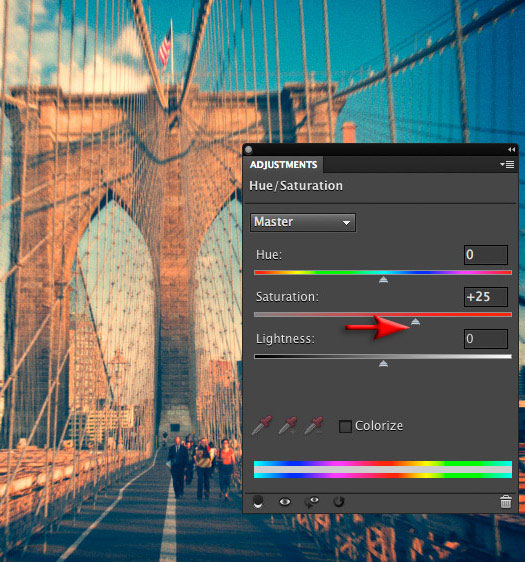
We can alter the color and tone using a Levels adjustment but we will need to use a Hue/Saturation adjustment layer to alter global saturation levels and target specific colors for further attention. Start by raising the Saturation level to +25 in the Master channel. In the red channel Adjust the hue to -10 and raise the saturation to +20. In the Cyan and Blue channels raise the Saturation to +10 for both.
Note > Use these target values as a starting point only. When applying this technique to your own images you may like to try experimenting by raising the saturation levels of key colors within a specific image.
STEP 12
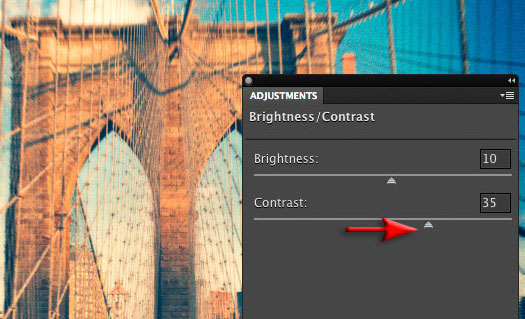
Too increase the overall contrast and fine-tune the brightness of the image add a Brightness/Contrast adjustment layer and adjust the sliders.
STEP 13
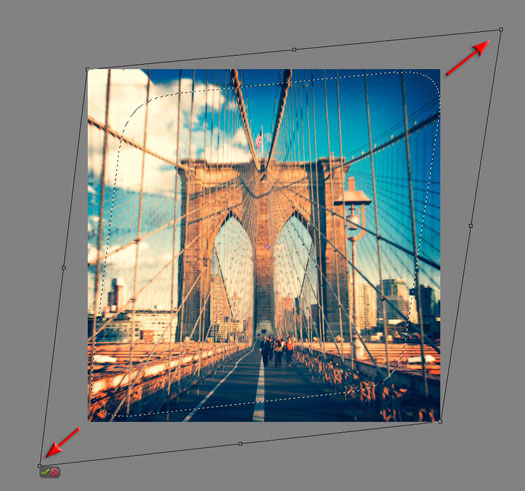
Some Holga images ‘suffer’ (or are ‘blessed with’ - depending how you look at it) from serious edge clipping and/or light leaks. The corner clipping can be unevenly distributed and more severe than your typical vignette. The corner clipping can be replicated by first creating a new layer and then making another edge selection using the Rectangular Marquee Tool with a 150-pixel feather as we did in step 7. Choose Inverse from the Select menu. Go to Select > Transform Selection (this feature only became available in Photoshop Elements 8). Zoom out so that you can see the corner handles of the Transform bounding box. Hold down the Ctrl key (PC) or Command key (Mac) and drag two of the four corner handles out in a diagonal direction. Commit the transformation by hitting the Return/Enter key.
STEP 14
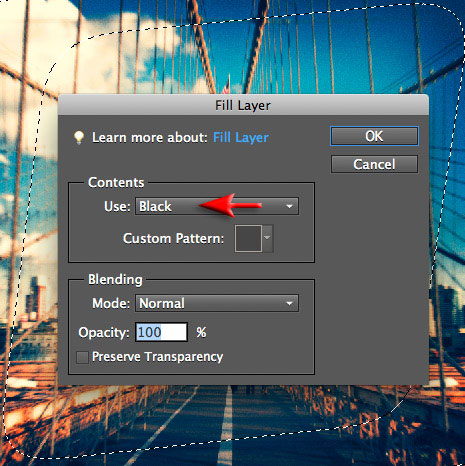
Go to Edit > Fill selection and choose Black as the contents before selecting OK. Lower the opacity of the layer depending on how severe or subtle you want the effect to appear.
STEP 15
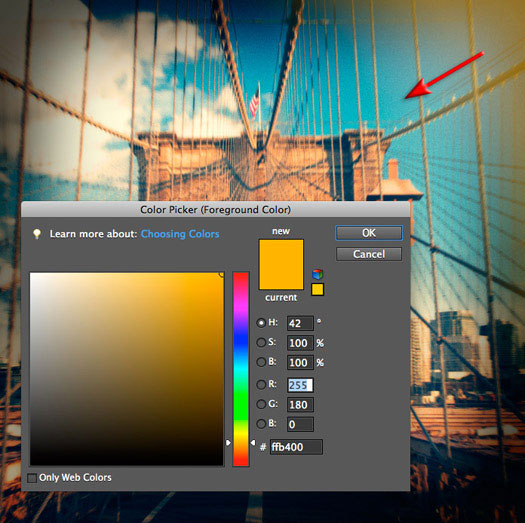
Light leaks in Holga camera’s appear as light orange patches on some frames (some Holga camera owners use black tape around the film loading area of the camera in an attempt to minimize this problem. These light leaks can be simulated by first adding a new empty layer, set the Mode to Screen, then click on the Foreground color swatch in the Tools panel to open the Color Picker. Select an orange color (around Hue 40°). Select OK and then select the Gradient Tool in the Tools panel. Choose the Foreground to Transparent gradient and the Linear Gradient options in the options bar and then drag a diagonal gradient across one of the corners of the image. Lower the opacity of the layer if you need more subtlety – although to be honest, subtlety if not the name of the game here.

The treatment outlined in this tutorial is also available as an automated Photoshop action that can be downloaded from www.markgaler.com
Adobe Photoshop Elements 9 Maximum Performance
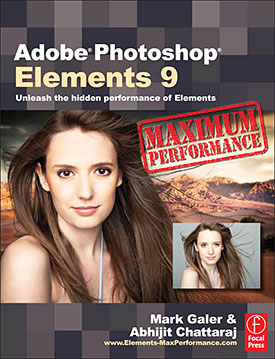 Let Mark Galer and Abhijit Chattaraj guide you through the most powerful photo editing tools and techniques that Elements has to offer. Adobe Photoshop Elements 9.0 Maximum Performance is a unique cominbtion of step-by-step projects, movie tutorials and sample images that will have you creating stunning images in no time at all. Whether you want to enhance your images for maximum impact, optimize your photos for perfect print quality, or create amazing, seamless montages, Adobe Photoshop Elements 9.0 Maximum Performance will give you the skills and know-how to create professional quality results, enabling you get maximum performance from this credit crunch approved software.
Full of far more content than any other Elements title — hours of tutorials, hundreds of images, and automated actions are just the start — Adobe Photoshop Elements 9.0 Maximum Performance will let you get Photoshop-quality results with Elements-priced software.
Create stunning images using powerful, little-known techniques.
The package is completed with an astonishingly supportive website packed with over 8 hours of movie tutorials, high resolution tutorial images, multimedia content and stock photography as well as automated actions to get even more out of the software. Read a sample chapter from the book: How To Create An HDR Effect Using Tonal Mapping In Photoshop Elements 9
 Buy Directly From Adobe's Online Store
Find upgrade options and CS5 deals at the Adobe USA Store. Visit the Adobe Special Offers Page to find the latest offers, including discount coupon codes. Get up to 80% off at the Adobe Education Store.
Photoshop CS5 Tutorials & CS5 Resources
See our Photoshop CS5 Resource Center for free Photoshop CS5 Tutorials & Videos, and the Free Photoshop CS5 Trial Download.
posted by Jennifer Apple | permalink | RSS feed | bookmark | comment | twitter
![]()
![]()
Photoshop CS5 & Photoshop CS5 Extended - Free Trial
 Adobe Photoshop CS5 delivers breakthrough capabilities to help you create images with impact. Refine your
images with reengineered photography tools for removing noise, adding grain, and creating high dynamic
range (HDR) images.
Get precise results when making complex selections. Remove any image element and
see the space fill in almost magically. Paint with naturally textured brushstrokes and realistic color blends. Learn more about Photoshop CS5.
Adobe Photoshop CS5 Extended software helps you create the ultimate images
for print, the web, and video. Enjoy all the state-of-the-art editing, compositing,
and painting capabilities in industry-standard Photoshop CS5, and experience
fast performance thanks to cross-platform 64-bit support.
Also create 3D extrusions
for logos, artwork, and motion graphics; edit 3D objects with advanced tools; and create and enhance motion-based content. Learn more about Photoshop CS5 Extended.
![]()
Exclusive 15% Discount On Topaz Plugins, Bundles And Upgrades
 Enter our exclusive discount coupon code PHOTOSHOPSUPPORT during the checkout process at Topaz Labs for an instant 15% discount on any Topaz product, including bundles and upgrades.
Topaz Labs Photoshop plug-ins are specifically designed to expand a photographer's creative toolbox by harnessing powerful image technology developments. Photographers everywhere are now taking advantage of the creative exposure effects, artistic simplification, unique edge manipulation, and top-of-the-line noise reduction offered in Topaz products. The Topaz Photoshop Plugins Bundle is a super powerful Photoshop plugins package that includes the following Topaz products:
Topaz Adjust
Deliver stunning and dynamic images with this uniquely powerful plug-in that features HDR-like abilities and enhances exposure, color and detail.
 Topaz Detail
A three-level detail adjustment plug-in that specializes in micro-contrast enhancements and sharpening with no artifacts.
Topaz ReMask
The fastest and most effective masking and extraction program with one-click mask refining.
Topaz DeNoise
Highest-quality noise reduction plug-in that removes the most noise and color noise while preserving the most image detail.
Topaz Simplify
Provides creative simplification, art effects, and line accentuation for easy one-of-a-kind art.
Topaz Clean
Take control of the detail depth of your images with extensive smoothing, texture control and edge enhancement tools.
Topaz DeJPEG
Drastically improves the quality of web images and other compressed photos.
Learn more about the Topaz Photoshop Plugins Bundle. Download a free trial version.
![]()
Exclusive onOne Software 15% Instant Discount Coupon
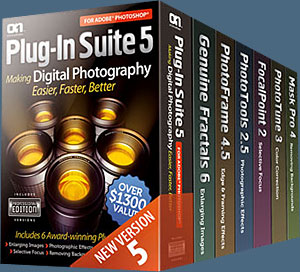 Enter our exclusive discount coupon code - PSSPPT06 - during the checkout process at onOne Software for an instant 15% discount on any onOne product. This includes Genuine Fractals and their amazing Photoshop Plug-In Suite.
OnOne’s new Plug-In Suite solves six of the most frequent problems photographers will encounter in Photoshop. This suite has been granted American Photos Magazine’s Editor’s Choice award for Top Image Editing Software. The Plugin Suite includes:
Genuine Fractals Pro is renowned by both photographers and printers for its finesse at increasing images to more than ten times their original size while maintaining the sharpness and detail you started with. Think of this as the industry standard for image resizing.
Mask Pro is used to remove the tough stuff — such as hair, smoke and glass — while retaining the fine detail. You choose what colors to keep, then paint away what you don’t need.
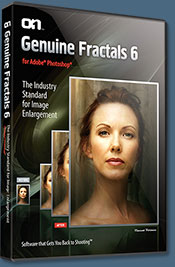 PhotoTools Pro packs hundreds of high-calibre photographic effects into one user-friendly plug-in. It’s fast and easy to use. Gives your photos that pro quality look.
PhotoFrame Pro lets you enhance your pictures with hundreds of such design effects, or simply drop your image into a pre-fab layout in Photoshop, Lightroom or Aperture.
FocalPoint helps to control focus and minimize visual noise. Draw the eye to specific points in your images by using selective focus, depth-of-field and vignette effects.
PhotoTune lets you can compare images side-by-side and easily color correct and enhance them. PhotoTune optimizes the dynamic range, color and sharpness of your image without the need to know all the complicated controls in Photoshop like levels and curves.
![]()
Nik Software 15% Instant Discount - Exclusive 15% Coupon
Enter our exclusive discount coupon code - NIKPSS - during the checkout process at Nik Software for an instant 15% discount on any Nik Software product. This exclusive discount coupon code can be applied to all the latest Nik Software Photoshop plugins, including Silver Efex Pro, Color Efex Pro, Viveza, Sharpener Pro, and Dfine.
Color Efex Pro
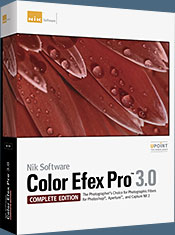 52 photographic filters with over 250 effects for professional quality images.
Completely Original. Completely Indispensable.
Nik Software Color Efex Pro filters are the leading photographic filters for digital photography. The award-winning Color Efex Pro filters are widely used by many of today's professional photographers around the world to save time and get professional level results. Whether you choose the Complete Edition, Select Edition, or Standard Edition, you’ll get traditional and stylizing filters that offer virtually endless possibilities to enhance and transform images quickly and easily.
Patented U Point technology provides the ultimate control to selectively apply enhancements without the need for any complicated masks, layers or selections. Control color, light and tonality in your images and create unique enhancements with professional results. With 52 filters and over 250 effects found in Color Efex Pro, you can perform high quality retouching, color correction, and endless creative enhancements to your photographs. Download a free Trial version.
Viveza
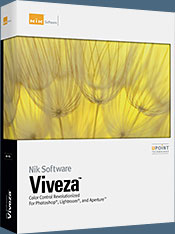 The most powerful tool to selectively control color and light in photographic images without the need for complicated selections or layer masks.
Two of the most important factors in creating great photography are color and light. Mastering the art of selectively correcting or enhancing each of these is now possible for every photographer without the need for complicated masks or selections, or expert-level knowledge of Photoshop. Integrating award-winning U Point technology, Viveza is the most powerful and precise tool available to control light and color in photographic images.
U Point powered Color Control Points, placed directly on colors or objects in an image (such as sky, skin, grass, etc.), reveal easy-to-use controls that photographers can use to quickly adjust brightness, contrast or color in a fraction of the time needed by other tools. With Viveza you’ll spend more time shooting photographs and save hours of image editing. Download a free Trial version.
Silver Efex Pro
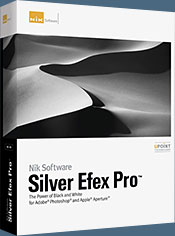 Complete power and control to create professional quality black and white images in one convenient tool.
Silver Efex Pro from Nik Software is the most powerful tool for creating professional quality black and white images from your photographs. For the first time, all the advanced power and control required for professional results have been brought together in one convenient tool.
Featuring Nik Software’s patented U Point technology to selectively control the tonality and contrast of the image, Silver Efex Pro includes advanced imaging algorithms to protect against unwanted artifacts, a comprehensive collection of emulated black and white film types, a variable toning selector for adding traditional toning techniques, over 20 one-click preset styles, and a state-of-the-art grain reproduction engine that help produce the highest quality black and white images possible from your color images while providing more freedom to experiment. Download a free Trial version to use Silver Efex Pro.
Enter our exclusive discount coupon code - NIKPSS - during the checkout process at Nik Software for an instant 15% discount. This exclusive discount coupon code can be applied to all the latest Nik Software Photoshop plugins, including Silver Efex Pro, Color Efex Pro, Viveza, Sharpener Pro, and Dfine.
![]()
Photoshop Masking Plugin Fluid Mask - Exclusive Instant Discount
 The 4 1/2 out of 5 star review of Fluid Mask at MacWorld begins by saying that this "Photoshop plug-in takes the pain out of extracting backgrounds," and goes on to recommend the latest version, stating that "Fluid Mask is a very effective tool for separating objects from their backgrounds. It offers a variety of useful features for tackling almost any difficult image, from wispy hair to complex foliage. Online video tutorials and live training sessions help ease the learning curve."
Our friends at Vertus, the makers of Fluid Mask Photoshop Plugin, have set up a special exclusive discount for PhotoshopSupport.com. Go to our Fluid Mask page for a special, exclusive discount link.
Fluid Mask is designed for photographers, image editors, graphic designers and all those who take digital image editing seriously. In a streamlined interface and workflow, Fluid Mask instantly shows key edges in the image and provides comprehensive easy to use tools that work with difficult-to-see edges and tricky areas like trees & lattices. Fluid Mask will also preserve all-important edge information for a professional quality cut out. Go to our Fluid Mask page for more info.
![]()
Photoshop CS5 Essential Skills - By Mark Galer And Philip Andrews
 A practical guide to creative image editing, Photoshop CS5: Essential Skills by Mark Galer and Philip Andrews will help you to master the essential features and tools of this awesome software. Broken into three parts to form a structured, self-study guide, the book covers foundation skills and more advanced techniques, with a complete section of step-by-step imaging projects so you can practice your skills and create professional-looking results.
Written by two internationally recognized authors and Adobe Photoshop Ambassadors, this established book and DVD package is fully updated with the latest CS5 features and contains vital information on optimizing photography and digital imaging workflows. Photoshop CS5: Essential Skills includes a DVD with more than 10 hours of movie tutorials and supporting files.
Read 2 free sample chapters:
Refine Edge - Best New Feature in Photoshop CS5 - Tutorial
New To Photoshop CS5 - Merge To HDR Pro - Tutorial
Find more Photoshop CS5
tutorials on our Photoshop CS5 Tutorials Page.
Read 2 free sample chaptersfrom the Adobe Photoshop CS4 version:
Skin Retouching Tips In Photoshop CS4
Transforming Smart Objects In Photoshop CS4
Find more Photoshop CS4 tutorials on our Photoshop CS4 Tutorials Page.
Read 2 free sample chapters from the Adobe Photoshop CS3 version:
![]() Adjusting Exposure in Adobe Camera Raw CS3
Adjusting Exposure in Adobe Camera Raw CS3
![]() Photoshop CS3 Tutorial High Dynamic Range
Photoshop CS3 Tutorial High Dynamic Range
![]()


