![]()
![]()
![]() Photoshop for Students. Get super savings at the Adobe Academic Store.
Photoshop for Students. Get super savings at the Adobe Academic Store.
![]() Buy. Download. Create. Get Photoshop CS3 now at the Adobe Store.
Buy. Download. Create. Get Photoshop CS3 now at the Adobe Store.
![]()
![]()
![]()
Bitmap and Vector Graphics Explained
by Chance Agrella
As people begin working with computer graphics, one of the subjects of greatest confusion is the difference between bitmap graphics and vector graphics. This article will attempt to define both, then explain them as they relate to each other. I've tried to start as simply as I can while offering some tips for intermediate users about working with each.
The article is divided into three sections:
Part 1: What is a bitmap graphic?
Part 2: What is a vector graphic?
Part 3: Comparing Bitmaps and Vector Graphics
Part 1: What is a bitmap graphic?
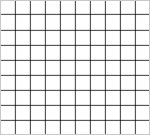
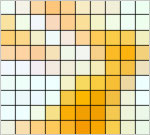
A bitmap graphic (you may occasionally hear "raster" graphic) is basically a large grid - think of a huge checkerboard, or a screen door, or any grid with a lot of little squares. If you put a different color in each little square, you can build an image square by square. When you stand far enough away from the grid, the individual grid squares blend together and you see a complete photographic image. (See Illustration 1.)
|
Illustration 1
 |
 |
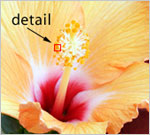 |
This is how computer monitors and televisions work - they both are a series of little squares (pixels) in a big grid (the screen). When you specify your monitor's resolution (800x600, 1024x768 etc), you are telling the computer how many dots across by how many dots tall, and thus you define the grid that gets filled in with dots to show the image. (See Illustration 2.)
This is also how the pixel or megapixel count of a digital camera is derived: If you have a 6.3 megapixel camera, that means the files produced by the sensor (digital film) will be something like 3072x2048. Just do the math - 3072 X(times) 2048 = 6,291,456. A megapixel is a million pixels, so we get 6.29 megapixels, which is close enough to 6.3 for the marketing people.
Illustration 2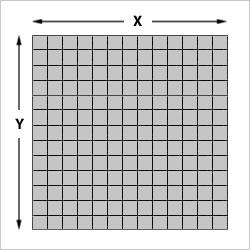 |
The quality and appearance of a bitmap image is determined by (1) its size and (2) its resolution. In some instances, as when printing images to actual paper, "size" can refer to the number of pixels (like 800 x 600) or the physical dimensions (like 8 by 10 inches).
Resolution refers to a couple of different things in different contexts. Sometimes it references the density of pixels, and is usually expressed as Dots Per Inch (DPI).
Graphics have different resolutions for different purposes, and it's important to know how you will be using the graphic. If you don't have high enough resolution and you try to print an image, it will look blocky or fuzzy. If your image is very high resolution but you use it on the web, it will take longer than necessary to download. So what resolution, or DPI, should you choose?
The traditional rule of thumb is 72 DPI for images that will only appear online and 300 dpi for images that can be commercially printed. If you are printing images at home, 200 DPI or so should give you acceptable results. Resolutions higher than 300 DPI generally will NOT give better printed results - you just get unnecessarily large file sizes. The term DPI also is seen in specifications for printer and scanners - how many dots per inch the device is capable of scanning or printing.
The term resolution is also used when referring to the overall size of a bitmap graphic, as in:
Question:"What's the resolution of that photo?"
Answer (1): "It's 2400 by 1600."
The answer could also be (2): "It's 300 dpi."
The best answer would be (3): "It's 2400 by 1600 at 300 dpi."
So, for best results you may need to know the number of pixels, the resolution, the physical size, and how the image is to be used. Especially when the images are to be printed by a commercial printer, you have to know dimensions and the DPI to ensure a quality result.
Working with and resizing bitmaps:
Bitmaps are easy to work with as long as you think ahead and know what you have to work with. Bitmaps can effectively be made smaller, but cannot be made larger without degrading the quality of the graphic. For example, if you are working with an image that is 250x250 pixels, you can shrink it to 100x100 and it will look great - there is extra information that can be discarded. However, if you want to make the image 1000x1000, Photoshop will let you do it, but the image quality will suffer. Let's see some numbers:
Original Image - 250x250: 62,500 pixels (250 * 250).
Smaller Image - 100x100: 10,000 pixels (100 * 100) - Photoshop can discard 52,500 pixels and still have all the information needed to make the 100x100 image.
Larger Image - 1000x1000: 1,000,000 pixels (1000 * 1000) - Photoshop can make a grid of 1000x1000 pixels, but what should go in them? There are 62,500 pixels to work with, but that leaves 937,500 pixels unaccounted for! That's 15 times what we have to work with. To compensate, Photoshop will interpolate to create the missing data. That means it will look at what it has to work with and create a best guess as to what is needed. It actually does a remarkably good job, but the image may well suffer noticeably if you increase the image size more that 10 percent or so.
To avoid this damaging interpolation, one needs to think ahead and create a document as large or larger than will ever be needed. That way you can shrink the graphic to any size you need, and it will always look great. If you have files from a digital camera, start with the largest size and work down, then keep the larger original someplace where you can come back to it
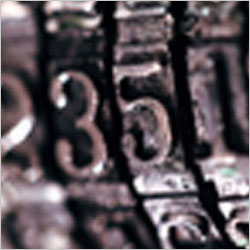
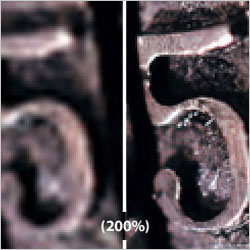
One word of caution - if you make an image smaller in Photoshop, that information is gone. You cannot resize the image back to its original size and get your original image. (See Illustration 3.)
For instance, you have a 250x250 image and you use "Image Size" to drop the size to 75x75. Since you are making the graphic smaller, Photoshop dumps the information that is no longer needed. ((250 X 250) - (75 X 75) = (62,500 - 5,625) = 56,875 discarded pixels). If you then change your mind and use "Image Size" to put the size back to 250x250, Photoshop DOES NOT go back to what you started with - it will take that 5,625 pixels you're left with and guess (interpolate) the other 56,875, leaving you with a badly degraded image. With any luck, you didn't save and close the file, so you can "Revert" to get back to the original or go back in your history palette to a state before you resized the first time.
Illustration 3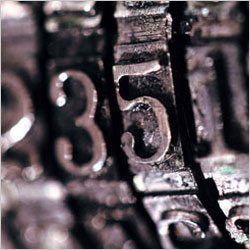 |
 |
|
|
|
 |
 |
Some advantages of bitmap graphics:
- Bitmaps can represent complex, photographic images. The grid can be filled with thousands or millions of subtle variations of color to recreate the complexity found in the world around us.
- Bitmaps are quite universal - almost any program can work with simple bitmap file formats, and they require little system overhead to properly display.
Some disadvantages of bitmap:
- Since you have a finite amount of information, bitmaps are not effectively scaleable to larger sizes. You can increase the size of the image, but there is no information to occupy the space so the software interpolates to create a best guess.
Illustration 4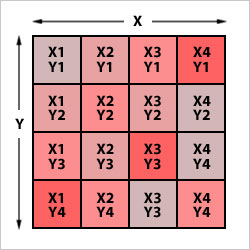 |
- Bitmaps do not maintain editability. You cannot open a typical (non-Photoshop format) bitmap file and modify it as though you were the originator - there is no layer or other information in most bitmap files (TIFF, PICT, JPEG, etc...).
Bitmap formats:
Some of the most prominent bitmap formats are: TIFF (.tif), BMP (.bmp), PICT (.pct), GIF (.gif), JPEG (.jpg). There are others as well. Photoshop's native PSD format used to be bitmap only, but now has support for text and vector layers as well.
Part 2: What is a vector graphic?
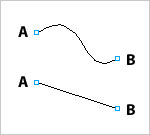
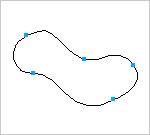
In regards to this discussion, a vector graphic is one in which the shape or path of a line is defined by a bit of math. Vector graphics are basically points connected by lines of various shapes, filled with solid or gradient colors. So it's point A, connected to point B by a line of some shape, with the shape of that line defined by a little mathematical description. More points and more lines can make more complex shapes. The line that defines the vector shape is referred to as the path. (See Illustration 5).
|
Illustration 5
 |
 |
 |
Drawing a shape with math? What's that supposed to mean? Well, if we think back to our algebra classes, lines and curves can be drawn in an X and Y coordinate space by graphing equations. (See Illustration 6.) In Illustration 6, a graceful curved line (parabola) is drawn simply by graphing the equation y = (x squared). By making the math more complicated, you can define more nuanced shapes. And there is no grid to worry about: as you make y = (x squared) much larger or much smaller, the line of the parabola is still perfectly defined. Its resolution is infinite.
Illustration 6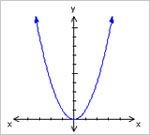 |
Images made up of shapes, like line drawings and illustrations and logos, are often well suited for vector formats. Images with dense, differing colors, like photographic images, are NOT well suited to vector graphic formats.
Some advantages of vector graphics:
There are (at least) three very neat things about vector graphics:
- First, the file sizes are usually very small - rather than describing the many, many squares in a bitmap, it is only necessary to describe the math involved in recreating the image. For example, the Freerange Stock logo file used as the basis for the third panel of Illustration 5 above is only 36KB.
- Second, they have infinite resolution - no matter how large you expand or how small you contract the image, the math creating it holds up and it will always show smooth, clear edges and details. The little 36KB logo file mentioned above can be printed at ANY size (see Illustration 7) and will look great.
|
Illustration 7
 |
 |
Once a "universal" version (usually an .eps file) of a graphic or a logo is PROPERLY originated, it can be used by may people and many different software packages. You do not have to recreate images in each application - this saves time and allows you to distribute and have greater control over your logo/brand/whatever. This can also be a big mess (see disadvantages below...).
Some disadvantages of vector graphics:
- The primary thing to keep in mind with vectors is this: Vector formats are NOT well suited to photographic images. The many colors and complexity necessitated by representing photographic subjects quickly overwhelms the formats. This isn't necessarily a disadvantage - it's just not something for which vector formats are well suited. Similarly, for advanced manipulation and complex colorings and lighting effects, you would need to rasterize (defined in Part 3) the vector into a bitmap and go from there.
- Vector formats aren't as universally interoperable as bitmaps. Even "universal" formats like .eps are often misused and misunderstood, so trying to give a vector graphic to your friend who doesn't have the same software can be a struggle. (Especially, in my experience, using Corel products.) Without caution and some expertise, your logo or graphic can be distorted, have the wrong fonts, be the wrong color, be uselessly low resolution or be missing entirely. On the other hand, once it's worked out properly it can be an advantage (see above...).
Vector graphics we use everyday: Type!
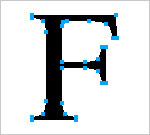
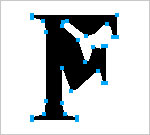
Did you know that we all use vector graphics everyday? Fonts are vector graphics shaped like letters, and they illustrate the behavior of vectors very well. First, small file size - an entire font, composed of many letters, numbers and symbols, is a small file that can easily be downloaded or emailed. Second, scalability and resolution independence - type can be set to any size and it never starts to look chunky. (That is, if your fonts are properly installed and used. There are cases where fonts will look chunky and have stair-stepped edges, but that's another topic.)
So when you install and use a font, you are working with vector graphics - some programs (mostly the illustration programs mentioned below, like Illustrator and Freehand) even allow you to convert these text shapes into editable shapes or paths. Once converted to paths (see Illustration 8), you can modify the shape of the letters or fiddle with them anyway you like.
|
Illustration 8
 |
 |
 |
Programs that use vector graphics:
Many programs can use vector graphics in one form or another. Page layout programs like Quark XPress and Adobe InDesign can import, place, scale and distort (but not create or otherwise modify) vector graphics, usually in the forms of an .eps file. And they use text, which, we just noted, is basically a vector graphic.
Several other applications are also capable of using the files, but not creating them. Vector graphics are usually created in programs called illustration programs, like Adobe Illustrator, Adobe (formerly Macromedia) Freehand or Corel Draw. These are the programs that allow you to start with a blank document, draw or design what you want, and then export a completed .eps file for use elsewhere.
Vector formats:
Some of the most prominent vector formats are EPS (Encapsulated Post Script - .eps), Adobe Illustrator (.ai), Adobe (formerly Macromedia) Freehand (.FHx). On a side note Adobe (formerly Macromedia) Flash files are mostly vector data.
Formats that can deal with both bitmaps and vector information:
Recent Photoshop versions use a .psd file that can include vector layers (like text and shapes and paths). Adobe Acrobat's Portable Document Format (.pdf) files can contain bitmap images and vector data in many different forms. The .eps format is also capable of holding both vector and bitmap data, which is why this format can get messy as an interoperable standard for vector files. On a side note, the .eps file is basically the same file that a Post Script laser printer uses. (Remember, EPS is Encapsulated Post Script, and many laser printers use the Post Script language to format printed pages.) EPS/Post Script was developed by Adobe, and is also the basis of Adobe's now-universal PDF format.
Part 3: Comparing Vector vs. Bitmap Graphics
So far we've looked at bitmaps and vector graphics separately. Now let's summarize a bit and rehash this information as we compare some points about these graphic types.
Back and forth - converting Vector to Bitmap and Bitmap to Vector:
I've noted the fact that vectors and bitmaps have different uses and are manipulated differently in different programs. What if you have a logo you've made in Photoshop, but you'd like it to be a vector EPS file? Or what if you want to use or manipulate a vector illustration in your Photoshop document? Let's start with the latter:
In Photoshop, you can apply drop shadows, give texture and distort bitmap graphics in a way that is difficult or impossible in vector illustration programs. Luckily, there is a very slick way to get vectors into Photoshop: just open them. When you do this, you will get a dialog box asking you to enter the size you would like the file to become - enter any value, and Photoshop will rasterize the file.
Here's what that means, and what the dialog box is asking: Remember that vector files have infinite resolution, and that bitmap files have a defined resolution? Photoshop will set up a grid of any size you specify, then fill in that grid with information from the vector file, creating a perfect bitmap file from the original vector. Once the file has been rasterized into a Photoshop document, you end up with a bitmap file as large as you need it - no stair-stepped edges and no interpolation - which you can then manipulate as needed. I suggest rasterizing the vector in to a file larger than you think you will need, then shrinking the manipulated result down for use.
Going the other way requires a lot more work, at least for a clean result. To get a vector file out a bitmap original, make a selection of the area/shape you want to convert, then select Make Work Path in the Paths palette in Photoshop. You will be asked to define a tolerance - I suggest somewhere around the default value of one pixel. If you make the tolerance too small, you will have more detail, but a mess of extra points on the path to clean up. Too high a tolerance and the shape will be ill-defined, but will have fewer points to clean up.
The best option will vary depending on the shape, so experiment. Once you have a Work Path in something like the right shape, select Export > Paths to Illustrator and save the resulting Illustrator (.ai) file. You can then open the file in Illustrator or any program that can edit Illustrator files. There may well be a lot of smoothing and cleaning up to do, but you should have a good start.
When to use which, and why - a little case study:
Each graphic type has instances where it makes sense to use one or the other. Let's say we're doing a project that will get printed - an advertisement, an elaborate invitation, or a catalog cover. For best results, both vector and bitmap graphics should play a role. We'll use some photos - lots of colors, fixed/finite size from a digital camera. These files have to be bitmaps, probably .tif or .jpg or .pict files. Photos just can't be easily represented as a vector graphic. But the files will be comparatively large.
We also want to use a company logo and some simple illustrations. The graphic designer (or you) probably created these in an illustration program so they would be a portable, small-sized file that will print smoothly at any resolution. The files use simple, non-photorealistic colors, and we may want to edit them a bit to serve our needs. These files should be bitmaps - probably .EPS files for use in other programs.
We will also use some type, which as we said, is basically a vector file.
Illustration 9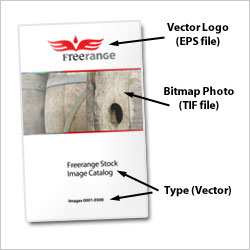 |
Once we have these files collected, we need a program that can work with both bitmaps and vector graphics. Traditionally, this has meant page layout programs like Quark XPress or Adobe InDesign, though as Photoshop has matured, it has become more adept at handling both bitmap and vector graphics. I now commonly use Photoshop to do page layout and often it works well. Regardless of the program, the vector and bitmap elements get integrated into one work. (See Illustration 9.)
More comparisons a bit more in depth:
File Size: I've said that vector file sizes are smaller, making them easier to distribute via email or any other electronic means. Let's take a look at some file sizes for the Freerange logo we've already used. I'll be comparing the Vector graphic to versions of that graphic that have been rasterized into bitmaps.

| Resolution: | Vector Size: | Bitmap Size: |
| 250 x 78 | 36KB | 57KB |
| 800 x 248 | 36KB | 581KB |
| 1500 x 466 | 36KB | 2000KB (2 MB) |
This can go on and on, with the bitmap becoming very, very large. The vector file never changes size, no matter how larger it's needed. (Now, the other way to look at this is: "Vector files don't really have a resolution, so your table is inappropriate/stupid." This very true, but I'm trying to make a point.)
Scalability: When a vector graphic is placed in a document, it can be scaled up or down with no loss in quality. Bitmaps can be made smaller, but not larger without interpolation, which will degrade the quality of the image. (See Illustration 10.) Let's look at a couple of scaled images as vector and as bitmap - this is basically Illustration 7 with one extra panel:
|
Illustration 10
 |
 |
 |
Okay, that about wraps it up - I've approached the issue from a couple different angles, and I hope the Vector vs. Bitmap question has been somewhat clarified!
I have made some broad generalizations for the sake of clarity, so if this is your area of expertise feel free to contact me with suggestions or corrections.
![]()
Photoshop CS3 Upgrade Options And Bundles From The Adobe Store
 Photoshop CS3 Extended is ideal for film, video, and multimedia pros and for graphic and web designers using 3D and motion. Get the full version for US $999, or upgrade for US $349. The standard version of Photoshop CS3 is available for US $649, or as an upgrade for US $199. See all upgrade options at the Adobe Store. See our CS3 Resource Center for free Photoshop CS3 tutorials.
Photoshop Extended is also available as part of Adobe Creative Suite 3 Design Premium, which combines all-new CS3 versions of Photoshop, Flash Pro, Dreamweaver, Illustrator, InDesign and Acrobat 8 Pro. Upgrade options for customers in Europe, the UK, Australia, New Zealand and Asia can be found at the Adobe International Store.
![]()
Adobe Photoshop Lightroom Available At The Adobe Store
 There are tons of new features in Adobe Lightroom 1.0 that you won't find in the beta version. From Clone and Healing functionality to metadata browsing, you'll be able to free-up post-processing time like never before. Get it now at the Adobe Store. Customers in Europe, the UK, Australia, New Zealand and Asia can find special pricing and offers at the Adobe International Store. For free Lightroom tutorials see our Lightroom tutorials page.
![]()
Special Offer - Fluid Mask - Photoshop Masking Plugin
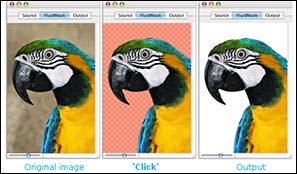 Fluid Mask is based on breakthrough segmentation technology inspired by the way the eye, optic nerve and brain perform visual processing. When an image is loaded, Fluid Mask's segmentation engine analyses the distribution of colors, finding the natural groups within the image. Together with information calculated about edges, gradients and textures, a model is constructed which divides the images into objects.
Vertus Software is offering Fluid Mask at the special 'friends and partner' discounted rate. This is an exclusive offer to visitors of PhotoshopSupport.com. To qualify, visit the Fluid Mask Discount Price page. Find out more about Fluid Mask on our special Fluid Mask Page.
![]()
![]()
![]()
![]() The Photoshop Blog offers the latest Photoshop and Digital Photography news and software updates, tips and tutorials, and random thoughts from graphic artist, digital photographer and Photoshop expert Jennifer Apple.
The Photoshop Blog offers the latest Photoshop and Digital Photography news and software updates, tips and tutorials, and random thoughts from graphic artist, digital photographer and Photoshop expert Jennifer Apple.
![]()
Alien Skin Software - Photoshop Plugins - Special 10% & 20% Discounts On All Alien Skin Photoshop Plugins
 Our friends at Alien Skin Software have set us up with an exclusive special offer discount link that will give you some sweet savings at their online store.
Just follow this link and you'll see 10% and 20% price drops on their products when you get to the Alien Skin Online Store area (excludes the Eye Candy Bundle, which is already discounted at $199). This special offer includes a discount on Eye Candy: Textures, Eye Candy: Nature, Eye Candy: Impact, Exposure, Blow Up, and their latest release Snap Art.
Snap Art – $149 – our price $129
Blow Up – $199 – our price $179
Exposure – $199 – our price $179
Eye Candy 5: Impact – $99 – our price $79
Eye Candy 5: Nature – $99 – our price $79
Eye Candy 5: Textures – $99 – our price $79
![]()
SiteGrinder Photoshop Plugin - Create Websites Instantly
 There often seems to be a strict division of labor within the world of web design and development. Creative professionals tend to stick to the Photoshop domain, while those well-versed in scripting are left to the task of implementing their work. Indeed, the two realms are quite different from each other, to which any of us even vaguely familiar with either can easily attest.
Essentially, Photoshop is a no-holds-barred design studio, offering the artist a seemingly endless array of creative options. On the other hand, HTML, CSS, Java and the like follow strict rules of engagement, requiring the developer to take any number of esoteric concerns into consideration in order to ensure that designs are properly displayed on the web.
Turn Photoshop Into A Complete Web Design Tool
SiteGrinder seeks to bridge this gap between design and development. Basically, this program turns Photoshop into an easy-to-use and fully functional web design tool. With SiteGrinder, designers will now have the freedom to totally let their creativity loose and then, without skipping a beat, transfer their designs to the web. Bringing esthetic concerns together with more practical considerations, this program is an amazingly powerful tool that would make a fantastic addition to any web designer's bag of tricks.
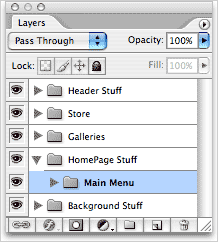 Generate Your Web Pages Directly From Photoshop
By generating web pages directly from Photoshop, you'll be able to spend much more time on the creative end of the spectrum, since you'll know right off the bat how well particular designs will translate to the web. No more going back to the Photoshop drawing board after getting a phone call from your development team, telling you that what you had envisioned doesn't have a chance of being displayed on the web. You can immediately visually and interactively test your designs, which permits you to then make changes to either esthetics or functions while it's still relatively early on in the design process.
Pricing and Availability
Mac OS X and Windows versions of the SiteGrinder unlockable demo are available now via download. SiteGrinder can be ordered from Media Lab's online store.
![]()
Photoshop CS3 Book - CS3 Essential Skills - By Mark Galer And Philip Andrews
 Brimming with beautiful pictures, Photoshop CS3 Essential Skills guides you through a project-based, progressive curriculum so that you can build all the essential skills to enhance photographs creatively and professionally with Photoshop CS3. If you are an aspiring professional, enthusiastic amateur photographer, or a student learning photography, digital imaging, art and design, or design graphics, you'll be amazed at the stunning results you can achieve. A DVD is included free.
The Essential Skills Photography Series from Focal Press uniquely offers a structured learning experience for photographers of all ages, with both the underlying theory and loads of invaluable 'how to' and real-life practice projects - all from the most talented photography practitioners/educators in the world.
Read 2 free sample chapters:
![]() Adjusting Exposure in Adobe Camera Raw CS3
Adjusting Exposure in Adobe Camera Raw CS3
![]() Photoshop CS3 Tutorial High Dynamic Range
Photoshop CS3 Tutorial High Dynamic Range
Special book offer - save 24%
![]() Photoshop CS3: Essential Skills (Amazon.com - $28.08 - save 24%)
Photoshop CS3: Essential Skills (Amazon.com - $28.08 - save 24%)
![]()
Photoshop CS2 Book - Photoshop CS2: Essential Skills - By Mark Galer And Philip Andrews
 An inspirational and user-friendly guide to creative image editing, Photoshop CS2: Essential Skills provides direction for photographers and designers alike who have ventured into the realm of the 'digital darkroom.' The book offers a progressive curriculum to guide you through Photoshop with a series of clear, step-by-step projects designed to place knowledge into a practical context.
Whether you simply want to retouch an image, create a glamour makeover or create a highly sophisticated montage - this book will give you the essential skills to complete the work to a professional standard.
Read 2 free sample chapters:
![]() How To Sharpen An Image In Photoshop — Advanced Sharpening Techniques
How To Sharpen An Image In Photoshop — Advanced Sharpening Techniques
![]() Working With Shadows In Photoshop - Advanced Shadow Techniques
Working With Shadows In Photoshop - Advanced Shadow Techniques
Special book offer - save 37%
![]() Photoshop CS2: Essential Skills (Amazon.com - $20.76 - save 37%)
Photoshop CS2: Essential Skills (Amazon.com - $20.76 - save 37%)
![]()
Exclusive 20% Discount On Select Total Training Products & Bundles
 To redeem our exclusive discount coupon, use promotion code save20pss in your shopping cart. You could save hundreds of dollars. Use this special link to see the full offer.
Total Training for Adobe Photoshop
Learn Adobe Photoshop with 21 hours of interactive Adobe Photoshop tutorials. This is training for real-world situations and includes additional tips and techniques used by the pros.
View Sample Photoshop, Dreamweaver and Flash Pro Video Tutorials
![]() Free Adobe Photoshop CS3 video tutorials
Free Adobe Photoshop CS3 video tutorials
![]() Free Adobe Photoshop CS2 video tutorials
Free Adobe Photoshop CS2 video tutorials
![]() Free Adobe Dreamweaver video tutorials
Free Adobe Dreamweaver video tutorials
![]() Free Adobe Flash Pro video tutorials
Free Adobe Flash Pro video tutorials
![]()
