
 Try before you buy. Download any Adobe product for a free 30 day trial. Try before you buy. Download any Adobe product for a free 30 day trial.


How To Install & Use The Photoshop Frames & Borders Free Brush Set
 Download the Frames & Borders Free Brush Set (zip/6.5MB) Download the Frames & Borders Free Brush Set (zip/6.5MB)
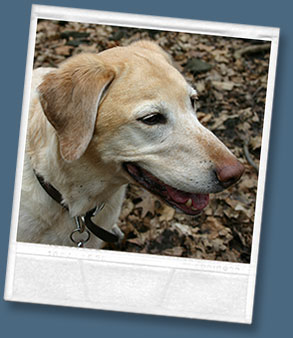 This tutorial will walk you through installing and using the Frames & Borders Free Brush Set (zip/6.5MB) by Stephanie of Obsidian Dawn. It also includes tips on using specific brushes from the set to insure that they come out their best! This tutorial will walk you through installing and using the Frames & Borders Free Brush Set (zip/6.5MB) by Stephanie of Obsidian Dawn. It also includes tips on using specific brushes from the set to insure that they come out their best!
You'll find a description of each of the 28 brushes at the end of this tutorial.
If you are familiar with how to install and use Photoshop brushes already, skip down to the "Using the Brushes" section.
Extracting the ZIP file
After downloading the brush set, place the ZIP file anywhere on your computer where it will be easily found, such as your desktop. Using your extraction utility of choice (Windows comes with one now - just double click on the file), extract the SS-frames.abr file into your Program Files > Adobe > Photoshop (whatever version you are using) > Presets > Brushes folder.
Loading the Brush Set
 Open Photoshop. If you already had it open just now, the brushes will not automatically show up until you close and re-open the program, so go ahead and do so now. To be sure that your tools palette is visible, click on "Window" in the top menu and make sure that "Tools" has a checkmark next to it. If it doesn't, click it. In your tools palette, click on the Brush tool. Open Photoshop. If you already had it open just now, the brushes will not automatically show up until you close and re-open the program, so go ahead and do so now. To be sure that your tools palette is visible, click on "Window" in the top menu and make sure that "Tools" has a checkmark next to it. If it doesn't, click it. In your tools palette, click on the Brush tool.
 Once you've done so, you'll see a small menu of brush tool options located just below the top menu. Right next to the thumbnail of the current brush that you have selected, there is a small down arrow. Click that to open the brush preset picker. Once you've done so, you'll see a small menu of brush tool options located just below the top menu. Right next to the thumbnail of the current brush that you have selected, there is a small down arrow. Click that to open the brush preset picker.
 In this dropdown menu, you will see all of the brushes that are a part of your currently selected brush set. On the far upper right-hand corner, there is a small arrow. Click it. In this dropdown menu, you will see all of the brushes that are a part of your currently selected brush set. On the far upper right-hand corner, there is a small arrow. Click it.
You are now viewing, among other things, all of the brush sets that are installed on your computer. They are listed just below the section where you can "Save Brushes..." and "Replace Brushes..." etc. The name of this brush set is "SS-frames" so go ahead and look for that, then select it by clicking on it. Photoshop will ask you if you wish to "Replace current brushes with the brushes from SS-frames.abr?"
Click "OK," and now you should see some very different thumbnails in the brush preset picker. Those are the frames brushes! You've successfully loaded the brush set. If you don't see "SS-frames" among the listed brush sets available, then you didn't extract the ABR file into the right directory.
Using the Brushes
 Using a Photoshop brush is as easy as clicking on your canvas with the brush selected. But these were made to frame images or photos, so there's a bit more to it than that. Let's start with a fresh canvas. Under the top menu, choose File > New. Make the width and height both 800 pixels, the resolution 72 pixels/inch (should be default), the color mode RGB, and the background contents white. Using a Photoshop brush is as easy as clicking on your canvas with the brush selected. But these were made to frame images or photos, so there's a bit more to it than that. Let's start with a fresh canvas. Under the top menu, choose File > New. Make the width and height both 800 pixels, the resolution 72 pixels/inch (should be default), the color mode RGB, and the background contents white.
We need a photo to frame! So, on the top menu choose File > Open and find the photo that you would like to put a border around. Choose "Ok" once you've found it to open it within Photoshop. Under the top menu, choose Image > Image Size. If the width/height are below 600 pixels or so, you don't need to change anything. Just hit "Ok." If the photo is larger than that, however, we need to size it down just a bit. Change the width (or height, whichever is larger) to 600 pixels, and choose "Ok."
Now hit CTRL-A (Mac: Cmd-A) to "select all," then CTRL-C (Mac: Cmd-C) to copy. Now hit CTRL-Tab (Mac: Cmd-Tab) to switch back to the other file that we just made, and CTRL-V (Mac: Cmd-V) to paste. This should paste your photo into the middle of the white canvas that we created.
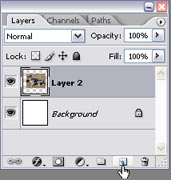 To frame this photo with one of the brushes from the frames set, we're going to want to ensure that this brush is on its own layer. To do that, under the top menu click Window and be sure that "Layers" has a checkmark next to it. If it doesn't, click on it. To frame this photo with one of the brushes from the frames set, we're going to want to ensure that this brush is on its own layer. To do that, under the top menu click Window and be sure that "Layers" has a checkmark next to it. If it doesn't, click on it.
Your layers palette should now look something like the image on the right.
To create a new layer for the brush, click on the "Create a New Layer" button at the bottom of the layers palette. It is the icon that looks like a page with the lower left corner turned up, and should be just to the left of the garbage can icon. You can see my icon hovering over it in this screenshot.
By default, this layer should be called "Layer 3" or somesuch. But let's rename it. Right click on this new layer in the layers palette and choose "Layer Properties.." When Photoshop asks you to, name it "Brush" and hit "OK." While we're at it, let's name the layer with the photo on it, too. Right click on that layer and choose layer properties, then name it "Photo" and hit "Ok." We want to be working on our brush layer right now, however, so left click on that layer once to select it.
On the tools palette, make sure that you still have the brush tool selected. Click on the small arrow to the right of the brush thumbnail, located just under the main menu at the top of the Photoshop window (just like we did earlier when we were loading the brushes). Look through the frames brushes and decide which one you'd like to use.
 My photo is longer horizontally than vertically, so I chose one of the wider brushes that was made to fit a landscape photo. (Please note, most of these brushes will work just as well for horizontal or vertical photos - I will go on to explain later how you can rotate the brush to work for either.) My photo is longer horizontally than vertically, so I chose one of the wider brushes that was made to fit a landscape photo. (Please note, most of these brushes will work just as well for horizontal or vertical photos - I will go on to explain later how you can rotate the brush to work for either.)
The brush that I am using is called "rope-square," and it is made to look like a rope. Once you have selected your brush, you need to find the right size. You can slide the arrow at the top of the brush preset picker window to the right or left, or you can click within the text box and enter a numeric value.
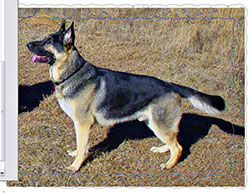 You want to make sure that the inner edge of the brush will cover the entire photo. To see your brush size in relation to your photo, while you are choosing brushes and sizes, you can hover your mouse over the photo and Photoshop will show you an outline of what area the brush will cover. See the outline of the brush below? You want to make sure that the inner edge of the brush will cover the entire photo. To see your brush size in relation to your photo, while you are choosing brushes and sizes, you can hover your mouse over the photo and Photoshop will show you an outline of what area the brush will cover. See the outline of the brush below?
Once you've selected your brush size, you need to choose your color. For the brush itself, we're going to use black. Why? Well, most of the brushes in this pack will have some sort of transparent area, if you were to just click once on the canvas to frame the photo. We don't want any transparency, though. We don't want to see parts of the photo beneath the brush - not in most cases, anyway!
 So we're going to have a layer where we apply the brush to frame the photo, and then we're going to have a layer beneath that adds any colors that we want to have, as well as taking away that transparency. So we're going to have a layer where we apply the brush to frame the photo, and then we're going to have a layer beneath that adds any colors that we want to have, as well as taking away that transparency.
So, choose black as your foreground color on the bottom of your tools palette.
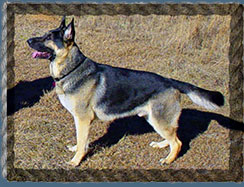 Move your mouse over the canvas until you're sure that the inner edge of the brush is covering the portion of the photo that you wish to frame, then left click once. Move your mouse over the canvas until you're sure that the inner edge of the brush is covering the portion of the photo that you wish to frame, then left click once.
The frame that you chose should appear on the canvas. In the case of the rope border that I'm using, the brush is extremely transparent, as you can see. But the next step will fix that.
 In the tools palette, choose the "Magic Wand Tool." It looks like the image on the left. In the tools palette, choose the "Magic Wand Tool." It looks like the image on the left.
Make sure that your "Brush" layer is still active in your layers palette by left clicking on it. Back on the canvas, click in the middle of the border.
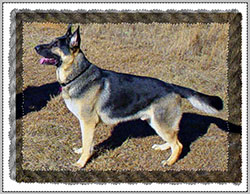 This should select the space in the middle of the frames brush. Holding SHIFT, click outside the border. By holding shift, you are adding to the current selection, so you should now have inside and outside of the frame selected. Everything but the frame itself, in other words. Like this. This should select the space in the middle of the frames brush. Holding SHIFT, click outside the border. By holding shift, you are adding to the current selection, so you should now have inside and outside of the frame selected. Everything but the frame itself, in other words. Like this.
In the top menu, click on Select > Inverse. Or, the shortcut for this is SHIFT-CTRL-I (Mac: Cmd-Shift-I). Now instead of having all of the area outside the frame selected, you have the frame itself selected.
We want to make sure that there's no color poking out around the edges of our brush, though, so let's click Select > Modify > Contract on the top menu, and choose 1 pixel. Hit "Ok." This changes our selection area so that it's smaller on all edges by 1 pixel.
 On the tools palette, select the "Paint Bucket Tool." On the layers palette, click on the "Photo" layer. Click on the "Create a New Layer" button at the bottom of the layers palette again, just like we did earlier. On the tools palette, select the "Paint Bucket Tool." On the layers palette, click on the "Photo" layer. Click on the "Create a New Layer" button at the bottom of the layers palette again, just like we did earlier.
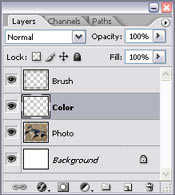 Now right click on this layer and choose "Layer Properties" - name it "Color" and click "OK." Your layers palette should now look something like the image on the right. Now right click on this layer and choose "Layer Properties" - name it "Color" and click "OK." Your layers palette should now look something like the image on the right.
Using the color of your choosing (in this case, a nice medium brown), click within the selected area on the canvas. This should fill in the brush area with color and take away any transparency that there was previously. CTRL-D (Mac: Cmd-D) to deselect the area that you had previously selected, so you can get a better look at your border. You will still likely have areas of the photo that are poking out around the edges of the frame. Don't worry, we'll fix those next!
In the tools palette, select the "Magic Wand Tool" once again. Making sure that the "Colors" layer is active (click on it in the layers palette), click once somewhere in the middle of the border area. You should now have all of the space in the middle of the border selected, where the photo is.
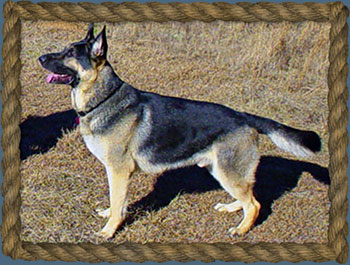 On the top menu, click Select > Modify > Expand and choose 1 pixel. Now click SHIFT-CTRL-I (Mac: Cmd-Shift-I) to inverse the selection. In the layers palette, click on your "Photo" layer to select it. Hit DELETE to remove the edges of the photograph that are sticking out beyond the frame. CTRL-D (Mac: Cmd-D) to deselect. On the top menu, click Select > Modify > Expand and choose 1 pixel. Now click SHIFT-CTRL-I (Mac: Cmd-Shift-I) to inverse the selection. In the layers palette, click on your "Photo" layer to select it. Hit DELETE to remove the edges of the photograph that are sticking out beyond the frame. CTRL-D (Mac: Cmd-D) to deselect.
Voila! You now have a border around your photo.
If you want to play around with how the border looks, you can change the Opacity of the Brush layer (in the layers palette, upper right) or change the Hue/Saturation of the Color layer (Image > Adjustments > Hue/Saturation). You can also apply various layer styles like a drop shadow, a color gradient, or a pattern to the "Color" layer (on the bottom of the layers palette, the "Add a Layer Style" button looks like an "f" inside a darker circle - that's where you'll find all these options).
If your color is still sticking out a bit from beneath the Brush layer, select the magic wand tool and click on the canvas somewhere within the colored area itself. Click SHIFT-CTRL-I (Mac: Cmd-Shift-I) to inverse the selection. Choose Select > Modify > Expand and choose 1 pixel. Then hit DELETE. CTRL-D (Mac: Cmd-D) to deselect and get a better look at it. Keep doing this until there is no more color sticking out, expanding by 1 pixel each time. You shouldn't even have to do it once, but each brush is different and this explains how to fix it "just in case."
Is the border that you want to use taller than it is wide and your photo is just the opposite? No problem! Most of these borders can be rotated and still work (except for the archway). Follow the steps exactly as they are written above, but just after you click once on the canvas to use the brush, click on Edit > Transform > 90° CW. Then continue on with the tutorial.
Tips for Particular Brushes
 For most of the brushes in this pack, the above procedure is perfect for framing photos. There are a few brushes, however, that could use a bit of extra explanation. For most of the brushes in this pack, the above procedure is perfect for framing photos. There are a few brushes, however, that could use a bit of extra explanation.
Some of the borders are pure black, with no gradients of gray in them. With these borders, feel free to use the brush in whatever color you want, without needing a "Color" layer beneath it.
Brushes that are like this: decorative1, decorative3, decorative5, filmstrip, grunge1, grunge2, stamp.
You can see an example to the right. This is the "stamp" brush.
Some brushes - like the celtic brush - have "holes" or transparent areas in them. You may not want to create a solid "Color" layer, since it would show through these small holes. Instead of using the paint bucket tool, you may want to duplicate the "Brush" layer (right click on the "Brush" layer and choose "Duplicate Layer"), CTRL-E (Mac: Cmd-E) to merge that layer down, and then apply a color overlay to that layer (on the layers palette, click on the "Add a Layer Style" button - it looks like a cursive "f" inside a dark circle - and then choose "Color Overlay").
 Another idea for how to deal with these kinds of brushes: you could make it so that the photo shows through the holes, instead of the background. To do this, you'll want to do away with the "Color" layer once again. Use the brush in whatever color you'd like, instead of black. Then, when it comes time to delete the edges of the photo, instead of selecting the inner portion of the frame, use the magic wand tool to select the outer portion of the frame. Expand it by 1-2 pixels by clicking on Select > Modify > Expand. Then select the Photo layer and hit DELETE. You'll end up with something like this.
Brushes with transparency/holes: Celtic, decorative1, decorative2, decorative3, decorative4, decorative4-inverse, decorative5, doily.
For the grunge brushes, the edges are far too uneven to use the above selection method to delete the edges of the photo. In the case of brushes grunge1 and grunge2, I would highly advise cropping the photo by hand.
Use the rectangle marquee tool to make a selection as close to the middle of the grunge border as you can, like I've done here. Once you've made your rectangle, CTRL-SHIFT-I (Mac: Cmd-Shift-I) to inverse the selection and then DELETE to remove the edges of the photo.
 And last - but not least - we have the Polaroid brush. You could use the brush "Polaroid - white" to make a white border around a photo and then apply layer styles like drop shadow, bevel and emboss, etc. to make it look like a Polaroid. That's an option. And last - but not least - we have the Polaroid brush. You could use the brush "Polaroid - white" to make a white border around a photo and then apply layer styles like drop shadow, bevel and emboss, etc. to make it look like a Polaroid. That's an option.
But if you'd like it to be more detailed than that, follow the course of this tutorial exactly, but use the "Polaroid - dark" brush to make your border. Then on your "Color" layer, make it white. See the level of detail on the border?
That's it! If you have any questions about this tutorial or how to use these brushes, please feel free to ask them at Stephanie's feedback and requests page.
If you are interested in downloading the image pack for these brushes, rather than the brushes themselves, you can find the Frames & Borders image pack here.
And of course, here's a link to the Frames & Borders Free Brush Set (zip/6.5MB). Below is a complete description of what you'll find inside. Have fun!
More Free Photoshop Brushes From Stephanie
We've collected the most recent of Stephanie's original brushes on a special Obsidian Dawn Photoshop Brushes Page, with big preview images to give you an idea of each set. You'll also find her great random tips for using Photoshop Brushes.

Photoshop CS5 & Photoshop CS5 Extended - New Painting Brushes
 Adobe Photoshop CS5 delivers breakthrough capabilities to help you create images with impact. Refine your
images with reengineered photography tools for removing noise, adding grain, and creating high dynamic
range (HDR) images. Get precise results when making complex selections. Remove any image element and
see the space fill in almost magically. Paint with naturally textured brushstrokes and realistic color blends. Learn more about Photoshop CS5. Adobe Photoshop CS5 delivers breakthrough capabilities to help you create images with impact. Refine your
images with reengineered photography tools for removing noise, adding grain, and creating high dynamic
range (HDR) images. Get precise results when making complex selections. Remove any image element and
see the space fill in almost magically. Paint with naturally textured brushstrokes and realistic color blends. Learn more about Photoshop CS5.
Adobe Photoshop CS5 Extended software helps you create the ultimate images
for print, the web, and video. Enjoy all the state-of-the-art editing, compositing,
and painting capabilities in industry-standard Photoshop CS5, and experience
fast performance thanks to cross-platform 64-bit support. Also create 3D extrusions
for logos, artwork, and motion graphics; edit 3D objects with advanced tools; and create and enhance motion-based content. Learn more about Photoshop CS5 Extended.
Photoshop CS5 - Extraordinary Painting Effects
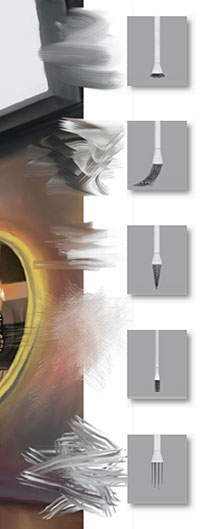 With a new Mixer Brush, a Bristle Tips feature, and a new mechanism for blending colors, Photoshop CS5 redefines the way you paint. You can take advantage of more natural and realistic painting effects, making it easy to take your imagery and designs in new artistic directions. With a new Mixer Brush, a Bristle Tips feature, and a new mechanism for blending colors, Photoshop CS5 redefines the way you paint. You can take advantage of more natural and realistic painting effects, making it easy to take your imagery and designs in new artistic directions.
The Mixer Brush lets you define multiple colors on a single tip, and then mix and blend them with the underlying hues on your canvas, achieving creative results that rival traditional painting media. When starting with a photo original, you can use a dry, empty brush to blend the existing colors while at the same time adding a painterly effect to the image.
Mixer Brush settings provide extensive control over the wetness of the canvas colors, the load rate that determines amount of paint loaded on the brush, the mixing rate between brush and canvas colors, and whether the brush is refilled, cleaned, or both after each painting stroke.
In conjunction with these new mixing features, Photoshop CS5 incorporates unprecedented control over stroke characteristics of its painting tools with Bristle Tips. Bristle Qualities define key bristle properties such as shape, length, stiffness, thickness, angle, and spacing, which affect how the color is laid on the image as you paint.
The Bristle Brush Preview feature provides a visual representation of these changes, and you can save your tip configurations for future use, allowing you to build a customized collection of Bristle Tips to experiment with when using Photoshop brush tools. Read about all the new features in Photoshop CS5.
You can upgrade from any Suite to any Suite, as there are no more restrictions. Customers can upgrade to CS5 suites from up to 3 versions back. Customers can even step down; go from Photoshop Extended to Photoshop or from a Master Collection to another Suite. For full upgrade pricing on individual CS5 products visit the Adobe Store. See CS5 pricing in UK currency at the Adobe UK Store. Visit the Adobe Special Offers page to find deals. Save 80% on Adobe Student Editions. Try before you buy — download a free Photoshop CS5 trial.

Frames & Borders Free Brush Set - Brush Descriptions
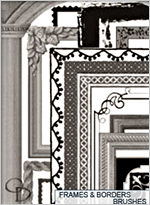
Inside the Frames & Borders Free Brush Set (zip/6.5MB) you'll find 28 frames and borders of varying width and height ratios, all made to fit most standard photo sizes. Some of the brushes are made for landscape photos (wider than they are tall) and other brushes are made for portrait photos (taller than they are wide). All of them (except for the "archway" brush) can be rotated. These are original brushes by Stephanie of Obsidian Dawn and are cleared to be used for commercial use. Here's a complete list of the free brushes in the set:
Archway: a stone archway
Bamboo: sticks of bamboo in the shape of a frame
Celtic: a border of Celtic knotwork
Decorative 1: an ornamental border with loops and dots
Decorative 2: a border with crisscrossing ribbons
Decorative 3: a border with lines and swirls at the edges
Decorative 4: swirls & fleur-de-lis make up this border
Decorative 4-inverse: this is the same as "Decorative4", but with the colors inversed
Decorative 5: a classic styled border with rounded inner edges
Diamonds: a border made up of diamond shapes
Doily: this is just the outer fringes of a lace doily
Fabric: fabric cut with zig-zag scissors and stitched together with a thick thread
Filmstrip: a filmstrip border to make photos look like a movie reel or a negative
Frame1: a frame made of wood and with metal studs - textured and grungy looking
Frame2: a simple wooden frame
Frame3: an ornamental metal (or wood) photo frame
Grunge1: a grungy border, fairly uniform
Grunge2: a grungy border that's kind of all over the place
Grunge-squares: a border made up of grungy styled squares
Leaves1: a regular beveled frame, but with a patch of leaves in the upper left corner
Leaves2: a border made up of vines and leaves
Polaroid-dark: to be used with a dark brush color on a white background
Polaroid-white: a more simple border, made to be used with a white brush color
Ric-rac: a border made up of ric-rac, a fabric-type border used in sewing
Rope-circle: a rope in the shape of a circle that can be used as a border
Rope-square: a rope border, in the shape of a square
Sequins: a border made up of overlapping sequins
Stamp: a border made to make your photo look like a stamp

Obsidian Dawn: Free Brushes by Stephanie Shimerdla
 A delightful collection of special effects brushes can be found here. Realistic renderings of lightning, flames, blood stains and more. A delightful collection of special effects brushes can be found here. Realistic renderings of lightning, flames, blood stains and more.
 Obsidian Dawn: Free Brushes by Stephanie Shimerdla Obsidian Dawn: Free Brushes by Stephanie Shimerdla
|
|
|
![]()
![]()
![]() Try before you buy. Download any Adobe product for a free 30 day trial.
Try before you buy. Download any Adobe product for a free 30 day trial.![]()
![]()
![]() Download the Frames & Borders Free Brush Set (zip/6.5MB)
Download the Frames & Borders Free Brush Set (zip/6.5MB) This tutorial will walk you through installing and using the Frames & Borders Free Brush Set (zip/6.5MB) by Stephanie of Obsidian Dawn. It also includes tips on using specific brushes from the set to insure that they come out their best!
![]() Open Photoshop. If you already had it open just now, the brushes will not automatically show up until you close and re-open the program, so go ahead and do so now. To be sure that your tools palette is visible, click on "Window" in the top menu and make sure that "Tools" has a checkmark next to it. If it doesn't, click it. In your tools palette, click on the Brush tool.
Open Photoshop. If you already had it open just now, the brushes will not automatically show up until you close and re-open the program, so go ahead and do so now. To be sure that your tools palette is visible, click on "Window" in the top menu and make sure that "Tools" has a checkmark next to it. If it doesn't, click it. In your tools palette, click on the Brush tool. Once you've done so, you'll see a small menu of brush tool options located just below the top menu. Right next to the thumbnail of the current brush that you have selected, there is a small down arrow. Click that to open the brush preset picker.
 In this dropdown menu, you will see all of the brushes that are a part of your currently selected brush set. On the far upper right-hand corner, there is a small arrow. Click it.
  Using a Photoshop brush is as easy as clicking on your canvas with the brush selected. But these were made to frame images or photos, so there's a bit more to it than that. Let's start with a fresh canvas. Under the top menu, choose File > New. Make the width and height both 800 pixels, the resolution 72 pixels/inch (should be default), the color mode RGB, and the background contents white.
  To frame this photo with one of the brushes from the frames set, we're going to want to ensure that this brush is on its own layer. To do that, under the top menu click Window and be sure that "Layers" has a checkmark next to it. If it doesn't, click on it.
  My photo is longer horizontally than vertically, so I chose one of the wider brushes that was made to fit a landscape photo. (Please note, most of these brushes will work just as well for horizontal or vertical photos - I will go on to explain later how you can rotate the brush to work for either.)
 You want to make sure that the inner edge of the brush will cover the entire photo. To see your brush size in relation to your photo, while you are choosing brushes and sizes, you can hover your mouse over the photo and Photoshop will show you an outline of what area the brush will cover. See the outline of the brush below?
 So we're going to have a layer where we apply the brush to frame the photo, and then we're going to have a layer beneath that adds any colors that we want to have, as well as taking away that transparency.
  Move your mouse over the canvas until you're sure that the inner edge of the brush is covering the portion of the photo that you wish to frame, then left click once.
 ![]() In the tools palette, choose the "Magic Wand Tool." It looks like the image on the left.
In the tools palette, choose the "Magic Wand Tool." It looks like the image on the left. This should select the space in the middle of the frames brush. Holding SHIFT, click outside the border. By holding shift, you are adding to the current selection, so you should now have inside and outside of the frame selected. Everything but the frame itself, in other words. Like this.
![]() On the tools palette, select the "Paint Bucket Tool." On the layers palette, click on the "Photo" layer. Click on the "Create a New Layer" button at the bottom of the layers palette again, just like we did earlier.
On the tools palette, select the "Paint Bucket Tool." On the layers palette, click on the "Photo" layer. Click on the "Create a New Layer" button at the bottom of the layers palette again, just like we did earlier.  Now right click on this layer and choose "Layer Properties" - name it "Color" and click "OK." Your layers palette should now look something like the image on the right.
 On the top menu, click Select > Modify > Expand and choose 1 pixel. Now click SHIFT-CTRL-I (Mac: Cmd-Shift-I) to inverse the selection. In the layers palette, click on your "Photo" layer to select it. Hit DELETE to remove the edges of the photograph that are sticking out beyond the frame. CTRL-D (Mac: Cmd-D) to deselect.
 For most of the brushes in this pack, the above procedure is perfect for framing photos. There are a few brushes, however, that could use a bit of extra explanation.
  Another idea for how to deal with these kinds of brushes: you could make it so that the photo shows through the holes, instead of the background. To do this, you'll want to do away with the "Color" layer once again. Use the brush in whatever color you'd like, instead of black. Then, when it comes time to delete the edges of the photo, instead of selecting the inner portion of the frame, use the magic wand tool to select the outer portion of the frame. Expand it by 1-2 pixels by clicking on Select > Modify > Expand. Then select the Photo layer and hit DELETE. You'll end up with something like this.


