![]()
![]()
![]() Buy. Download. Create. Get Photoshop now at the Adobe Store.
Buy. Download. Create. Get Photoshop now at the Adobe Store.
![]()
![]()
Wacom MasterClass Video Training - 18 Free Videos - Plus 20% Discount Code
 Below are 18 free videos from the Wacom MasterClass collection. If you choose to purchase this product, make sure to use our exclusive discount coupon code Wacom20 for an instant 20% discount, which brings you 10 hours of expert video training for only $79.99.
This exceptional value includes all of Volumes 1–3 of the Wacom MasterClass collection, including lessons from artists Angie Taylor, Steve Caplin, Daniel Lieske, and Uli Staiger. In addition to a basic course covering the tablet’s tools and settings, you get training on everything from beauty retouching and painting in Photoshop to drawing in Illustrator and motion design with After Effects.
Each class features lessons with picture-in-picture live footage of the artist working with their pen and tablet, enabling you to see and learn from their techniques up close.
Basic Settings - Installing Your Tablet - Installing the Wireless Tablet
In this lesson you'll see how to install the Wacom tablet Intuos4 and connect it to your computer via Bluetooth. You'll also get some tips on optimizing the battery life of your tablet.
Basic Settings - Working with Pens - Pressure Sensitivity
In this tutorial you'll learn about the pressure sensitivity of the pen and how you can adjust its settings to suit the way you work in Photoshop.
Basic Settings - Working with Pens - Fine Tuning and Tilt Sensitivity
In this video you'll see how to use the Wacom Control Panel to fine-tune the click threshold and adjust tilt sensitivity to work with the new Art Pen.
Vol.1: Beauty Retouching - Removing Skin Blemishes - Spot Healing Tool: More Blemishes
A few small scars and wrinkles detract from the model's overall appearance, so in this video we'll get rid of them using the Spot Healing tool.
Vol.1: Beauty Retouching Major Adjustments Liquify Filter: The Eye
The left eye on our model looks too small and too far away from the nose, producing an unbalanced appearance. The Liquify filter can correct this problem too, as shown in this video.
Vol.1: Optimizing Your Architectural and Landscape Images — Panoramas and the Vanishing Point Filter — Patching with Vanishing Point
This video looks at the Vanishing Point filter. Everyone who works with architectural photography needs to know how to use this filter, which is the single most useful tool for fixing architectural blemishes.
Vol.1: Lightroom Crash Course Spot Removal
This video looks at spot removal in Lightroom, which is a curious process that involves defining a circular area to be patched and then specifying the source location for the patch. The end results, though, are worth the trouble.
Vol.2: Drawing and Painting in Photoshop - Preliminaries - Warming Up with Scribbles
In this lesson we'll do some casual scribbling to get comfortable in the workspace and warm up the creative part of the brain.
Vol.2: Creating the Planet - Creating the Planet - Refining the Clouds
We'll nondestructively refine the appearance of our clouds in this video by adding a layer mask and an adjustment layer.
Vol.2: Drawing in Illustrator Building the Human Form — Customizing Shapes with the Reshape Tools
The Reshape tools can be used to reshape paths and customize shapes with your Wacom pen. In this video you'll try them out, using the Warp, Pucker, Bloat, and Wrinkle tools to give your artwork your own unique style.
Vol.2: Drawing in Illustrator — Editing Shapes and Adding Details — Creating Textures and Patterns with the Symbol Sprayer Tool
This video looks at the Symbol Sprayer, which you can use in to add a large number of identical objects to the artwork at one time. Once they are created you can update them as a group or break them apart so they behave like ordinary objects.
Vol.2: Painter Crash Course — Blocking in with the Digital Watercolor Brush
Using the sketch as a guide, in this video we'll block in the big shapes of our painting using the Digital Watercolor brush.
Vol. 3: 3D with Photoshop Crash Course - Creating a Complex Object from a Grayscale Image
You can create a new 3D object just by painting a 2D image – Photoshop uses the luminance information to build up a great landscape-like object! You'll see how it works in this video.
Vol.3: Motion Design with After Effects Painting Techniques - Clone Tool Basics
In this tutorial you'll learn the basics of the very powerful Clone tool. We'll also look at the options for offsetting cloned pixels in time.
Vol.3: SketchBook Pro Crash Course - Setting Everything Up - Wacom Control Panel
This video looks at the Wacom Control Panel and how to set it up. You'll get some ideas of things you might want to change, like the contents of the Radial menu and the ExpressKeys.
Vol. 3: Motion Design with After Effects Painting Techniques — Basic Drawing and Painting in After Effects
Every application is different and has its own idiosyncrasies when it comes to drawing and painting. In this lesson you'll experiment with various brushes and settings so that you become comfortable painting in After Effects.
Vol.3: Motion Design with After Effects Painting Techniques — Creating Reveals with the Eraser Tool
Hand-painted reveals can produce really nice, organic-looking animations. In this tutorial you'll learn how to create reveals over time using the Eraser tool.
Vol.3: Zbrush Crash Course — Unified Skin
Before using polysculpting tools, we need to turn our sketch sphere model into a polygon mesh with the Unified Skin panel. This is a simple process, as you'll see in this video.
![]()
Wacom Intuos 5 Pen Tablet - Multi-touch, Wireless, Heads-up Display Inspires Creative Expression
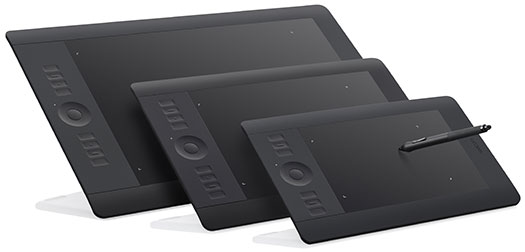
Wacom today announced the Intuos 5, the next generation lineup of pen tablets for professional photographers, designers and artists. The Intuos5, available today, comes in three models: Intuos5 touch Small ($229.95 USD), Medium ($349.95 USD) and Large ($469.95 USD).
Superior new features include multi-touch gesture support for intuitive input, an Express View display to facilitate an efficient workflow and wireless capabilities for convenience and comfort. Combined with Wacom’s renowned pen pressure and tilt sensitive pen, the state-of-the-art Intuos5 inspires creativity through an immersive experience.
With its ergonomic, ambidextrous design and bold new look, the slim-profile Intuos 5 allows creative professionals to work in complete comfort. The professional matte-black, soft-touch finish and illuminated accents reflect a modern and durable design. To meet the workflow and workspace needs of Wacom’s diverse professional customer base, Intuos5 models are being introduced in the Americas in three different sizes (small, medium and large) to accommodate creative preferences.
The addition of multi-touch to the Intuos5 provides a complementary input method to the pen that is natural to use in the creative process. One of the distinct benefits of multi-touch is its support of gestures to zoom, scroll, pan and rotate digital content, all while remaining focused on the creative process. Not only is the Intuos5 able to recognize standard Windows and Mac gestures, but customizable gestures can be created in supporting applications to make navigational input easier and stress free. For example, a customized gesture could be created to open a commonly used feature within Adobe® Photoshop.
Wacom continues to build customizable non-dominant hand controls into its professional tablets to help users streamline their workflow and be more productive. On the Intuos5, these include customizable ExpressKeys (six on small size and eight on both medium and large sizes) and one Touch Ring, with four-function toggle. These features allow users to place commonly used shortcuts and modifiers right at their fingertips, decreasing dependency on the computer keyboard while increasing productivity. The ambidextrous design allows right-handed and left-handed users to simply rotate the tablet 180 degrees for easy access to the ExpressKeys and Touch Ring.
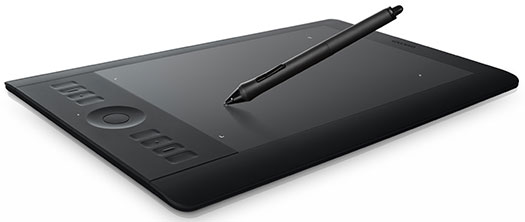
To help users remember their application-specific ExpressKey settings, Intuos5 comes equipped with Express View, a new Heads-Up Display (HUD) feature that displays the current settings on the computer screen. Lightly resting a finger on any of the keys reveals the settings on-screen and fades within a few seconds so as not to disrupt the creative process.
For creative professionals, the Intuos5 Grip Pen remains the heart and soul of the tablet experience. The Intuos5 pen registers 2048 levels of pen pressure and up to 60 degrees of pen tilt, allowing the pen to emulate the same feel, response and effects derived from working with traditional tools such as paint brushes, markers and pens.
In addition, Intuos5 features Wacom’s proprietary Tip Sensor technology, which means that pressure-sensitive effects can start with an incredibly light touch. The Wacom pen expands the creative effects that can be achieved within software applications that support pressure and/or tilt sensitivity such as Adobe Photoshop, Adobe Illustrator, Corel Painter, Autodesk Sketchbook Pro and many more. The Grip Pen also features a pressure-sensitive eraser and two side switches that can be customized for commands such as double-click and right-click.
With the Intuos5, Wacom broadens its offering for wireless connectivity. Now, all sizes of Intuos5 can be converted to a wireless tablet by installing the Wireless Accessory kit, sold separately on Wacom’s e-store. The kit includes a rechargeable battery that charges through USB, a RF module that plugs into the tablet and a receiver that plugs into a USB port on the computer.
The Intuos5, available today, comes in three models: Intuos5 touch Small ($229.95 USD), Medium ($349.95 USD) and Large ($469.95 USD).
Get Photoshop CS6 Beta For Free At Adobe Labs
Adobe has announced that Adobe Photoshop CS6 beta, a preview of what's to come in the next release of Photoshop, is available as a free download from Adobe Labs.
![]()
 Find Us On Facebook, Follow Us On Twitter
Visit PhotoshopSupport on Facebook. Follow us on Twitter.
Adobe Deals & Special Coupon Offers
Visit the Adobe Coupons & Special Offers Page to see the latest deals from Adobe. Find upgrade options at the Adobe Store. Get up to 80% off at the Adobe Education Store. Find out about monthly or annual subscriptions. You can also download a free 30 day trial of any Adobe CS5 product.
![]()
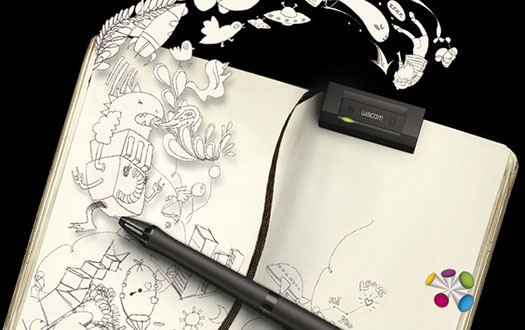
Wacom Inkling Digital Sketch Pen - Draw On Sketchbook Or Paper
The Inkling digital sketch pen captures a digital likeness of your work while you sketch with its ballpoint tip on any sketchbook or standard piece of paper. Designed for rough concepting and creative brainstorming, the Inkling digital sketch pen is ideal for the front end of the creative process.
In addition to capturing your sketch, stroke by stroke, Inkling allows you to create layers in digital files while you sketch on paper. Digital files are transferred to your computer using the Inkling Sketch Manager software, and later, exported to applications such as Adobe®Photoshop and Illustrator. Files can also be opened with the included Inkling Sketch Manager software to edit, delete, add layers or change file formats.
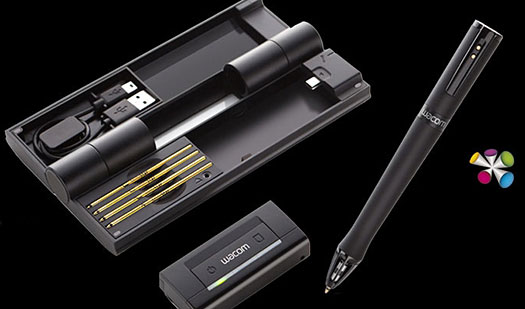
TheInkling digital sketch pen is comprised of both hardware and software components. Hardware includes the pen and a wireless receiver that captures a likeness of the sketch and stores it digitally. The ballpoint pen uses Wacom pressure-sensing technology to detect how hard the pen is being pressed to the paper while sketching. These pressure variations will appear in the digital version of your drawing.
The receiver can be clipped to the edge of standard paper or sketchbooks and the position can be adjusted for left or right handed users to provide the receiver with an uninterrupted line of sight with the pen tip. When sketching is complete, the receiver is connected to the user’s computer via USB to transfer the digital files. Files are opened with the included Inkling Sketch Manager software to manage layers or change file formats before transferring them for adjustment and editing in other creative software applications.
The Inkling Sketch Manager software is designed to help you save time by quickly preparing your files for immediate email distribution or for further development in other creative software application, such as Adobe Photoshop. In the Inkling device, you can add, delete and combine layers and then save the files in the format you need, or export the files, with layers, directly to select applications.
From the Sketch Manager Preview screen, you can see all of your sketches that are in your “My Sketches” folder. From this screen, save or open any sketch, for further adjustment, or if you forgot to add layers while you were drawing, make these changes right in Inkling Sketch Manager.
Inkling Tutorials
When the installation of the Inkling Sketch Manager software (located on the flash memory of the Inkling receiver and not on a DVD) is complete, the Installer asks if you would like to view the Inkling tutorial. We suggest that you take this opportunity to view the tutorial to acquaint yourself with the complete functionality and recommended use of the product. You can also watch the Inkling Tutorial by selecting each chapter from the menu below:
Chapter 1: Installing software (PC)
Chapter 1: Installing software (Mac)
Chapter 2: Charging Inkling
Chapter 3: Replacing the pen cartridge
Chapter 4: Setting up Inkling
Chapter 5: Using Inkling
Chapter 6: Connecting Inkling & transferring sketches
Inkling FAQ
How long does it take to charge Inkling and what is the work time?
Inkling will fully charge within 3 hours, yielding a typical work time of up to 15 hours for the pen and up to 8 hours for the receiver.
How accurate are the sketches?
In general, sketches with Inkling will be accurate to within approximately +/- 0.1 inches (+/- 2.5 mm) in the main drawing area of an A4 page, and within (approximately +/- 0.2 inches (+/- 5.0 mm) at the edges of the page.
What are the drawing sizes that Inkling supports?
The maximum size area that Inkling can record is A4 paper, 8.27” x 11.69 inches (210 x 297 mm). Inkling can be attached to a larger sized paper, but it will only record a portion of the drawing that fits within this recording area. Inkling also does not record any part of a drawing that is within approximately 0.8 inches (2.0 cm) of the receiver.
What are the factors that affect the accuracy?
Inkling uses both ultrasonic and infrared technologies that require proper conditions to operate well. The main factors that can affect the accuracy of Inkling are obstruction of the line of sight between the pen sensors and the receiver. (the pen sensors are located in the pen tip area starting just below the widest point of the pen). Very high stroke speeds, direct sunlight on the receiver, the position of the receiver, ultrasonic noise, and other “white” noise at specific frequencies can also affect performance.
What is the resolution of Inkling sketches?
The resolution of the sketches is 600 dpi.
![]()


