![]()
![]()
![]()
![]() Try before you buy. Download any Adobe product for a free 30 day trial.
Try before you buy. Download any Adobe product for a free 30 day trial.
![]()

![]()
Contrast Tutorial - Working With Adjustment Layers In Elements 6
This tutorial is an extract from Adobe Photoshop Elements 6.0 Maximum Performance by Mark Galer. Unleash the hidden potential for professional image editing in Adobe Photoshop Elements with this project-based, real-world guide.
Working With Adjustment Layers
One of the most important image adjustment features in a professional photographer’s workflow is Curves (a sort of Levels command on steroids). Color Curves has now made a welcome appearance in the Enhance menu in Photoshop Elements but it is still not available as an adjustment layer. This project shows you several ways to control contrast using adjustment layers to increase your post-production editing power to maximum performance.
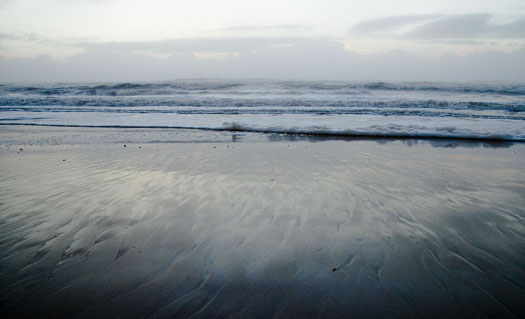
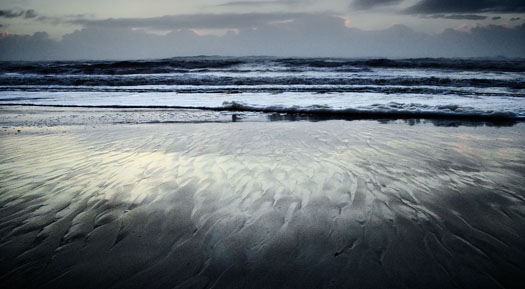
Fig 01 Before and after
The revised Brightness/Contrast adjustment feature
If you have been image editing for some time you will know that ‘Levels’ has always been a superior option to enhance the brightness and contrast of your image rather than the Brightness/Contrast feature.
Adjusting the brightness or contrast of an image using the Brightness/Contrast adjustment used to be very destructive, e.g. if you wanted to make the shadows brighter and elected to use the Brightness/Contrast control, all of the pixels in the image were made brighter (not just the shadows) - causing the pixels that were already bright to fall off the end of the histogram and lose their detail or become white (level 255).
The Brightness/Contrast adjustment feature has now been fully revised so that its behavior falls in line with the non-destructive nature of the Brightness and Contrast sliders in Adobe Camera Raw.
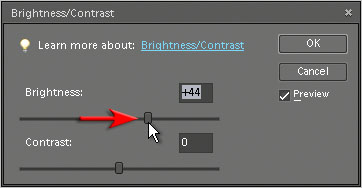
Fig 02 Brightness/Contrast
Using the Brightness slider is now like moving the center (Gamma) slider in the Levels adjustment feature, i.e. the image is made brighter whilst preserving the black and white points within the image. The Contrast slider, on the other hand, makes the shadows darker and the highlights brighter but not at the expense of the black and white points of the image. The only problem with new Brightness/Contrast adjustment feature is that it cannot focus its attention on a limited range of tones, e.g. make the shadows darker or lighter but leave the midtones and highlights as they were.
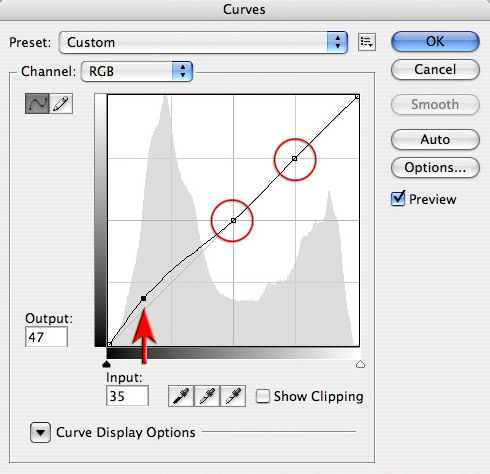
Fig 03 The Curves adjustment feature as seen in the full version of Photoshop CS3
The Curves adjustment feature allows the user to target tones within the image and move them independently, e.g. the user can decide to make only the darker tones lighter whilst preserving the value of both the midtones and the highlights. It is also possible to move the shadows in one direction and the highlights in another. In this way the midtone contrast of the image can be increased with a great deal more control than the new Brightness/Contrast adjustment feature.
Resolving the problem
Now there are four ways to enable you to harness the power of curves in Adobe Elements 6. The first way is ‘Adjust Color Curves’ (Enhance > Adjust Color > Adjust Color Curves) and is a user-friendly version of the Curves adjustment feature found in the full version of Photoshop.
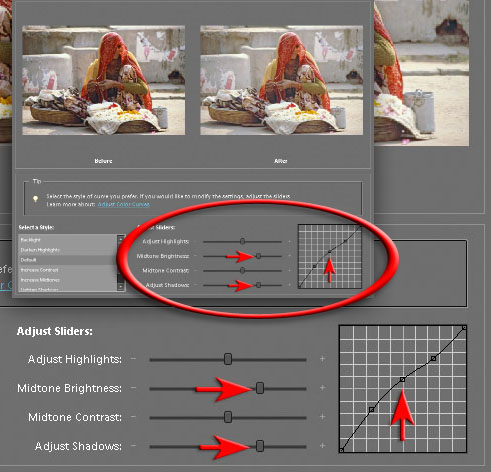
Fig 04
Method 1 - Color Curves
‘Adjust Color Curves’ can be accessed from the Enhance menu (Enhance > Adjust Color > Adjust Color Curves). Unfortunately ‘Adjust Color Curves’ is not available as an adjustment layer so it would be advisable to first duplicate the background layer and apply the changes to this duplicate layer. Start by clicking on the thumbnail of your choice and then click on the advanced options to access the sliders that are required to fine-tune the tonality of your image. It may be necessary to add a Hue/Saturation adjustment layer to modify any changes in the color saturation that may have occurred as a result of the Color Curves adjustment.
Accessing curves as an adjustment layer
The second way of using curves, but this time as an adjustment layer, is a bit cheeky and is available if you have access to a multilayered file created in the full version of Photoshop (check out the supporting DVD that comes with the Adobe Photoshop Elements 6 Maximum Performance book to download the file used in the example below).
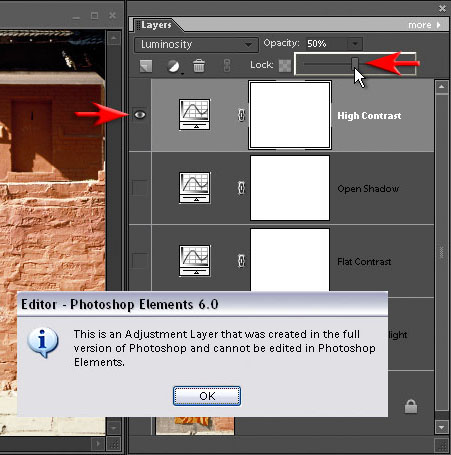
Fig 05 A Photoshop file opened in Elements will allow the user limited functionality to modify the adjustments
Method 2 - Grand theft
One of the great mysteries of life is that although you can’t ‘create’ a Curves adjustment layer in Photoshop Elements you can ‘open’ an image that already has one. Photoshop Elements allows you to see the effects of the Curves adjustment layer (that was created in the full version of Photoshop), switch it off and on, and lower the opacity of the Curves adjustment layer (enabling you to lower the effect of the adjustment layer gradually).
You can also drag this Curves adjustment layer into any other image file that is open in Elements (just click on the adjustment layer thumbnail in the Layers palette and drag it into another image window).
Theoretically this means that if you had a single file that was created in Photoshop with a wide range of Curves adjustment layers to suit your everyday image-editing tasks you could use this as a ‘Curves resource’ - just drag, drop and adjust the opacity to suit the needs of each image you are editing.
The sort of adjustment layers that would be particularly useful would be those that enabled the Photoshop Elements user to increase and decrease image contrast, raise or lower shadow brightness independently, and raise or lower highlight brightness independently.
If the adjustment layers contain generous adjustments they can be simply tailored to suit each new image-editing task by just lowering or increasing the layer opacity. The adjustment layers are resolution independent, which is another way of saying that they will fit any image, big or small - naughty but very nice!
Method 3 - Gradients
The third version is for users of Elements who want a little more control, have a guilty conscience or prefer to explore the advanced features of the package they have purchased rather than the one they have not. This third method allows you to access the ultimate tonal control that Curves has to offer using a different adjustment feature not really designed for the job but which, when push comes to shove, can be adapted to fit the needs of the cash-strapped image editor seeking quality and control.
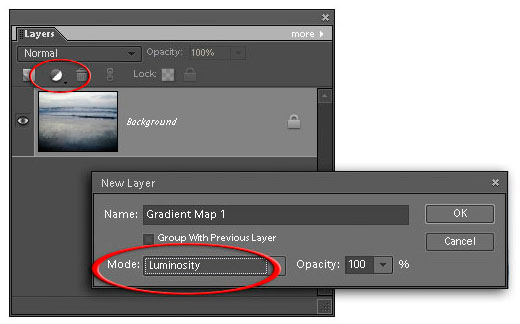
Fig 06-Step 1
Step 1
The first step is to hold down the Alt key and mouse button whilst selecting the Gradient Map adjustment layer from the Create adjustment layer menu in the Layers palette. This will open the New Layer dialog box. Select ‘Luminosity’ from the Mode menu and select OK.
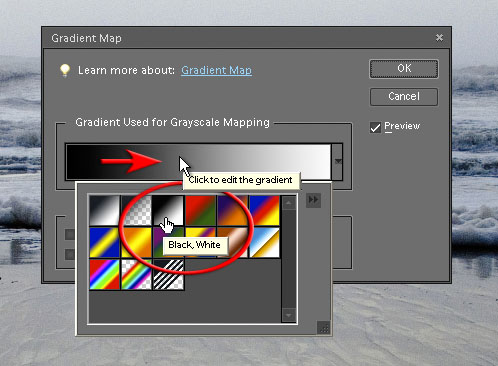
Fig 07-Step 2
Step 2
Click on the third gradient swatch in the presets menu (Black, White). Click on the gradient in the dialog box to open the Gradient Editor.
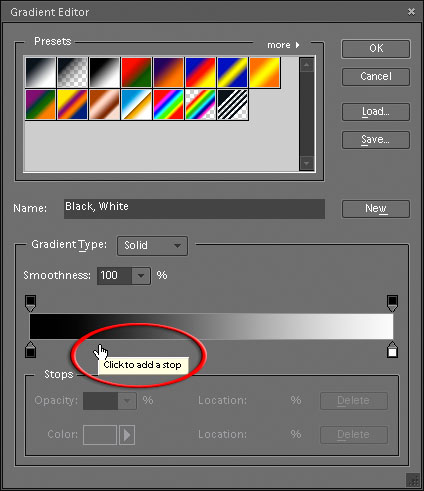
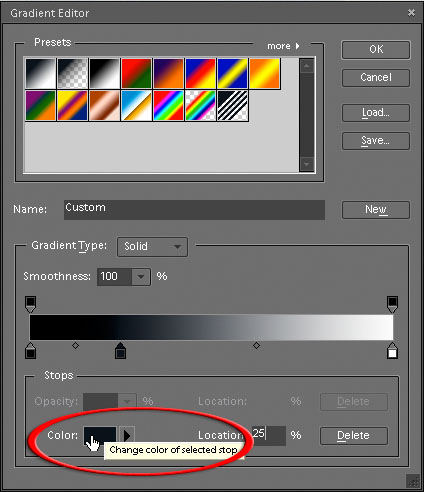
Fig 08-Step 3
Step 3
Move the cursor to just below the gray ramp and click to add a ‘stop’ slightly left of center. Type in 25% as the location and double-click on the color swatch to open the Color Picker.
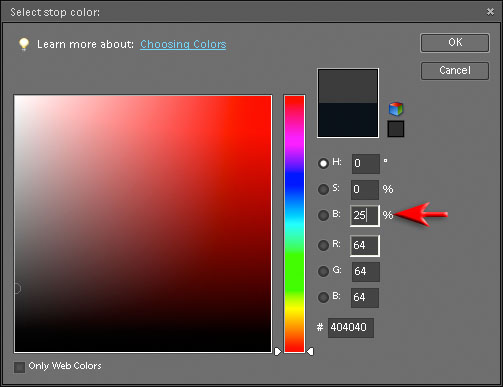

Fig 09-Step 4
Step 4
Choose a brightness value of 25% and click OK (ensure a value of 0 is entered in the other two fields of the HSB radio buttons). Add another stop right of center (at a location of approximately 75%) and again click on the color swatch to open the Color Picker. This time choose a brightness value of 75% and again click OK.

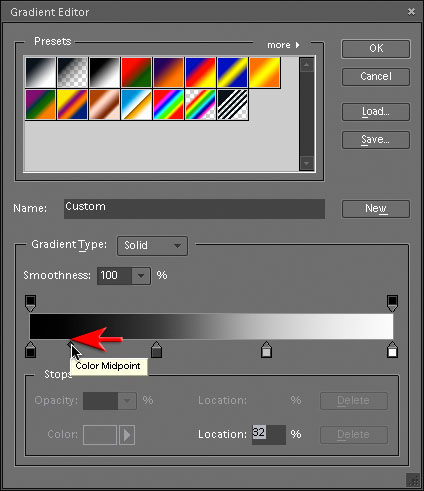
Fig 10-Step 5
Step 5
The ‘Black/White’ Gradient Map in Luminosity mode will leave the existing tonal values of your image the same as before. The magic starts when you start to drag the stops you created to new positions on the gray ramp. Moving the two sliders further apart will lower the contrast whilst dragging them closer together will increase contrast. A ‘Color Midpoint’ also appears between the two stops that you are adjusting to allow you to fine-tune your adjustment.
In this project drag the two sliders together to increase the contrast but move the color midpoint to the left so that deep shadows do not become too dark. Be amazed - you are exercising absolute control over the brightness values of your image! This technique allows all of the versatility of a Curves adjustment layer when editing the luminosity of your image.
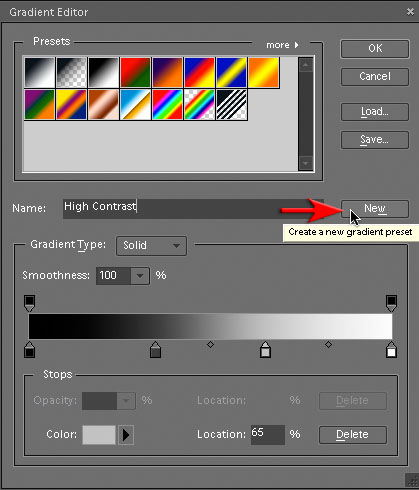
Fig 11-Performasnce Tip
Performance Tip
When you have created a modified gradient map you can name and add the map to the list of presets for future use. Download the Gradient presets file (Tonal_Gradients.grd) from the supporting DVD that comes with the book and use either your ‘Preset Manager’ from the Edit menu to add them to your gradient library or load them directly using the Gradient Editor by clicking on the Load button.
Note > Moving stops too close together can create steps or bands in the tonality of your image, creating an effect that is posterized and unnatural. It is important to realize there are limits to how much tonal manipulation an image is capable of handling before the quality suffers.
The Gradient Map adjustment layer set to Luminosity mode acts like a ‘hot-wired’ Levels adjustment layer. Its advantage is that you can set as many stops or ‘sliders’ as you like, giving the user total control. Any localized areas that require further attention can simply be masked on the adjacent layer mask and tackled separately on a second Gradient Map layer.
Note > If you have a selection active when you choose the Gradient Map adjustment layer it automatically translates the selection into a layer mask, restricting any adjustments to the selected area.
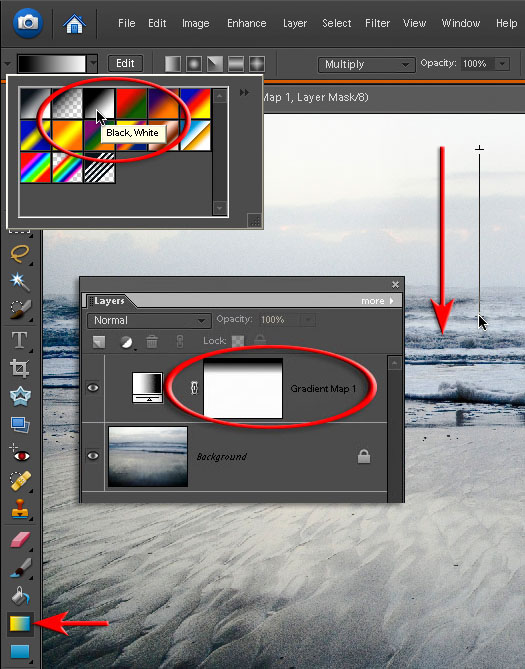
Fig 12-Step 6
Step 6
If you are looking to achieve a simple global contrast adjustment the project is complete. If, however, you want to enhance the image further using more gradients try the following technique. Select the Gradient Map adjustment layer, choose the ‘Gradient tool’ from the Tools palette (or type the letter G on the keyboard). Choose the ‘Black/White’ and ‘Linear’ options and then drag a gradient from the top of the image window to just below the horizon line. This will shield the sky from the contrast adjustment applied by the Gradient Map adjustment layer.
This tutorial is an extract from Adobe Photoshop Elements 6.0 Maximum Performance. Learn more tips and tricks from Photoshop expert Mark Galer.
![]()
Photoshop Elements 6.0 Maximum Performance.
Unleash the hidden potential for professional image editing in Adobe Photoshop Elements with Photoshop Elements 6.0 Maximum Performance, a project-based, real-world guide.
 Using step-by-step instructions and accompanying movie tutorials, Mark Galer leads you through the less well-known and most powerful post-production editing techniques Adobe Photoshop Elements has to offer. Cunning tricks and clever workarounds in this book show you how to create inspiring, professional-looking images and perform tasks you only thought possible in the full Adobe Photoshop package.
Whether you’re an imaging professional or a photography enthusiast, this book will help you get the maximum performance from your software. Learn how to:
- Create striking effects with no commercial lighting or studio equipment
- Extend the dynamic range of your digital camera by merging multiple exposures
- Optimize, enhance and montage images with stunning results
The accompanying DVD provides extensive support with movie tutorials for all projects, high resolution images, multilayered files of completed projects, a stock library and a keyboard shortcut guide.
Mark Galer is a freelance photographer, accomplished lecturer and best-selling author of number books on photography. He is an official Adobe Ambassador for Adobe Photoshop and Adobe Photoshop Elements.
![]()
Adobe Photoshop Elements 5.0 Maximum Performance
 Get the most from your digital camera to produce high-end results that casual users only dreamed of. Your photos will look like a pro shot them as imaging guru Mark Galer shows you how to use critical but little-known techniques for professional quality editing.
- Create awesome effects with no commercial lighting or studio equipment
- Extend the dynamic range of your digital camera by merging multiple exposures
- Give your shots the WOW! factor with advanced options for more power
Everything is at your fingertips with the DVD:
- 5 hours of video tutorials, cataloged into digestible snippets
- Over 200 royalty-free, high-resolution images
- Raw and 16-bit/Channel files
- wMulti-layered project files, loadable presets and keyboard shortcut reference guide
Mark Galer is a senior lecturer in digital imaging at RMIT, Australia, is a Photoshop Elements Ambassador and is the author of 7 best-selling digital imaging books. 'Well written, well illustrated, with a good knack for explaining complex issues.' - Steve Caplin, digital illustrator and author of How to Cheat in Photoshop.
![]() Buy Adobe Photoshop Elements 5.0 Maximum Performance at Amazon.com (34% off).
Buy Adobe Photoshop Elements 5.0 Maximum Performance at Amazon.com (34% off).
![]() Photoshop Elements 5.0 - Special Offer - only $65.99 at Amazon.com.
Photoshop Elements 5.0 - Special Offer - only $65.99 at Amazon.com.
![]()
Photoshop Elements 7 Tips, Tricks And Tutorials
 Here are some tips and tricks and tutorials to help you work more efficiently in Photoshop Elements 7, all from Peachpit Press.
Why Won’t Photoshop Elements Do What I Tell It To Do?
Here's a list of explanations and solutions for common issues that might be blocking your progress in Adobe Photoshop Elements 7.
A Quick Tour of Photoshop Elements
If you're new to Photoshop Elements, this lesson will familiarize you with the Adobe Photoshop Elements 7 workspace and provide you with an overview of the tools and procedures you’ll use to capture and edit your digital images.
Getting Professional Results with Photoshop Elements and Your Inkjet Printer: Toning
Before digital photography, only black and white images could be chemically toned, but today toning can be applied to color images too. Tim Daly shows you how.
Sharing photos in e-mail
If you're new to Photoshop Elements, this lesson will familiarize you with the Adobe Photoshop Elements 7 workspace and provide you with an overview of the tools and procedures you’ll use to capture and edit your digital images.
 Automatic Photo Backups
So what are you going to do with 20 GB (or more) of online storage at Photoshop.com? Photoshop Elements 7 introduces an extremely welcome new feature: Automatic online backups of your images.
Importing media
Bringing your digital files into Photoshop Elements is easy.
Photomerge Scene Cleaner
You’ve probably seen the photo on the Internet or forwarded via email from a friend: a couple in full wedding attire are exchanging vows on the beach, the ocean meeting the sky in the background, and...what’s that? Yes, a topless sunbather is walking into the frame, ruining an otherwise romantic wedding photo. In Elements 7, however, that photo would be easily salvageable.
Smart Brush
You could accomplish the same results as the Photomerge Scene Cleaner by hand-editing areas between images, but it would take up more time. In the same spirit, the new Smart Brush tool offers a collection of common editing tasks that can be applied simply by painting areas of your photos.
![]()
![]()