![]()
![]()
Try before you buy. Download any Adobe product for a free 30 day trial.
![]()
![]()
Photoshop Tips & Tricks — Variety Pack Volume 2
Here is a collection of useful tips and tricks to improve your Photoshop skills.
Flip Through Your Font Collection
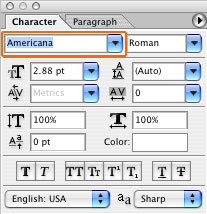 Often when I am searching for that perfect font for a logo I will try hundreds of font faces.
I used to change them one by one in the font pallet. However you can speed things up a bit if you just put your mouse in the font drop down box to select it and use the up and down arrow keys to tab through all your fonts.
It makes quick work of the task and you can even find a few fonts that you never would have tried otherwise.
Reset Dialog Box
When Photoshop opens most of it's dialogue boxes it offers you the ability to click OK or Cancel to accept or cancel the task. Some of Photoshop's dialogue boxes offer a hidden "Reset" option. Items like Levels, Curves, and Hue & Saturation.
Holding the Option key changes the Cancel to a Reset, allowing you to reset the dialogue box without having to cancel, and re-open the box every time you want to start over.
Copy Layer Styles
Here is a handy time saving tip I found very useful within my own work flow. Many times when I am working I create elements all on separate layers. Well then I decide much later on that I want to apply a style to those layers.
 Normally, you may just recreate the effect over and over again on each layer individually. What if you have 20 layers with 4 or 5 layer effects?! That's more work than what I am up for. Fortunately Photoshop has an easy way to apply a style to multiple layers all at once.
First link all the layers that you want to effect. Then select from the menu Layer/ Layer Styles/ Copy Layer Style. Then go back to the same menu and select Layer/ Layer Styles/ Paste Layer Style to Linked.
You can also access these functions by CTRL-Clicking the layer itself. Now all your layers have the same effects applied to them in a matter of seconds.
Stroke A Path
The ability to stroke a path is an elementary, but not widely known function in Photoshop.
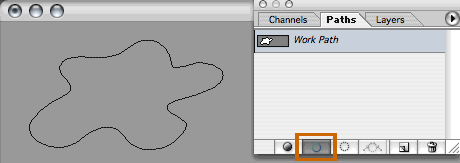
Select the path by clicking on the path layer and Option(Alt)-Click the Stroke Path button at the bottom of the Path palette to open the Stroke dialog box.
Choose from the list of tools. Now that you know what tools are available go back to the tool settings to set them up before applying the stroke to a path.
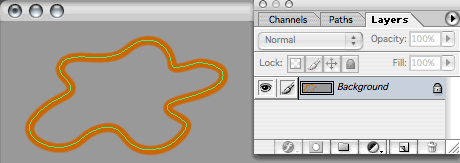
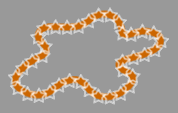 You can create complex effects if you create several layers of strokes with different tool settings.
For example select a hard brush tip with big spacing to create a chain of objects or use the smudge tool to simulate a finger smudging a painting along a path.
Color Sampler Tool
Here is another useful feature of the Eyedropper tool.
When you compare several samples of colors with each other you don't need to jot down the numbers on a piece of paper. You can press Shift while clicking with the Eyedropper tool (shortcut: "I"). This opens up an extended Info palette. You can click on your image up to four times. For each selector you will be able to see a corresponding color value in the info palette.
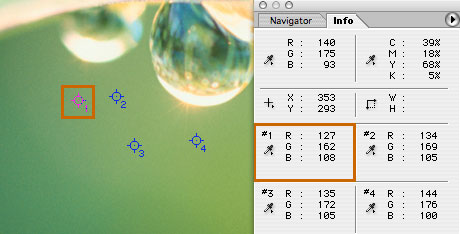
To delete any of the selectors press Apple (or Cmd) and drag them out from the image. If you want to see the values in different color systems click the tiny Eyedropper icon below the number in the info palette to bring up a little menu with several options to choose from.
You can also use this function to sample the same color several times and have the info palette show you the values in real time for different color systems, while you're adjusting colors in your image. The position of the color samples are saved into the document, so you can refer to them even after reopening the document.
Pick Up The Average Color
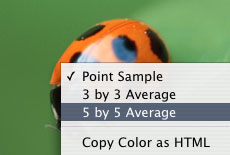 I've touched on one of the special features of the Eyedropper tool above. BTW it's easy to remember the tool shortcut for the Eyedropper: it's "i" as "eye".
Sometimes when you have a bitmap image, the individual pixels that make up the color of a surface can be very different from each other, especially if the image is noisy. In these cases when you want to pick a color from the surface, you might end up with a much lighter or darker color than the average surface color.
In this case Press CTRL when clicking the area for your sampling to pick a little square of 3x3 or 5x5 pixels instead of just one particular pixel. This way the picked color will truly reflect the overall feel of the color of the surface.
![]()
![]()
![]()
![]()


