![]()
![]() Try before you buy. Download any Adobe product for a free 30 day trial.
Try before you buy. Download any Adobe product for a free 30 day trial.
![]()
![]() The Photoshop Blog offers the latest Photoshop news and software updates, Photoshop tips and tutorials, and random thoughts from graphic artist and Photoshop expert Jennifer Apple.
The Photoshop Blog offers the latest Photoshop news and software updates, Photoshop tips and tutorials, and random thoughts from graphic artist and Photoshop expert Jennifer Apple.
![]()
onOne Ships Perfect Photo Suite 7 - 15% Exclusive Discount Code
October 30, 2012
 onOne today announced the availability of Perfect Photo Suite 7. Improved to give photographers even more ways to maximize their creativity and solve common problems in digital photography.
Exclusive Discount Code - 15% Off
Use our exclusive discount code PSSPPT06 to get 15% off any onOne product, including the new Perfect Photo Suite 7.
Perfect Photo Suite 7 provides easy-to-use and powerful tools to develop stunning black and white photographs, enhance the look and feel of images with professionally-designed effects, beautifully retouch portraits, replace unwanted backgrounds, control depth-of-field after the shot has been taken, as well as resize and prepare images for print, in robust layered file workflow—in one affordable package.
For those who have purchased Perfect Photo Suite 6 on or after August 1, 2012, onOne Software will issue a complimentary upgrade to Perfect Photo Suite 7 via download
Perfect Photo Suite 7 introduces five new products—Perfect B&W, Perfect Portrait 2, Perfect Layers 3, Perfect Effects 4 and Perfect Resize 7.5 Pro, integrated with existing favorites Perfect Mask 5.2 and FocalPoint 2.
Photographers can effortlessly move between all of the modules while editing their photos using Perfect Photo Suite 7 as a standalone application. Photographers can also use Perfect Photo Suite to extend the image editing power of Adobe Photoshop Lightroom and Apple Aperture, and as a plug-in to Adobe Photoshop and Adobe Photoshop Elements.
Perfect Photo Suite 7 features a redesigned user interface with a new browser, search functionality, and the ability to flag and access favorite effects and presets. It also includes the powerful new edge-detecting Perfect Brush, presets that give users instant results alongside manual controls that offer photographers the option to fine-tune adjustments and create the images they envision. Perfect Photo Suite 7 includes full versions of the following onOne Software products:
Perfect B&W (New!): Perfect B&W is the completely brand new module that gives photographers the easiest way to develop stunning black and white images. It includes powerful and intuitive tools that add dramatic, elegant, and classic black and white looks to images instantly and offers users complete creative control to reproduce time-honored black and white processing techniques.
Perfect Effects 4 (New!): Perfect Effects 4 extends the creative power offered by the popular PhotoTools and provides even more ways to create images with impact. Perfect Effects 4 delivers an extended library of professional photographic effects, frames and edges accessible from a flexible new browser with keyword search functionality and Favorites selection. New blending modes and paint-in brush effects offer even more creative options for how effects are combined and applied.
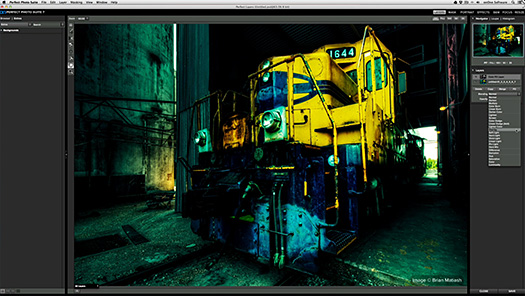
Perfect Portrait 2 (New!): Perfect Portrait 2 offers simply powerful portrait retouching, now improved with more accurate automated feature detection and enhancement tools to smooth skin, remove blemishes, brighten eyes and teeth, and correct skin color. Faster processing speeds also allow photographers to retouch images more quickly for simply stunning portraits.
Perfect Layers 3 (New!): Perfect Layers 3 gives photographers the ability to combine images and extend editing options in a layered file workflow without Photoshop. Users can create and edit multi-layered files with Perfect Layers directly from Lightroom, Aperture or as a standalone application. Included are new blending modes, textures, borders, PNG file support, and the powerful new edge-detecting Perfect Brush.
Perfect Resize 7.5 Pro (New!): Perfect Resize 7.5 Pro, formerly Genuine Fractals, increases image size faster than ever before and without the loss of sharpness or detail that might be normally expected. The same patented, fractal-based interpolation algorithms that were in Genuine Fractals are at the heart of Perfect Resize 7.5 Pro with several improvements. New algorithms for specific image types, built-in output presets, and the redesigned user interface, add to the power of Perfect Resize and make it even better for preparing all types of images for print. It is ideal to use with photos taken with DSLR cameras as well as snapshots taken with mobile devices.
Perfect Mask 5.2 (Improved!): High quality masks may be created quickly and easily with automated functionality and powerful tools that make selecting subjects and isolating backgrounds for removal extraordinarily accurate. The redesigned user interface allows photographers to focus on their image editing while keeping their most used tools readily accessible.
FocalPoint 2: FocalPoint 2 allows photographers to put the focus where they want after the shot. It’s the best way to add the most realistic depth of field and selective focus control to any image after it is photographed. A selection of lens presets is included to produce specific bokeh or the amount and kind of blur adjustment wanted.
Download A 30-day Free Trial Of Any Adobe Creative Suite
 Photoshop Extended integrates the state-of-the-art editing, compositing, and graphic design capabilities of Adobe Photoshop, and features advanced tools for 3D design, image and video editing.
Photoshop and Photoshop Extended can be purchased as stand-alone applications, as components of the Adobe Creative Suite family, or as part of Adobe's new Creative Cloud offering. Upgrade pricing is also available to eligible customers.
Download
the 30-day Photoshop free trial, or a trial of any Adobe product, including the Master Collection. See our Photoshop CS6 Tutorials Page for a collection of free tutorials and videos. Visit the Adobe Coupons & Special Offers Page to see the latest deals from Adobe. Get up to 80% off at the Adobe Education Store.
posted by Jennifer Apple | facebook | RSS feed | bookmark | comment | twitter
![]()
Using The New Layer Comps Panel In Photoshop CS6
OCTOBER 30, 2012
Here's a tutorial by Adam Smith from Photoshop Daily that deals with working with layer comps in Photoshop CS6.
The layer comps panel gives you the ability to share image stages and updates much quicker with new automated options.
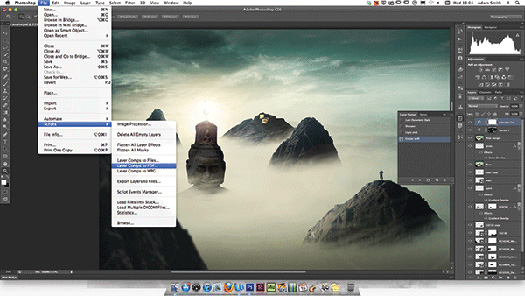
The Layer Comps panel in Photoshop is something of a hidden gem. This option might not be the most radical, but it will certainly improve the way you present your artwork and liaise with clients and other creatives. You can easily activate the feature by selecting the Window>Layer Comps menu.
The Layer Comps panel effectively enables you to take snapshots of key phases of your production in your layered images. You can then save these as presets and play them back to art directors, clients and so on, at any time needed during your creative process.
This option is an advantage for many Photoshop creatives. If you’re a retoucher you can more easily present progression without having to filter through separate or flattened layers. Web designers can now show rollover states far quicker with this option. The Layer Comps feature reduces numerous file saves as a means to share alternate image states, ultimately freeing up memory storage on your desktop computer.
This is all well and good, but what if those you share with don’t have Photoshop CS6? Adobe has thought hard about this and provided a Layer Comps to PDF option too. This will automatically save a PDF file with all your layer comps now displayed as sequenced images.
Step 01: Add a Layer Comp
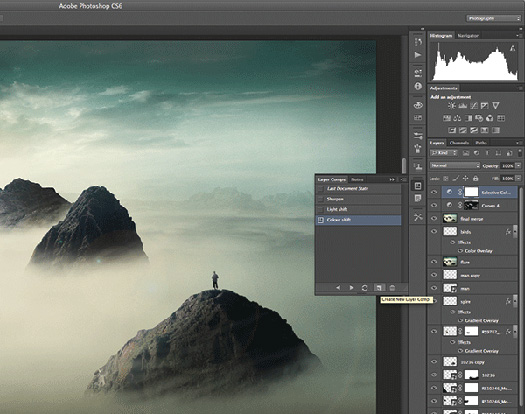
To add key stages of applications as layer comps, first make your changes then afterwards hit the Create new Layer Comp button (at the foot of Layer Comps panel). You can make further amendments, but make sure to select Update Layer Comp to make this stick.
Step 02: Make notes
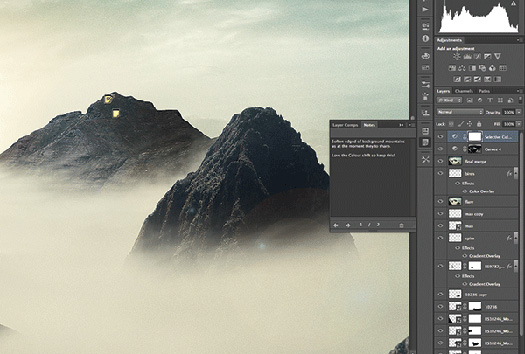
If you’re collaborating on an artwork and want to flag important changes, the Notes panel is helpfully paired with Layer Comps. Simply select the Notes tool (from the Eyedropper drop options in the Toolbar). Add to the image area you want to flag and type your suggestions.
Step 03: Save to PDF
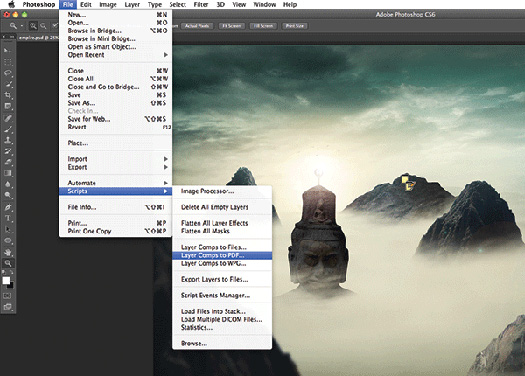
It can be a real problem if your client or intended recipient doesn’t have a version of Photoshop. Luckily Adobe has offered ways around this issue. Simply select File>Scripts>Layer Comps to PDF. Set a destination and save out, with your layers now grouped in a PDF file.
Download A 30-day Free Trial Of Any Adobe Creative Suite
 Photoshop Extended integrates the state-of-the-art editing, compositing, and graphic design capabilities of Adobe Photoshop, and features advanced tools for 3D design, image and video editing.
Photoshop and Photoshop Extended can be purchased as stand-alone applications, as components of the Adobe Creative Suite family, or as part of Adobe's new Creative Cloud offering. Upgrade pricing is also available to eligible customers.
Download
the 30-day Photoshop free trial, or a trial of any Adobe product, including the Master Collection. See our Photoshop CS6 Tutorials Page for a collection of free tutorials and videos. Visit the Adobe Coupons & Special Offers Page to see the latest deals from Adobe. Get up to 80% off at the Adobe Education Store.
posted by Jennifer Apple | facebook | RSS feed | bookmark | comment | twitter
![]()
How To Create An iPad App Using InDesign CS6 Without Writing Any Code - Video Tutorial
OCTOBER 30, 2012
In this episode of the Adobe Creative Suite Podcast, Terry White shows how to use InDesign (30-day free trial) to create iPad Apps without writing code. See the complete process from InDesign to the App running on my New iPad.
The Adobe Creative Cloud offering just got a whole lot sweeter! Adobe has made the Digital Publishing Suite Single Edition (DPS SE) available to Creative Cloud Members offering them the ability to create an UNLIMITED number of iPad Apps at no additional cost. Build your Folio in InDesign CS6, use the newly update “Create App” feature of the Folio builder, which generates a .ipa (iOS App) file, upload your App to Apple or simply deploy on your provisioned iPads.
Download A 30-day Free Trial Of Any Adobe Creative Suite
 Photoshop Extended integrates the state-of-the-art editing, compositing, and graphic design capabilities of Adobe Photoshop, and features advanced tools for 3D design, image and video editing.
Photoshop and Photoshop Extended can be purchased as stand-alone applications, as components of the Adobe Creative Suite family, or as part of Adobe's new Creative Cloud offering. Upgrade pricing is also available to eligible customers.
Download
the 30-day Photoshop free trial, or a trial of any Adobe product, including the Master Collection. See our Photoshop CS6 Tutorials Page for a collection of free tutorials and videos. Visit the Adobe Coupons & Special Offers Page to see the latest deals from Adobe. Get up to 80% off at the Adobe Education Store.
posted by Jennifer Apple | facebook | RSS feed | bookmark | comment | twitter
![]()
How To Embed Images In InDesign So They Don't Go Missing - Video Tutorial
OCTOBER 28, 2012
In this week’s InDesign Secrets episode, Anne-Marie Concepción addresses the dreaded lost image phenomenon, which occurs when Adobe InDesign can’t find your linked images and lets you know with glaring red question marks. The presence of glaring red question marks in your actual layout (and not just your Links panel) is courtesy of InDesign CS6, but the lost images phenomenon is familiar to users of earlier versions of InDesign as well.
Anne-Marie’s solution is simple: embed your images. That way they can’t get lost if you move the image folder or send the document off to a client without a separate file full of graphics. An embedded Photoshop file even retains its layers. The first step is to find the original image and relink it (you’ll have to solve that challenge on your own). Then right-click on the image in the Links panel and choose Embed Link. Your image is now permanently part of your file.
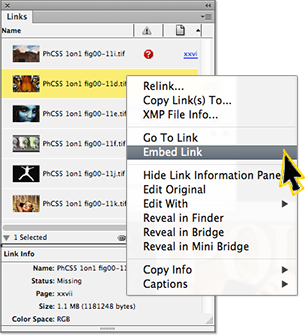
As easy as this is, you should be aware of two potential disadvantages to embedding your file. First, when you embed your images you no longer have the benefit of automatically updating links, but if your graphic is stable and not going to change (like a logo), then it’s really not a an issue. Second, embedding images makes your InDesign file significantly larger. But as Anne-Marie notes, it’s not 1993, and while you may not want to embed hundreds of images, the increased file size you’ll see from embedding a handful of images for an in-house document is not the obstacle it used to be.
One other note: you can’t embed a video file or another InDesign file. What I find particularly fascinating is if you embed a graphic file within your InDesign document, the encompassing InDesign file behaves in some ways like a zipped archive. If you wish to unembed the graphic later, you can create a new “original” right from InDesign. For certain scenarios, this is an elegantly simple solution to the lost image syndrome. Anne-Marie’s partner in InDesign secrecy, David Blatner, has a member-exclusive video in our library this week called Adjusting leading inside a paragraph, in which he explores customizing InDesign stroke styles.
You can get a free 7-day trial to the lynda.com Online Training Library. The trial membership entitles you to 7 days of access to all 986 courses in the lynda.com Online Training Library for free. Click sign up on the subscription plan of your choice to get started.
Download A 30-day Free Trial Of Any Adobe Creative Suite
 Photoshop Extended integrates the state-of-the-art editing, compositing, and graphic design capabilities of Adobe Photoshop, and features advanced tools for 3D design, image and video editing.
Photoshop and Photoshop Extended can be purchased as stand-alone applications, as components of the Adobe Creative Suite family, or as part of Adobe's new Creative Cloud offering. Upgrade pricing is also available to eligible customers.
Download
the 30-day Photoshop free trial, or a trial of any Adobe product, including the Master Collection. See our Photoshop CS6 Tutorials Page for a collection of free tutorials and videos. Visit the Adobe Coupons & Special Offers Page to see the latest deals from Adobe. Get up to 80% off at the Adobe Education Store.
posted by Jennifer Apple | facebook | RSS feed | bookmark | comment | twitter
![]()
Windows 8 And Adobe Photoshop Operating System Compatibility Chart
OCTOBER 26, 2012
You can find an Adobe product operating system compatibility chart that will show you exactly which Adobe products work with Windows 8 and which don't. The information details the compatibility of the most recently released version of each Adobe product with Microsoft Windows 8. The chart will be updated as new information becomes available.
Download A 30-day Free Trial Of Any Adobe Creative Suite
 Photoshop Extended integrates the state-of-the-art editing, compositing, and graphic design capabilities of Adobe Photoshop, and features advanced tools for 3D design, image and video editing.
Photoshop and Photoshop Extended can be purchased as stand-alone applications, as components of the Adobe Creative Suite family, or as part of Adobe's new Creative Cloud offering. Upgrade pricing is also available to eligible customers.
Download
the 30-day Photoshop free trial, or a trial of any Adobe product, including the Master Collection. See our Photoshop CS6 Tutorials Page for a collection of free tutorials and videos. Visit the Adobe Coupons & Special Offers Page to see the latest deals from Adobe. Get up to 80% off at the Adobe Education Store.
posted by Jennifer Apple | facebook | RSS feed | bookmark | comment | twitter
![]()
Toning Black and White Photographs - Lightroom 4 Video Tutorial
OCTOBER 26, 2012
In this episode of The Complete Picture (Toning Black and White Photographs in Lightroom 4 ), Julieanne Kost explains the best way to add a color tone to an image using the Split Tone and Tone Curve panels as well as demonstrates how to save presets to increase your productivity.
Although this video was recorded in Lightroom, the same techniques are available in Adobe Camera Raw in Photoshop CS6. Click to download the Toning presets for Lightroom 4 (JKost_Toning.zip) and Photoshop CS6 (PS_JKost Toning.zip).
Download A 30-day Free Trial Of Any Adobe Creative Suite
 Photoshop Extended integrates the state-of-the-art editing, compositing, and graphic design capabilities of Adobe Photoshop, and features advanced tools for 3D design, image and video editing.
Photoshop and Photoshop Extended can be purchased as stand-alone applications, as components of the Adobe Creative Suite family, or as part of Adobe's new Creative Cloud offering. Upgrade pricing is also available to eligible customers.
Download
the 30-day Photoshop free trial, or a trial of any Adobe product, including the Master Collection. See our Photoshop CS6 Tutorials Page for a collection of free tutorials and videos. Visit the Adobe Coupons & Special Offers Page to see the latest deals from Adobe. Get up to 80% off at the Adobe Education Store.
posted by Jennifer Apple | facebook | RSS feed | bookmark | comment | twitter
![]()
How To Carve A Pumpkin In Photoshop - Video And Step-by-Step
OCTOBER 24, 2012
In this week’s free Deke’s Techniques video, Deke celebrates his favorite holiday by showing you how to carve a ghoulish but gorgeous graphic into the face of a pumpkin using Adobe Photoshop.
Read step-by-step here.
Download A 30-day Free Trial Of Any Adobe Creative Suite
 Photoshop Extended integrates the state-of-the-art editing, compositing, and graphic design capabilities of Adobe Photoshop, and features advanced tools for 3D design, image and video editing.
Photoshop and Photoshop Extended can be purchased as stand-alone applications, as components of the Adobe Creative Suite family, or as part of Adobe's new Creative Cloud offering. Upgrade pricing is also available to eligible customers.
Download
the 30-day Photoshop free trial, or a trial of any Adobe product, including the Master Collection. See our Photoshop CS6 Tutorials Page for a collection of free tutorials and videos. Visit the Adobe Coupons & Special Offers Page to see the latest deals from Adobe. Get up to 80% off at the Adobe Education Store.
posted by Jennifer Apple | facebook | RSS feed | bookmark | comment | twitter
![]()
Dreamweaver CS6 Bible - Free Chapter PDF - Adding Advanced Design Features - Working With Layouts
OCTOBER 24, 2012
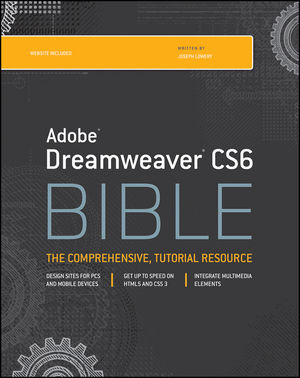 You can download chapter 10 from Dreamweaver CS6 Bible (PDF). Excerpted with permission from the publisher, Wiley, from Dreamweaver CS6 Bible by Joseph W. Lowery. Copyright © 2012. Here's what's covered in this chapter:
• Understanding how divs and AP elements work in Dreamweaver
• Inserting <div> tags
• Dreamweaver Technique: applying a CSS Layout
• Working with fluid grids for multiple screens
• Modifying AP elements: resizing, moving, and altering properties
• Dreamweaver Technique: Inserting an AP element
• Creating interactive AP elements with Dreamweaver behaviors
Dreamweaver CS6 Bible covers the latest version of the leading website development software. Web designers rely on Dreamweaver to create functional, attractive websites quickly and efficiently. The newest version adds some important functionality for tablet and smart phone screens, HTML5 enhancements, CSS3 updates, and native mobile application development for iOS, Android, and other platforms.
This comprehensive guide covers them all and much more, making it the complete course in Dreamweaver for new users as well as a vital guide to help experienced designers delve deeper into more advanced topics.
Download A 30-day Free Trial Of Any Adobe Creative Suite
 Photoshop Extended integrates the state-of-the-art editing, compositing, and graphic design capabilities of Adobe Photoshop, and features advanced tools for 3D design, image and video editing.
Photoshop and Photoshop Extended can be purchased as stand-alone applications, as components of the Adobe Creative Suite family, or as part of Adobe's new Creative Cloud offering. Upgrade pricing is also available to eligible customers.
Download
the 30-day Photoshop free trial, or a trial of any Adobe product, including the Master Collection. See our Photoshop CS6 Tutorials Page for a collection of free tutorials and videos. Visit the Adobe Coupons & Special Offers Page to see the latest deals from Adobe. Get up to 80% off at the Adobe Education Store.
posted by Jennifer Apple | facebook | RSS feed | bookmark | comment | twitter
![]()
Teach Yourself Visually Dreamweaver CS6 by Janine Warner - Sample Chapter - Working With Images And Multimedia
OCTOBER 23, 2012
 You can download chapter 6 from Teach Yourself Visually Dreamweaver CS6 — Working with Images and Multimedia.
Excerpted with permission from the publisher, Wiley, from Teach Yourself Visually Dreamweaver CS6 by Janine Warner. Copyright © 2012.
This chapter contains the following:
Insert an Image into a Web Page
Wrap Text around an Image
Add Space around an Image
Crop an Image
Resize an Image
Open an Image in an Image Editor Add a Background Image
Change the Background Color
Change Text Colors
Insert a Flash File
Insert a Flash Video File
Create a Rollover Image
Insert a YouTube Video
Learn to design and maintain content-rich websites the Visual way
With more than 90 percent market share, Dreamweaver is the preferred tool for professional website design and production. For those who learn best visually, this colorful, step-by-step guide is the perfect way to learn the program and start building websites with "wow". Teach Yourself Visually Dreamweaver CS6 by Janine Warner has numbered steps and full-color screen shots that show you just how to navigate the program, format and style text, create web-based forms and pages, build data-driven sites, and maintain a fully functioning website. All the enhancements of the newest version are covered.
Download A 30-day Free Trial Of Any Adobe Creative Suite
 Photoshop Extended integrates the state-of-the-art editing, compositing, and graphic design capabilities of Adobe Photoshop, and features advanced tools for 3D design, image and video editing.
Photoshop and Photoshop Extended can be purchased as stand-alone applications, as components of the Adobe Creative Suite family, or as part of Adobe's new Creative Cloud offering. Upgrade pricing is also available to eligible customers.
Download
the 30-day Photoshop free trial, or a trial of any Adobe product, including the Master Collection. See our Photoshop CS6 Tutorials Page for a collection of free tutorials and videos. Visit the Adobe Coupons & Special Offers Page to see the latest deals from Adobe. Get up to 80% off at the Adobe Education Store.
posted by Jennifer Apple | facebook | RSS feed | bookmark | comment | twitter
![]()
Fluid Mask Special Offer $129 - Photoshop Pro Masking Plugin
OCTOBER 23, 2012
 The 4 1/2 out of 5 star review of Fluid Mask 3 at MacWorld begins by saying that this "Photoshop plug-in takes the pain out of extracting backgrounds," and goes on to recommend the latest version, stating that "Fluid Mask 3.0.2 is a very effective tool for separating objects from their backgrounds. It offers a variety of useful features for tackling almost any difficult image, from wispy hair to complex foliage. Online video tutorials and live training sessions help ease the learning curve."
Our friends at Vertus, the makers of Fluid Mask 3 Photoshop Plugin, have set up a special exclusive discount for PhotoshopSupport.com. Buy now for only $129. Just follow this discount link and instantly get $20 off your purchase of Fluid Mask 3.
Fluid Mask 3 is designed for photographers, image editors, graphic designers and all those who take digital image editing seriously. In a streamlined interface and workflow, Fluid Mask 3 instantly shows key edges in the image and provides comprehensive easy to use tools that work with difficult-to-see edges and tricky areas like trees & lattices. Fluid Mask 3 will also preserve all-important edge information for a professional quality cut out.
Download A 30-day Free Trial Of Any Adobe Creative Suite
 Photoshop Extended integrates the state-of-the-art editing, compositing, and graphic design capabilities of Adobe Photoshop, and features advanced tools for 3D design, image and video editing.
Photoshop and Photoshop Extended can be purchased as stand-alone applications, as components of the Adobe Creative Suite family, or as part of Adobe's new Creative Cloud offering. Upgrade pricing is also available to eligible customers.
Download
the 30-day Photoshop free trial, or a trial of any Adobe product, including the Master Collection. See our Photoshop CS6 Tutorials Page for a collection of free tutorials and videos. Visit the Adobe Coupons & Special Offers Page to see the latest deals from Adobe. Get up to 80% off at the Adobe Education Store.
posted by Jennifer Apple | facebook | RSS feed | bookmark | comment | twitter
![]()
ColoRotate - Online Tool For Creating And Browsing Color Palettes
OCTOBER 23, 2012
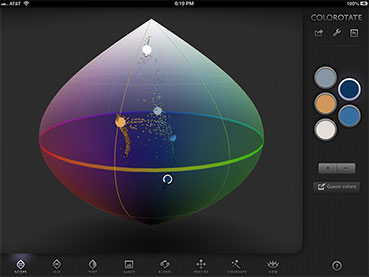 ColoRotate is a revolutionary tool that changes the way people choose colors on computers.
Usually, choosing color on computers is a drab experience.
It requires an understanding of color theory and its related concepts like luminescence, saturation, and brightness. This was (and is) almost exclusively the realm of graphic design artists and those with an innate sense of color.
For the vast majority of users however, choosing a color is a tedious and often unrewarding process. Palettes are either too simplistic, with a limited choice of colors, or too complex, requiring at least an appreciation of color models and how color works in the RGB (red, green, blue) spectrum. A proper understanding of color and its application is a core competency in itself.
ColoRotate removes the conventional complexity in color selection on computers. Based on the HSL 3D color model, ColoRotate is more intuitive and easier to use than traditional computer palettes. At a glance, users can see color relationships that in turn enable them to develop an aesthetic balance in color selection.
ColoRotate was developed with professional graphic designers and artists in mind, but even amateurs can utilize the tool. Users do not need any theoretical understanding of color systems nor any expertise in color selection (other than their normal sense of aesthetics). ColoRotate is an open, three dimensional color space that allows users to traverse over colors of various intensities.
Color selection is simply a matter of navigating the color space until one adjusts the hue and tint to the exact level required. There are no color combinations or numbers to be memorized or written down. Everything is intuitive.
Download A 30-day Free Trial Of Any Adobe Creative Suite
 Photoshop Extended integrates the state-of-the-art editing, compositing, and graphic design capabilities of Adobe Photoshop, and features advanced tools for 3D design, image and video editing.
Photoshop and Photoshop Extended can be purchased as stand-alone applications, as components of the Adobe Creative Suite family, or as part of Adobe's new Creative Cloud offering. Upgrade pricing is also available to eligible customers.
Download
the 30-day Photoshop free trial, or a trial of any Adobe product, including the Master Collection. See our Photoshop CS6 Tutorials Page for a collection of free tutorials and videos. Visit the Adobe Coupons & Special Offers Page to see the latest deals from Adobe. Get up to 80% off at the Adobe Education Store.
posted by Jennifer Apple | facebook | RSS feed | bookmark | comment | twitter![]()
5 Free Vectorized Tree Branch Brushes For Photoshop
OCTOBER 19, 2012
From Bittbox: 5 free Vectorized Tree Branch Brushes for use in Photoshop.

![]() Get 15% Off All onOne Software And Topaz Labs Photoshop Plugins - Including Ugrades & Bundles
Get 15% Off All onOne Software And Topaz Labs Photoshop Plugins - Including Ugrades & Bundles
Enter coupon code - PSSPPT06 - during checkout at onOne Software for an instant 15% discount on any onOne product.
Topaz Labs Photoshop Plugins — 15% Off
Enter coupon code PHOTOSHOPSUPPORT at Topaz Labs for an instant 15% discount, including bundles and upgrades.
posted by Jennifer Apple| RSS feed | bookmark
![]()
Creating a currency-style emblem in Illustrator - Video Tutorial and Step-by-Step
OCTOBER 18, 2012
In this week’s free Deke’s Techniques episode, Deke McClelland shows you how to use Adobe Illustrator (30-day free trial) to create a filigree emblem worthy of being used in your money-like design.
Deke begins with a dark background covered with intricate, scaled, hypotrochoid patterns based on last week’s Spirograph technique:
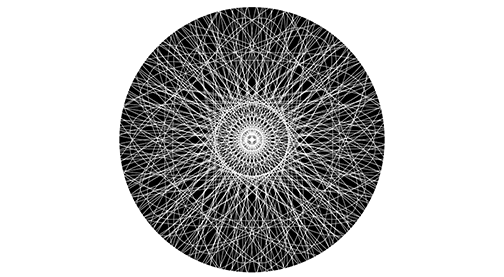
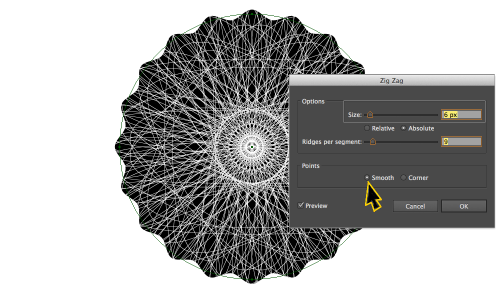
Next, he adds some scalloping to the edges of the black background circle using the Distort & Transform effect called Zig Zag. By setting the points to Smooth, the default sharp corners of the Zig Zag effect become gentle waves:
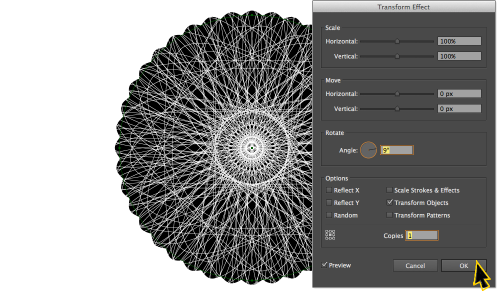
By duplicating the effect and turning it 9 degrees, Deke creates a second set of scalloped edges that will come in handy for the next step.
After moving the two scallop shapes to the top layer, deleting their fills, and applying a 4-point white stroke and a 6-point black stroke to each, the result is this intertwined braid around the edges of the Great Seal of Deke:
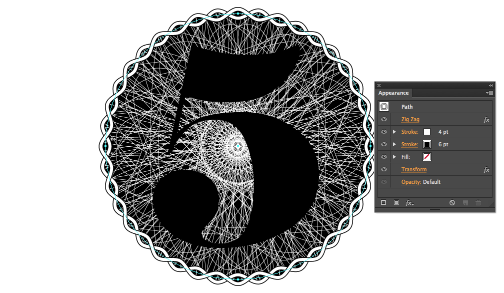
In order to make the braid a continuous shape (as opposed to looking like two intertwined lines), Deke moves the Transform effect up above the Stroke effects in the Appearance panel. Then to give his emblem a more American-currency hue, he changes the white stroke color to a pale green.
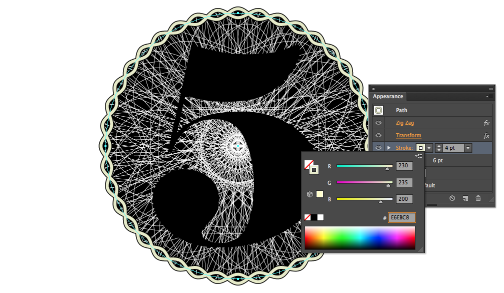
He also applies that pale money-green fill to the 5 character and gives it a shadow by creating a copy of the fill and using Transform to move the shadow down and to the right:
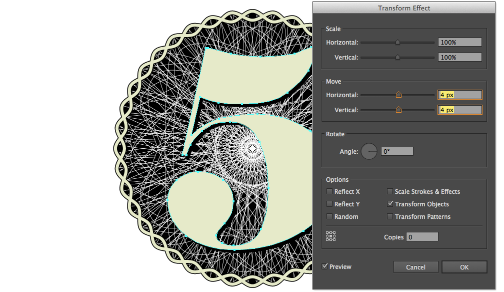
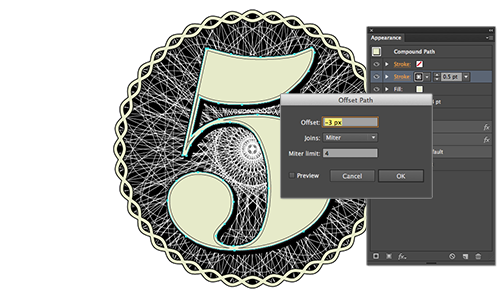
Deke then adds another Stroke effect to beef up the shadow, applies a thin stroke above the green fill, and uses the Offset Path effect set to a negative value (-3) to really sell the currency effect:
Finally, the filigree lines created with the Spirograph pattern are given the same pale green color. In the video, you’ll see the quick tips Deke uses to select all those paths and make sure no pale green lines extend beyond the emblem. The result is this currency-like seal:

You can get a free 7-day trial to the lynda.com Online Training Library. The trial membership entitles you to 7 days of access to all 986 courses in the lynda.com Online Training Library for free. Click sign up on the subscription plan of your choice to get started.
![]() Get 15% Off All onOne Software And Topaz Labs Photoshop Plugins - Including Ugrades & Bundles
Get 15% Off All onOne Software And Topaz Labs Photoshop Plugins - Including Ugrades & Bundles
Enter coupon code - PSSPPT06 - during checkout at onOne Software for an instant 15% discount on any onOne product.
Topaz Labs Photoshop Plugins — 15% Off
Enter coupon code PHOTOSHOPSUPPORT at Topaz Labs for an instant 15% discount, including bundles and upgrades.
posted by Jennifer Apple| RSS feed | bookmark
![]()
Creating Page Layouts in Dreamweaver with CSS - Dreamweaver CS6 Digital Classroom Sample Chapter
OCTOBER 18, 2012
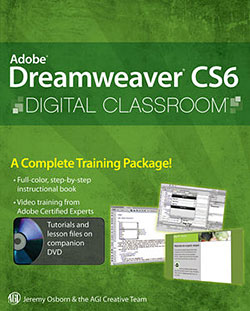 We have a free chapter from the book Adobe Dreamweaver CS6 Digital Classroom. In this chapter, Creating Page Layouts with CSS (PDF) you’ll learn the following:
* Understanding the CSS Box model
* Creating Divs and AP Divs
* Stacking and overlapping elements
* Styling box contents
* Using visual aids to fine- tune positioning
Excerpted with permission from the publisher, Wiley, from Adobe Dreamweaver CS6 Digital Classroom by Jeremy Osborn, AGI Creative Team. Copyright © 2012.
Learn Dreamweaver CS6 at your own speed with this complete training package
Dreamweaver is the industry standard software for professional website design, with more than 90 percent of the market. In this book-and-DVD package, expert instructors provide a complete course in basic Dreamweaver that you can access at your own speed. Step-by-step instructions in the book are supported by lesson files and video tutorials on the DVD, presenting the newest version of Dreamweaver in 16 self-paced lessons. You'll learn to use style sheets, dynamic HTML, multimedia, databases, and much more to design, develop, and maintain your website.
Dreamweaver CS6 Digital Classroom is the next best thing to having a personal tutor teach you this award-winning software. Note: DVD and other supplementary materials are not included as part of the e-book file, but are available for download after purchase.
![]() Get 15% Off All onOne Software And Topaz Labs Photoshop Plugins - Including Ugrades & Bundles
Get 15% Off All onOne Software And Topaz Labs Photoshop Plugins - Including Ugrades & Bundles
Enter coupon code - PSSPPT06 - during checkout at onOne Software for an instant 15% discount on any onOne product.
Topaz Labs Photoshop Plugins — 15% Off
Enter coupon code PHOTOSHOPSUPPORT at Topaz Labs for an instant 15% discount, including bundles and upgrades.
posted by Jennifer Apple | facebook | RSS feed | bookmark | comment | twitter
![]()
Converting Images To Black And White - Video Tutorial
OCTOBER 17, 2012
In this episode of The Complete Picture (Converting Images to Black and White), Julieanne demonstrates the best way to convert images to Black and White as well as how to save presets to increase your productivity. Note: although this video was recorded in Lightroom, the same techniques are available in Adobe Camera Raw in Photoshop CS6. Click here to download the presets for Lightroom 4 (JKost Black & White.zip) and Photoshop CS6 (PS_JKost Black White.zip).
Note: The preset names differ slightly for Photoshop and Lightroom as ACR does not support folders in the Presets tab and I wanted all of the Black and White presets grouped together. To install: download and unzip the presets for Lightroom/Photoshop (link above) and place them in the following location:
Lightroom
• Mac (user)/Library/Application Support/Adobe/Lightroom/Develop Presets
• Win (user)/Application Data/Adobe/Lightroom/Develop Presets
Photoshop
• Mac(user)/Library/Application Support/Adobe/Camera Raw /Settings (put the presets loose in the Settings folder – not in a subfolder)
• Win (user)/Application Data/Adobe/Camera Raw/Settings
Note: If you are on a Mac running Lion, the (user)/Library folder it hidden by default. To reveal it, hold the Option key down while selecting the “Go” menu in the Finder.
![]() Get 15% Off All onOne Software And Topaz Labs Photoshop Plugins - Including Ugrades & Bundles
Get 15% Off All onOne Software And Topaz Labs Photoshop Plugins - Including Ugrades & Bundles
Enter coupon code - PSSPPT06 - during checkout at onOne Software for an instant 15% discount on any onOne product.
Topaz Labs Photoshop Plugins — 15% Off
Enter coupon code PHOTOSHOPSUPPORT at Topaz Labs for an instant 15% discount, including bundles and upgrades.
posted by Jennifer Apple | facebook | RSS feed | bookmark | comment | twitter
![]()
10 Things Beginners Want to Know How To Do In Photoshop CS6 - 40 Minute Video Tutorial
OCTOBER 3, 2012
In this episode of the Adobe Creative Suite Podcast, Terry White shows you How to Get Started With Adobe Photoshop CS6. See how to do the 10 things that beginners ask how to do the most, including how to remove the background from an image and put it on a different background. (watch in Super HD 1280 x 720)
![]() Get 15% Off All onOne Software And Topaz Labs Photoshop Plugins - Including Ugrades & Bundles
Get 15% Off All onOne Software And Topaz Labs Photoshop Plugins - Including Ugrades & Bundles
Enter coupon code - PSSPPT06 - during checkout at onOne Software for an instant 15% discount on any onOne product.
Topaz Labs Photoshop Plugins — 15% Off
Enter coupon code PHOTOSHOPSUPPORT at Topaz Labs for an instant 15% discount, including bundles and upgrades.
posted by Jennifer Apple | facebook | RSS feed | bookmark | comment | twitter
![]()
Working With The New CS6 Adaptive Wide Angle Filter
OCTOBER 16, 2012
In this Photoshop CS6 (30-day free trial) tutorial from Photoshop Daily you'll learn how to correctly converge verticals in your photos.
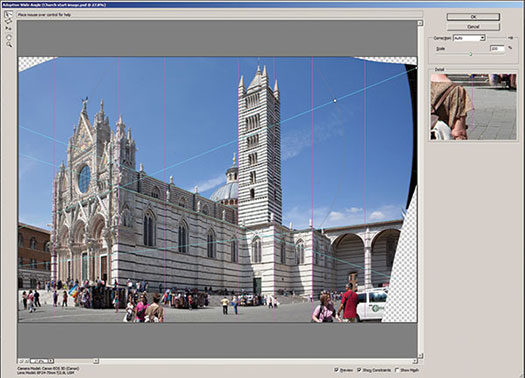
Draw your verticals
Open up your image and go to Filter>Adaptive Wide Angle. The default Constraint Proportions tool lets you draw your lines. Start with the verticals, holding down Shift as you match them up using the Detail window to ensure they’re tagged as true verticals. You’ll see the image slowly changing shape as you add your lines. Be sure to extend each line to top and bottom of the canvas by hitting Shift and dragging the end points when a four-way pointer appears. You may need to drag three or four times or more.
Draw your horizontals
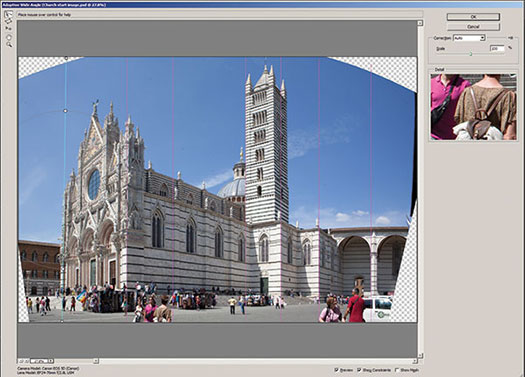
Next we need to add in some horizontal lines. As we’re not completely square on to one of the building faces, there are no truly horizontal lines in two dimensional terms so we don’t want to mark these as horizontal by Ctrl/right-clicking or hitting Shift when dragging. It’s still important to drag all these lines to the edge of our image canvas though so hit Shift and drag each once placed. The lines will be blue rather than purple to denote the fact that they’re not true horizontals.
Crop and Fill
Click OK when you’re done to apply your filter. You’ll now have some blank canvas around the image. If there’s complex detail at the image edges, Content-Aware Fill is unlikely to be able to deal with it, so crop (C) until you get near to easily reproducible detail like sky. Apply the crop and Cmd/Ctrl-click the layer to load it as a selection. Invert this selection with Cmd/Ctrl+Shift+I and go to Edit>Fill and choose Content-Aware. Deselect and use Spot Healing Brush (J) to clean up any join marks.

![]() Get 15% Off All onOne Software And Topaz Labs Photoshop Plugins - Including Ugrades & Bundles
Get 15% Off All onOne Software And Topaz Labs Photoshop Plugins - Including Ugrades & Bundles
Enter coupon code - PSSPPT06 - during checkout at onOne Software for an instant 15% discount on any onOne product.
Topaz Labs Photoshop Plugins — 15% Off
Enter coupon code PHOTOSHOPSUPPORT at Topaz Labs for an instant 15% discount, including bundles and upgrades.
posted by Jennifer Apple | facebook | RSS feed | bookmark | comment | twitter
![]()
CS6 Tutorial - Formating Text In Photoshop CS6
OCTOBER 14, 2012
 Here's a new tutorial from Photoshop Daily — Format text in Photoshop CS6. Explore the latest Paragraph and Character style options in Photoshop CS6.
Photoshop CS6’s new Type tool options are geared towards flexible design, with styling and editing faster than ever before (30-day free trial). This makes tweaking type in pages for print or web UI far more productive. This is achieved through the latest Paragraph Styles and Character Styles options. We suggest selecting Typography from the workspace drop option (top-right in the interface) to have all associate tools instantly available in one location. Here’s how they work...
Lorem Ipsum
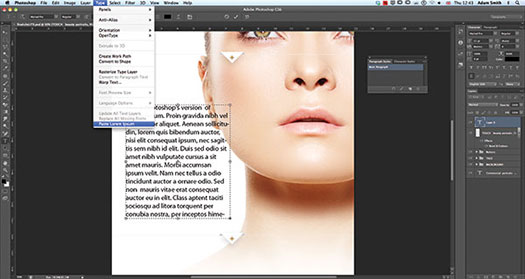
In previous editions of Photoshop, throwing down some blurb to work with in your template meant you had to draw out your text box. Then you’d type and repeatedly copy and paste text to fill the space. However, as Photoshop has borrowed much from InDesign, now you needn’t toil manually. Instead draw out a text box and select Type>Paste Lorem Ipsum.
Paragraph styles
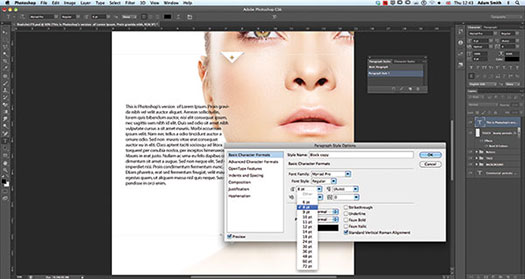
Once your Lorem Ipsum is set, you can start to fashion your paragraphs. Before you do, hit the Create a new Paragraph Style option. Double-click your Paragraph Style 1 preset to alter name, colour, font type, alignment and many other advanced features. Changes update live. Simply click between presets to change style factors.
Character styles
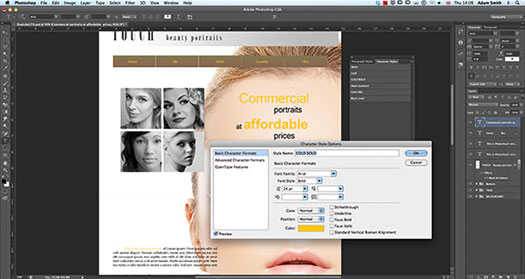
This functionality is interesting, letting you redefine the style of individual words and sentences. Simple select the word(s) you want to change and hit the Create a new Character Style. Double-click the preset to make changes, the same as a Paragraph Style. If you decide to update the effects in this preset each word with the existing effect attached will update automatically.
![]() Get 15% Off All onOne Software And Topaz Labs Photoshop Plugins - Including Ugrades & Bundles
Get 15% Off All onOne Software And Topaz Labs Photoshop Plugins - Including Ugrades & Bundles
Enter coupon code - PSSPPT06 - during checkout at onOne Software for an instant 15% discount on any onOne product.
Topaz Labs Photoshop Plugins — 15% Off
Enter coupon code PHOTOSHOPSUPPORT at Topaz Labs for an instant 15% discount, including bundles and upgrades.
posted by Jennifer Apple | facebook | RSS feed | bookmark | comment | twitter
![]()
Photoshop Creative Effects and Filters - 5 Free Video Tutorials
OCTOBER 12, 2012
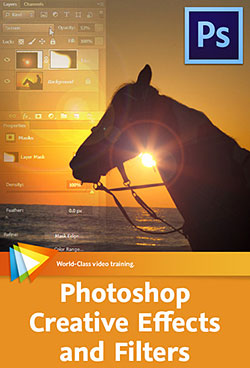 Here are 5 free videos from Photoshop Creative Effects and Filters - Take Your Images in New Directions. "If you can imagine something," says Tim Grey, "you can probably create it in Photoshop." (PS CS6 30-day free trial)
In this one of-a-kind workshop Tim puts his money where his mouth is by sharing his favorite techniques for using Photoshop’s effects and filters to create imaginative, out-of-the-ordinary images. If you decide to purchase the complete training, use our discount code PSSEP30 for an instant 30% savings, good through October 2012.
Using Smart Filters
Smart Filters provide you with the ability to apply creative filters with tremendous flexibility, and this lesson will show you how to put Smart Filters to use.
Creating a Gradient Map Preset
This lesson will guide you through the process of creating your own custom gradient to add a color effect to an image.
Creating an Oil Paint Effect
When you want to apply a painterly effect to a photo, the Oil Paint filter provides an excellent solution. This lesson will show you how to put this filter to use.
Playing with Blend Modes
Some of the blend modes available in Photoshop enable you to create unique effects in your images, as you'll see in this lesson.
Creating Blocks with Extrude
The Extrude filter has some very interesting creative possibilities, as you'll see in this lesson.
![]() Get 15% Off All onOne Software And Topaz Labs Photoshop Plugins - Including Ugrades & Bundles
Get 15% Off All onOne Software And Topaz Labs Photoshop Plugins - Including Ugrades & Bundles
Enter coupon code - PSSPPT06 - during checkout at onOne Software for an instant 15% discount on any onOne product.
Topaz Labs Photoshop Plugins — 15% Off
Enter coupon code PHOTOSHOPSUPPORT at Topaz Labs for an instant 15% discount, including bundles and upgrades.
posted by Jennifer Apple | facebook | RSS feed | bookmark | comment | twitter
![]()
How To Work With Smart Objects In Dreamweaver And Photoshop
OCTOBER 11, 2012
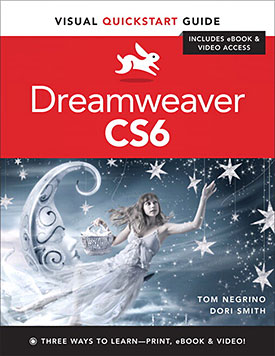 If your websites use a lot of images, you've probably spent plenty of time jumping between Dreamweaver and Photoshop to make changes, and then trying to keep track of which files are current and which need to be synched. Now you can cross that nightmare off your task list. Tom Negrino, coauthor of Dreamweaver CS6: Visual QuickStart Guide, shows how using Smart Objects in Dreamweaver CS6 (30-day free trial) can keep your images in sync automatically.
Images probably convey much of the message of the websites you build in Dreamweaver. If your site is photo-based, such as a photographer's portfolio site, images might even be the main part of your message, although most sites use images primarily to supplement the text.
However important images are to your particular site, you'll need to create a workflow to place any images on your site, and that means figuring out a way to prepare the images in Photoshop and then place them into your web pages in Dreamweaver. Adobe has built image integration into Photoshop and Dreamweaver, so you can start with an image in Photoshop and bring it into Dreamweaver. When your clients inevitably want changes in their websites, you can make your changes to the original image in Photoshop; those changes will reflow through to Dreamweaver, saving you lots of time in image replacement.
Read full article, Working with Smart Objects in Dreamweaver and Photoshop.
Dreamweaver CS6: Visual QuickStart Guide uses a combination of task-based instruction and strong visuals to teach beginning and intermediate users how to create, design, and publish powerful, innovative Web sites with Dreamweaver. Leading technology authors Tom Negrino and Dori Smith take you step-by-step through the new features in Adobe Dreamweaver CS6, with completely revised sections on critical tools like styling pages with CSS and adding user interactivity with JavaScript dynamic elements.
You'll also learn to take advantage of Dreamweaver's new ability to simultaneously design sites for a variety of screen sizes, including desktops, tablets, and mobile phones. If you're new to Dreamweaver and web design, you'll learn to create your first Web site, add text, style and lay out page content, manage styles, work with links, incorporate images, media, tables, forms, design site navigation, and so much more. If you're an experienced user, you'll find this a convenient reference to the new features of Dreamweaver CS6.
![]() Get 15% Off All onOne Software And Topaz Labs Photoshop Plugins - Including Ugrades & Bundles
Get 15% Off All onOne Software And Topaz Labs Photoshop Plugins - Including Ugrades & Bundles
Enter coupon code - PSSPPT06 - during checkout at onOne Software for an instant 15% discount on any onOne product.
Topaz Labs Photoshop Plugins — 15% Off
Enter coupon code PHOTOSHOPSUPPORT at Topaz Labs for an instant 15% discount, including bundles and upgrades.
posted by Jennifer Apple | facebook | RSS feed | bookmark | comment | twitter
![]()
New Book Answers Essential Lens Questions:
How Can I Get Better Images?
What Lens Should I Buy?
OCTOBER 10, 2012
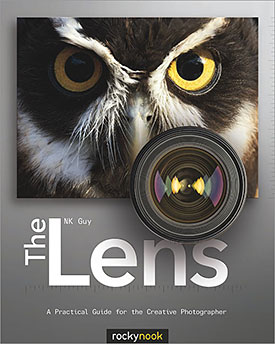 The Lens: A Practical Guide for the Creative Photographer (Rocky Nook, $44.95 USD) is a momentous handbook that demystifies optical technology, decodes arcane terminology, and provides practical tips for both amateur and professional photographers to help them make smart purchasing decisions and build the perfect lens collection.
"Choosing the right lens...is one of the most important photographic decisions you can make," says author NK Guy, "...nothing affects the quality of a photo more than the lens. It's no longer just about the megapixels—it's the glass that makes all the difference." And yet, many buyers of interchangeable lens cameras don't venture past the basic lens included in the camera box.
Some are reluctant to spend more money, are confused by the buzzwords, or are overwhelmed by all the choices that are available. This new book takes the guesswork out of the process so photographers can achieve an amazing scope for quality photography using interchangeable lenses. The book also covers the foundations of lens design, the optical and mechanical (and sometimes electronic) properties of photographic lenses, and presents some of the finest, most elaborate lenses on the market today.
NK Guy goes well beyond simply describing the various lenses available: included are discussions of various shooting situations, expert opinions, and an amazing array of example images. The book is beautifully illustrated with over 600 images. Only by understanding the tools available can the craftsman truly master his craft. This unique book is certain to provide an essential, solid foundation for most every photographer.
NK Guy is a Canadian writer and photographer living in Britain, and specializes in travel photography and event portraiture. He is the author of the Photographer's Dictionary, Mastering Canon EOS Flash Photography, and creator of PhotoNotes.org, the popular online resource for photographic education.
Photoshop Plugins - Get 15% Off All onOne, Topaz & Nik Plugins
![]() Enter coupon code - PSSPPT06 - during checkout at onOne Software for an instant 15% discount on any onOne product.
Enter coupon code - PSSPPT06 - during checkout at onOne Software for an instant 15% discount on any onOne product.
Topaz Labs Photoshop Plugins — 15% Off
Enter coupon code PHOTOSHOPSUPPORT at Topaz Labs for an instant 15% discount, including bundles and upgrades.
NIK Photoshop Plugins — 15% Discount Coupon
Enter coupon code NIKPSS during the checkout process at Nik Software for an instant 15% discount on any Nik plugin or bundle.
posted by Jennifer Apple | facebook | RSS feed | bookmark | comment | twitter
![]()
Creating A Spirograph-style Pattern From A Single Path In Illustrator - Video Tutorial And Step-by-Step
OCTOBER 10, 2012
In this video Deke McClelland shows you how to create a Spirograph-style pattern from a single, continuous path in Adobe Illustrator. Yes, it’s true, two weeks ago, Deke showed you a similar technique, but the fact is, although that project was legitimately a Spirograph-esque design, it was not a legitimate unbroken hypotrochoid. Those of you who may remember using a Spirograph know that the magic of it involved creating the design without ever lifting your pen from the paper. And Deke has discovered two ways to achieve that continuous line effect with Illustrator, which he demonstrates in this week’s episode:
The first step involves squishing a standard circle shape into this unassuming ellipse:

That ellipse is then duplicated 11 times using the Rotate tool to make copies, and each copy is turned 30 degrees from the previous copy’s opposite anchor point. Once the entire rotation is complete (and this is admittedly tedious), you can delete all the center anchor points and join the remaining half-ellipses to make a single path. After converting all the outer points to smooth points, you’re left with this regulation hypotrochoid:
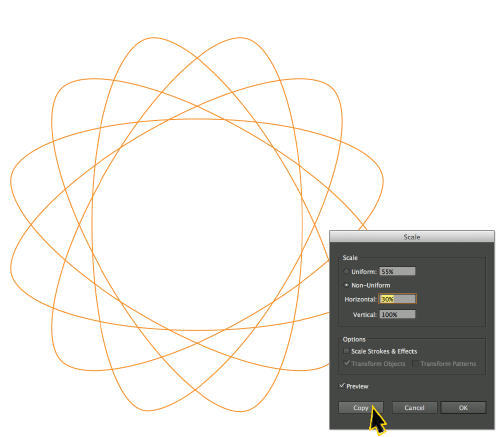
The second approach Deke demonstrates in the video also starts with an ellipse. But in this case, rather than duplicating whole ellipses and then efficiently cutting half of them away, Deke creates an open shape (like a lowercase cursive letter l) by cutting the shape open with the Scissors tool, then slightly rotating half of it:
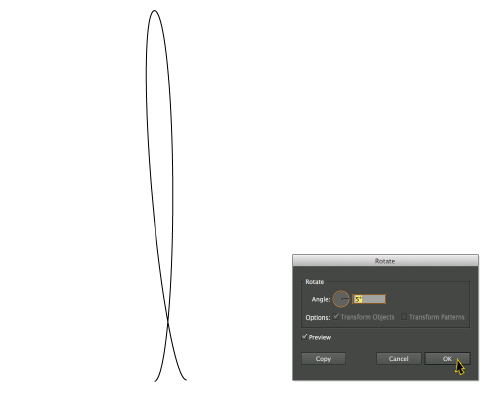
Once you have this open shape, it can be duplicated and rotated using Transform Effect:
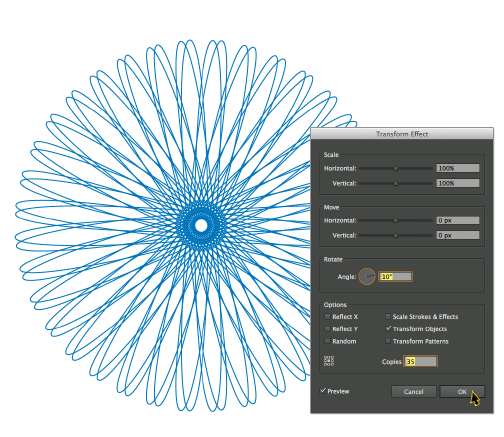
With either approach, there are a few fine tuning tweaks needed to perfect the shape, which Deke demonstrates in the video. In the end, you can combine the two shapes and apply the Multiply blend mode to mix the ink colors for a nostalgic, single-path Spirograph-like piece of artwork.
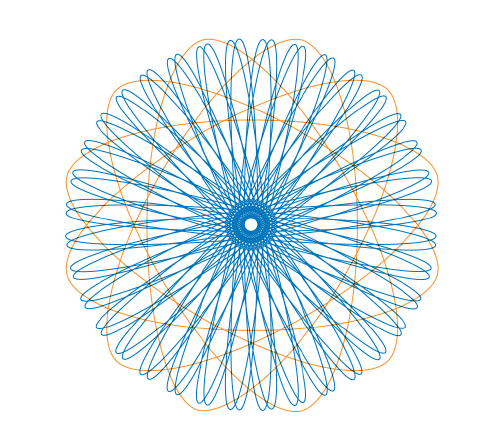
For members of lynda.com, Deke also has a third approach for this kind of effect called Scaling circles into complex patterns, where he shows you how to use the Scale tool to make very intricate, lace-like designs. You can get a free 7-day trial to the lynda.com Online Training Library. The trial membership entitles you to 7 days of access to all 986 courses in the lynda.com Online Training Library for free. Click sign up on the subscription plan of your choice to get started.
Photoshop Plugins - Get 15% Off All onOne, Topaz & Nik Plugins
![]() Enter coupon code - PSSPPT06 - during checkout at onOne Software for an instant 15% discount on any onOne product.
Enter coupon code - PSSPPT06 - during checkout at onOne Software for an instant 15% discount on any onOne product.
Topaz Labs Photoshop Plugins — 15% Off
Enter coupon code PHOTOSHOPSUPPORT at Topaz Labs for an instant 15% discount, including bundles and upgrades.
NIK Photoshop Plugins — 15% Discount Coupon
Enter coupon code NIKPSS during the checkout process at Nik Software for an instant 15% discount on any Nik plugin or bundle.
posted by Jennifer Apple | facebook | RSS feed | bookmark | comment | twitter
![]()
How To Use The Graduated Filter And Adjustment Brush In Lightroom And Camera Raw
OCTOBER 10, 2012
In this episode of The Complete Picture (The Graduated Filter and Adjustment Brush), discover the power of making selective adjustments like dodging and burning, color corrections and noise removal using the Graduated Filter and Adjustment Brush. Note: although this video was recorded in Lightroom, the same techniques are available in Adobe Camera Raw in Photoshop CS6 (30-day free trial).
Photoshop Plugins - Get 15% Off All onOne, Topaz & Nik Plugins
![]() Enter coupon code - PSSPPT06 - during checkout at onOne Software for an instant 15% discount on any onOne product.
Enter coupon code - PSSPPT06 - during checkout at onOne Software for an instant 15% discount on any onOne product.
Topaz Labs Photoshop Plugins — 15% Off
Enter coupon code PHOTOSHOPSUPPORT at Topaz Labs for an instant 15% discount, including bundles and upgrades.
NIK Photoshop Plugins — 15% Discount Coupon
Enter coupon code NIKPSS during the checkout process at Nik Software for an instant 15% discount on any Nik plugin or bundle.
posted by Jennifer Apple | facebook | RSS feed | bookmark | comment | twitter
![]()
How To Build A Photo Gallery Website In Dreamweaver CS6
OCTOBER 9, 2012
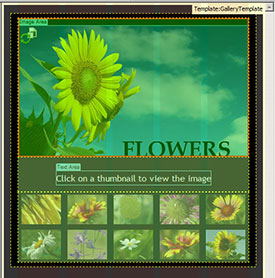 From the latest edition of Inspire magazine, Ten steps to building a photo gallery website with Adobe Dreamweaver CS6 (30-day free trial). From the intro: Adobe Dreamweaver is a web production tool used to build websites and mobile apps using web standard technologies (such as HTML, CSS, and JavaScript). Dreamweaver CS6 includes full support for HTML5 and CSS3, enabling you to create fluid page designs, smooth transitions between content, and content that translates to web and mobile applications.
Whether you're new to building websites or you're a seasoned developer, Dreamweaver is one of those tools that's hard to live without. Rather than using a suite of tools and utilities, you can use the visual preview features, coding tools, and server-related tools in Dreamweaver to speed development.
In this article, I guide you through some of the new features in Dreamweaver CS6 and introduce you to a basic workflow for creating a simple website. You'll build a template for a photo gallery website, including a home page, detail pages, and a navigation bar (click Figure 1 to see a running example). Along the way, you'll learn how to use the new Fluid Grid Layout feature, CSS3 transitions, and Dreamweaver templates.
Read the full article, Ten steps to building a photo gallery website with Adobe Dreamweaver CS6.
Photoshop Plugins - Get 15% Off All onOne, Topaz & Nik Plugins
![]() Enter coupon code - PSSPPT06 - during checkout at onOne Software for an instant 15% discount on any onOne product.
Enter coupon code - PSSPPT06 - during checkout at onOne Software for an instant 15% discount on any onOne product.
Topaz Labs Photoshop Plugins — 15% Off
Enter coupon code PHOTOSHOPSUPPORT at Topaz Labs for an instant 15% discount, including bundles and upgrades.
NIK Photoshop Plugins — 15% Discount Coupon
Enter coupon code NIKPSS during the checkout process at Nik Software for an instant 15% discount on any Nik plugin or bundle.
posted by Jennifer Apple | facebook | RSS feed | bookmark | comment | twitter
![]()
The Plugin Site Release FilterHub For Photoshop
OCTOBER 9, 2012
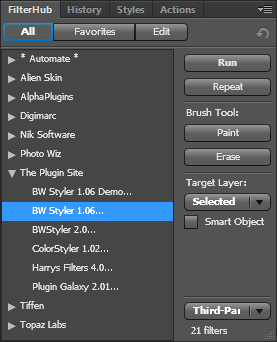 The Plugin Site has announced FilterHub, a panel extension for Photoshop CS4, CS5, CS5.5 and CS6, which runs under Windows and MacOS X. FilterHub is a powerful replacement for Photoshop's Filter menu and offers many advantages over it. It supports built-in Photoshop filters (from the Filter and Adjustments menus), filter plugins and third-party automation plugins. (Download a 14-day-trial version.)
Running filters from the Filter menu in Photoshop is a tedious task. You need to click the Filter item in the menu bar, move down the Filter menu list, find to the right sub menu, move the mouse to the right to enter the sub menu, move down the sub menu and finally click on the appropriate filter item. If you use multiple filters per image, this means performing a lot of unnecessary mouse movements. The wasted seconds for each filter execution add up to minutes and hours as time goes by.
Of course, you can record actions for a certain filter sequence, but you do not need the same filters in the same sequence for all images. You can also assign key shortcuts to filters, but then you have to remember them. Moreover, assigning key shortcuts to dozens of filters is impracticable or even impossible. So you will always need to resort to the inconvenient Filter menu.
With FilterHub your filters are only one click (or a double click) away. The FilterHub panel stays open as long as you wish and displays a configurable list of filters and plugins. You can make it display all filters, show only third-party plugins, enter key words to display only certain filters or add your preferred filters to a favorites list. So even if you do not have FilterHub enlarged to full screen height, you can always have your favorite filters accessible without scrolling.
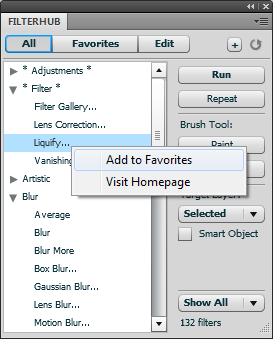 FilterHub additionally allows you to do many things that the Filter menu is not capable of. You can apply the last effect of any filter (not just the last used one) without displaying its dialog and you can paint or erase filter effects with the brush tool. Even more, it runs multiple filters (from the favorites list) with one click, renders the same filter effect on multiple layers in one pass or both: It applies multiple filters on multiple layers with one click.
But this is not all. FilterHub saves you more time and hassle. Before running a filter it can automatically create a duplicated layer, a merged copy of all layers (stamped layer), a smart object or flatten the image.
The Filter menu disables filters that do not officially support smart filtering or a certain image mode. FilterHub does not have these limitations. It applies all filters to smart objects, even those that are disabled on the Filter menu. Furthermore, if a filter does not support the current image mode, FilterHub automatically displays a list of supported modes, preselects the best suited one and converts the image accordingly. So you do not need to try out different modes until you find the right one. FilterHub's context menu offers an option for visiting the homepage of a selected filter, so you can find information about it or check out if there is a new version available.
FilterHub is unique as it is the only available tool that offers a replacement for the old-fashioned Filter menu. It is also the only available third-party tool that lets you run all filters of Photoshop and the only tool that lets you apply multiple filters to multiple layers with one click. The ability to execute filters and plugins faster and more conveniently together with its powerful features make it an indispensable tool for Photoshop users.
FilterHub requires Adobe Photoshop CS4, CS5, CS5.5 and CS6 either under Windows or MacOS X. FilterHub supports all localized versions of Photoshop, but its UI is only available in English and German. FilterHub costs USD 39.95 (Academic/educational license: USD 24.95). A 14-day-trial version can be downloaded.
Photoshop Plugins - Get 15% Off All onOne, Topaz & Nik Plugins
![]() Enter coupon code - PSSPPT06 - during checkout at onOne Software for an instant 15% discount on any onOne product.
Enter coupon code - PSSPPT06 - during checkout at onOne Software for an instant 15% discount on any onOne product.
Topaz Labs Photoshop Plugins — 15% Off
Enter coupon code PHOTOSHOPSUPPORT at Topaz Labs for an instant 15% discount, including bundles and upgrades.
NIK Photoshop Plugins — 15% Discount Coupon
Enter coupon code NIKPSS during the checkout process at Nik Software for an instant 15% discount on any Nik plugin or bundle.
posted by Jennifer Apple | facebook | RSS feed | bookmark | comment | twitter
![]()
2 New Lightroom 4 Plugins On Adobe Labs
OCTOBER 9, 2012
 From Julieanne Kost's Blog: Adobe has released 2 pre-production plug-ins that extend existing functionality inside the Develop Module in Lightroom: Adobe DNG Flat Field and Adobe DNG Recover Edge. These plug-ins are provided free of charge, but without an official support program.
Like other technologies on Adobe Labs, these tools are not finished products, but rather beta or prototype utilities that may work in your particular environment. To download the plug-ins and for more information, please visit Adobe Labs.
Adobe DNG Flat Field plug-in is a tool used to correct an optical phenomenon called shading, also known as “lens cast”.
Adobe DNG Recover Edge plug-in is a tool used to recover image data typically lost when using the in-camera crop mode.
Photoshop Plugins - Get 15% Off All onOne, Topaz & Nik Plugins
![]() Enter coupon code - PSSPPT06 - during checkout at onOne Software for an instant 15% discount on any onOne product.
Enter coupon code - PSSPPT06 - during checkout at onOne Software for an instant 15% discount on any onOne product.
Topaz Labs Photoshop Plugins — 15% Off
Enter coupon code PHOTOSHOPSUPPORT at Topaz Labs for an instant 15% discount, including bundles and upgrades.
NIK Photoshop Plugins — 15% Discount Coupon
Enter coupon code NIKPSS during the checkout process at Nik Software for an instant 15% discount on any Nik plugin or bundle.
posted by Jennifer Apple | facebook | RSS feed | bookmark | comment | twitter
![]()
Focus Pyramid Autofocus Lens Calibration Tool
OCTOBER 9, 2012
Here's a camera product, the Focus Pyramid Autofocus Lens Calibration Tool — a cardboard pyramid with some numbers printed on it, that does exactly what it says it does. Setup takes a few seconds, just some folding and tabs to insert. Then you set your camera up, take some shots, review them, and make any adjustments you may need to your camera settings so that your individual lenses are shooting tack sharp. Simple and inexpensive ($24.95). Nice.
You can find out more at the Focus Pyramid site. Here's a video to get you started.
Photoshop Plugins - Get 15% Off All onOne, Topaz & Nik Plugins
![]() Enter coupon code - PSSPPT06 - during checkout at onOne Software for an instant 15% discount on any onOne product.
Enter coupon code - PSSPPT06 - during checkout at onOne Software for an instant 15% discount on any onOne product.
Topaz Labs Photoshop Plugins — 15% Off
Enter coupon code PHOTOSHOPSUPPORT at Topaz Labs for an instant 15% discount, including bundles and upgrades.
NIK Photoshop Plugins — 15% Discount Coupon
Enter coupon code NIKPSS during the checkout process at Nik Software for an instant 15% discount on any Nik plugin or bundle.
posted by Jennifer Apple | facebook | RSS feed | bookmark | comment | twitter
![]()
Master Scripted Patterns - A Creative Photoshop CS6 Option
OCTOBER 8, 2012
 In this new Photoshop CS6 tutorial from Photoshop Daily, Adam Smith explores the creative potential of this new Photoshop CS6 option (free trial). At first, native Pattern presets in Photoshop had limited use for rudimentary texture application. But soon Photoshop artists started personalising patterns and enhancing projects for both on-screen and print.
The new CS6 Scripted Pattern options are in harmony with this creative philosophy. These now offer variable styles, which liberate designs from the single-tiled look that was set in earlier versions. Each defines its own method of displaying your pattern.
Brick Fill fixes textures into rows much like brickwork, with Cross Weave also adopting real-world properties, interlinking multiple textures at alternating 90-degree angles. Both these styles introduce alternate tones to your original pattern, however Spiral retains the original colour of your pattern. Random Fill is less organised, offering entirely random effects each time you apply.
Patterns can now be applied to empty layers, maintaining transparency. This means you don’t have to bother with solid backgrounds when layering effects. Unfortunately these presets don’t extend to the Layer Style options. Parameter control would help adjust looks, applying effects non-destructively in projects. Hopefully we can expect these updates in the near future, but for now we’ll show you how to approach existing scripted styles.
Step 01: Random foreground elements
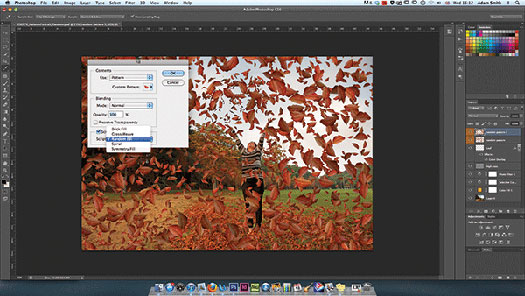
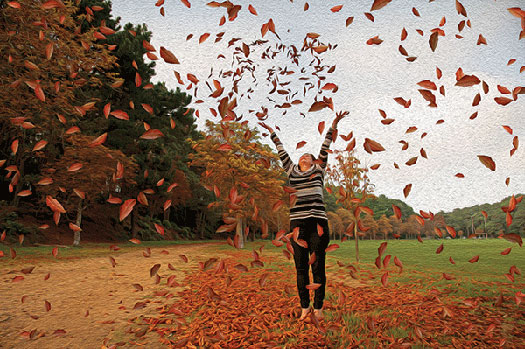
The Random Fill throws out some cool experimental effects. We’ve created a new pattern using leaf stock, applying this scripted pattern to create a foreground. The selection size you make around your leaf will establish spacing applied in your Random Fill effect.
Step 02: Chequered styles
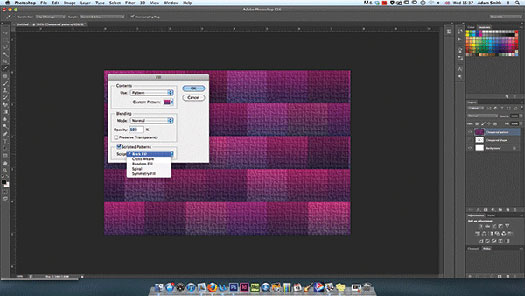
The Brick Fill option works best when applied with shapes with a hard edge, namely squares and rectangles, saved as a new pattern. This eradicates the annoyance of negative space that appears with other shapes. Stick to four sides and these should interlink nicely.
Step 03: Master the cross weave
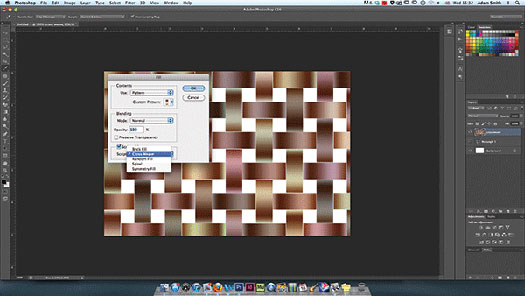
Cross Weave styles are very specific, so stick to the fundamental shapes. We’ve created a small gradient shape in CS6, making a selection and saving this as a pattern preset. Once applied using Scripted Patterns>Cross Weave, the effects are quite attractive.
Final image:
Photoshop Plugins - Get 15% Off All onOne, Topaz & Nik Plugins
![]() Enter coupon code - PSSPPT06 - during checkout at onOne Software for an instant 15% discount on any onOne Software product.
Enter coupon code - PSSPPT06 - during checkout at onOne Software for an instant 15% discount on any onOne Software product.
Topaz Labs Photoshop Plugins — 15% Off
Enter coupon code PHOTOSHOPSUPPORT at Topaz Labs for an instant 15% discount, including bundles and upgrades.
NIK Photoshop Plugins — 15% Discount Coupon
Enter coupon code NIKPSS during the checkout process at Nik Software for an instant 15% discount on any Nik plugin or bundle.
posted by Jennifer Apple | facebook | RSS feed | bookmark | comment | twitter
![]()
Learning Adobe Illustrator CS6 Tutorial DVD - Video Training - 14 Free Videos
OCTOBER 7, 2012
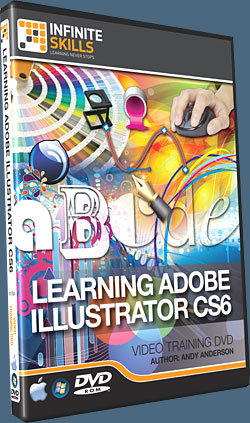 In this Adobe Illustrator CS6 training course, expert author and trainer Andy Anderson guides you through the tools and techniques that are available to you in this vector graphics editor from Adobe Systems.
Used by professionals around the world, Illustrator can be a mystifying program, but Andy breaks it down into easy-to-understand sections that even an absolute beginner with Illustrator can understand.
Here are the free videos you can watch now from this course:
Introduction To Adobe Illustrator
Working Smart With Illustrator Preferences
Group & Direct Selection Techniques
It's All In The Math
The World Of Illustrator Gradients
The Pathfinder Panel - Part 1
Going Beyond The Pathfinder Panel
Creating Custom Symbols
Pen Tool 101
Generating Paths With The Pen Tool
Working With Smart Guides & The Pen Tool
Generating An Opacity Mask
Working With Live Paint
Creating Custom Illustrator Brushes
This Adobe Illustrator CS6 training course tutorial series starts out with a tour of the Illustrator interface, and an explanation of vector art. Once you have a grounding in the basic navigation, Andy quickly takes you into applying Illustrator tools for selections, color management, shapes, fills, strokes, as well as anchors and paths.
You will learn about creating and managing vector based shapes, using the pen tool, working with effects and layers, working with masks and images, and much, much more. By the completion of this video based tutorial for Adobe Illustrator CS6, you will fully understand the difference between vector and raster art, and how to create high-quality vector images using the variety of tools provided to you in Illustrator CS6. Working files are included to allow you to work with the same files that the author uses throughout this video training course.
Photoshop Plugins - Get 15% Off All onOne, Topaz & Nik Plugins
![]() Enter coupon code - PSSPPT06 - during checkout at onOne Software for an instant 15% discount on any onOne Software product.
Enter coupon code - PSSPPT06 - during checkout at onOne Software for an instant 15% discount on any onOne Software product.
Topaz Labs Photoshop Plugins — 15% Off
Enter coupon code PHOTOSHOPSUPPORT at Topaz Labs for an instant 15% discount, including bundles and upgrades.
NIK Photoshop Plugins — 15% Discount Coupon
Enter coupon code NIKPSS during the checkout process at Nik Software for an instant 15% discount on any Nik plugin or bundle.
posted by Jennifer Apple | facebook | RSS feed | bookmark | comment | twitter
![]()
Adobe Photoshop Elements 11 Learn by Video - 7 Free Clips
OCTOBER 5, 2012
 Here are 7 free videos for Photoshop Elements 11 (30-day free trial) taken from the video tutorial series Adobe Photoshop Elements 11 Learn by Video - Manage, Optimize, and Share Your Photographic Memories. If you decide to purchase the complete training, use our discount code PSSEP30 for an instant 30% savings, good through end of October 2012.
Updating an Existing Catalog
If you've been using Photoshop Elements prior to version 11, you'll want to watch this lesson so you'll know exactly how to update your existing Elements catalog.
Identifying the People in Photos
The Elements Organizer includes a powerful "people recognition" feature that enables you to automatically identify the people in your photos. This lesson will show you how to put this feature to use.
Performing a Visual Search
The Elements Organizer lets you find images that are visually similar to a particular photo that you've identified. This lesson will show you how to use this impressive capability.
Creating a Perfect Portrait
In this lesson you'll learn how to apply a variety of adjustments to improve any photo that features a person, making it look like a great portrait.
Creating an Out of Bounds Effect
With the Out of Bounds guided edit you can make a subject pop out of the photo, as you'll see in this lesson.
Creating Reflections
This lesson will show you how to create a reflection effect that can add some elegance to a photo.
Creating Greeting Cards
This lesson will show you how to create custom greeting cards that feature your photos.
Photoshop Plugins - Get 15% Off All onOne, Topaz & Nik Plugins
![]() Enter coupon code - PSSPPT06 - during checkout at onOne Software for an instant 15% discount on any onOne product.
Enter coupon code - PSSPPT06 - during checkout at onOne Software for an instant 15% discount on any onOne product.
Topaz Labs Photoshop Plugins — 15% Off
Enter coupon code PHOTOSHOPSUPPORT at Topaz Labs for an instant 15% discount, including bundles and upgrades.
NIK Photoshop Plugins — 15% Discount Coupon
Enter coupon code NIKPSS during the checkout process at Nik Software for an instant 15% discount on any Nik plugin or bundle.
posted by Jennifer Apple | facebook | RSS feed | bookmark | comment | twitter
![]()
How To Turn A Pencil Drawing Into Ink-style Art - Photoshop Video And Step-by-Step Tutorial
OCTOBER 4, 2012
Deke McClelland shows you step-by-step how to use Adobe Photoshop to turn a scanned pencil sketch into a digital ink-style drawing.
For his sample file, Deke uses a scanned pencil-sketched comic strip reminiscent of art he drew in his youth:

The first step is to get rid of some color effects that were created during the scanning process. Because this unwanted color is living in the Blue channel, Deke uses the Photoshop Channel Mixer to reduce the effects by mixing in greater values of the Red and Green channels. This process also creates an opportunity for Deke to darken the outlines of his characters.
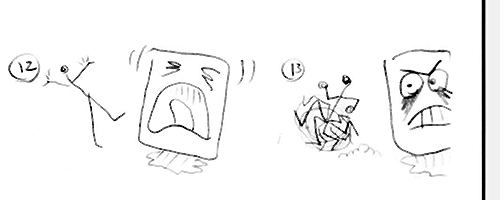
Next, he strengthens the black outlines with a Levels adjustment:

Then Deke applies the Despeckle filter to help reduce the noisy edges around the drawing caused by the JPEG compression, and creates a white rectangle to cover the edge of the drawing paper that reveals where the scanned paper ends and the scanner itself starts.

One advantage of drawing digitally is the ability to reconsider details. Before taking the time to redraw the cartoon with pencil, Deke brushes white around the eyes of his square character, who he’s affectionately named Jello, so he can redraw the eyes digitally.

After switching his brush color to black, Deke redraws a more refined expression of gelatinous rage and reconstructs the side of Jello’s face that got cut off by the scan:

In the end, you get all the benefits of drawing in the real world, and refining in the digital one. To see every nuance and detail of the process, check out the movie Turning a pencil sketch into digital ink at the top of this post, or on lynda.com. For members of lynda.com, Deke also has a member-exclusive movie this week called Adding a graph-paper background, where he shows you how to give your digitally inked characters a unique background.
You can get a free 7-day trial to the lynda.com Online Training Library. The trial membership entitles you to 7 days of access to all 986 courses in the lynda.com Online Training Library for free. Click sign up on the subscription plan of your choice to get started.
Photoshop Plugins - Get 15% Off All onOne, Topaz & Nik Plugins
![]() Enter coupon code - PSSPPT06 - during checkout at onOne Software for an instant 15% discount on any onOne Software product.
Enter coupon code - PSSPPT06 - during checkout at onOne Software for an instant 15% discount on any onOne Software product.
Topaz Labs Photoshop Plugins — 15% Off
Enter coupon code PHOTOSHOPSUPPORT at Topaz Labs for an instant 15% discount, including bundles and upgrades.
NIK Photoshop Plugins — 15% Discount Coupon
Enter coupon code NIKPSS during the checkout process at Nik Software for an instant 15% discount on any Nik plugin or bundle.
posted by Jennifer Apple | facebook | RSS feed | bookmark | comment | twitter
![]()
Adobe Photoshop Lightroom Updated To 4.2 - Now Available
OCTOBER 3, 2012
 Lightroom 4.2 is now available as a final release on Adobe.com (update link is on right side bar) and through the update mechanism in Lightroom 4. The goal of this release is to provide additional camera raw support, lens profile support and address bugs that were introduced in previous releases of Lightroom.
Bugs Corrected in Lightroom 4.2:
The following bugs that were part the Lightroom 4 releases have been corrected:
- Stacked photos were hidden in both the Grid view and Filmstrip. This occurred when photos get unstacked as a result of enabling auto-stacking.
- Folder stacks with virtual copies were unstacked when moving to another folder.
- When scrolling through the filmstrip (at somewhat fast rate), occasionally a “gray” image was displayed for an instant and then replaced by the correct image preview.
- The Navigator Panel in Map did not pan correctly.
- Parents and synonyms of “do not export” keywords also did not export.
- Occasionally were unable to publish videos to Facebook
- Audio did not play in video files after creating a slideshow that contains music (Win 7 only)
Image select arrow on keyword list didn’t display when keyword list contained a large number of keywords
- Unable to edit Lightroom photos as jpegs in Photoshop Elements
- Carriage Return in either the Title or Caption field invalidated a Flickr upload.
- Tether capture bar disappeared after deleting photo (Win only).
- Back Cover of Book layout had Horizontal text on spine rather than Vertical
- Sharpening was not applied to books that were exported as JPEG files
- Double-byte characters were not exported to Books saved as PDF files
- Unable to type accented character in book module in LR4
- Luminance Noise slider was unresponsive when Clarity is greater than 0.
- Develop keyboard shortcuts (+ and – keys) no longer worked in older process versions such as PV2010
New Camera Support in Lightroom 4.2:
Canon EOS 650D / Rebel T4i
Canon EOS M
Fujifilm XF1
Fujifilm X-E1
Fuji FinePix F800EXR
Leaf Credo 40
Leaf Credo 60
Leica S
Leica D-LUX 6
Leica V-LUX 4
Nikon Coolpix P7700
Nikon 1 J2
Nikon D600*
Panasonic DMC-G5
Panasonic DMC-LX7
Panasonic DMC-FZ200
Pentax K-30
Samsung EX2F
Sony Alpha NEX-5R
Sony Alpha NEX-6
Sony Alpha SLT-A99V
Sony DSC-RX100
* Please note that the support for Nikon D600 is preliminary and there is a minor risk that the appearance of your images may change when the final support for Nikon D600 is available in an upcoming release.
Newly supported cameras for tethered capture:
Canon EOS Kiss X5
Canon EOS Kiss REBEL T3i
Canon EOS 600D
Canon EOS Kiss X50
Canon EOS REBEL T3
Canon EOS 1100D
Canon EOS 5D Mark III
Canon EOS 1D X
Nikon D4
Nikon D800
Nikon D800e
Photoshop Plugins - Get 15% Off All onOne, Topaz & Nik Plugins
![]() Enter coupon code - PSSPPT06 - during checkout at onOne Software for an instant 15% discount on any onOne Software product.
Enter coupon code - PSSPPT06 - during checkout at onOne Software for an instant 15% discount on any onOne Software product.
Topaz Labs Photoshop Plugins — 15% Off
Enter coupon code PHOTOSHOPSUPPORT at Topaz Labs for an instant 15% discount, including bundles and upgrades.
NIK Photoshop Plugins — 15% Discount Coupon
Enter coupon code NIKPSS during the checkout process at Nik Software for an instant 15% discount on any Nik plugin or bundle.
posted by Jennifer Apple | facebook | RSS feed | bookmark | comment | twitter
![]()
Mastering Color Correction in Photoshop - 5 Free Videos
OCTOBER 3, 2012
 Here are 5 free videos from Mastering Color Correction in Photoshop - Take Control of the Colors in Your Images. There’s more to color than meets the eye. Getting it right is both an art and a science, and in this course Tim Grey shares his knowledge of color correction in Photoshop (CS6 30-day free trial). If you decide to purchase the complete training, use our discount code PSSEP30 for an instant 30% savings, good through October 2012.
Reading a Histogram
The Histogram display is generally thought of as a tool for evaluating tonal information in your photos, but as you'll see in this lesson, it can also be helpful when it comes to color.
Vibrance vs. Saturation
This lesson will show you the important differences between vibrance and saturation when it comes to adjusting the intensity of colors in your photos.
Balancing a Specific Color
When a specific color in a photo isn't looking quite right, you can apply an adjustment that only affects a particular range of colors, as you'll see in this lesson.
Painting a Color Fix
This lesson will guide you through the process of painting a color fix into specific areas of a photo.
Matching Color Between Images
If you have two images that need to have matching colors, the technique you'll learn in this lesson provides a solution.
Photoshop Plugins - Get 15% Off All onOne, Topaz & Nik Plugins
![]() Enter coupon code - PSSPPT06 - during checkout at onOne Software for an instant 15% discount on any onOne Software product.
Enter coupon code - PSSPPT06 - during checkout at onOne Software for an instant 15% discount on any onOne Software product.
Topaz Labs Photoshop Plugins — 15% Off
Enter coupon code PHOTOSHOPSUPPORT at Topaz Labs for an instant 15% discount, including bundles and upgrades.
NIK Photoshop Plugins — 15% Discount Coupon
Enter coupon code NIKPSS during the checkout process at Nik Software for an instant 15% discount on any Nik plugin or bundle.
posted by Jennifer Apple | facebook | RSS feed | bookmark | comment | twitter
![]()
Adobe Unveils Next Generation Acrobat XI - New Cloud Services
OCTOBER 1, 2012
 Adobe today unveiled Adobe Acrobat XI software with cloud services, a powerful new solution that rises to today's complex document challenges. Acrobat XI Standard has an MSRP of $299/$139 for the upgrade package. Acrobat XI Pro will cost $449/$199. A download of Reader XI will be free when Acrobat ships. The lowest tier of Adobe EchoSign still costs $14.95/month, and Adobe FormsCentral subscriptions start at $14.99/month.
The industry standard for PDF software will now feature complete PDF editing and export to Microsoft PowerPoint; touch-friendly capabilities on tablets; and newly integrated cloud services, including sophisticated Web contracting with Adobe EchoSign® and forms creation, data collection and analysis with Adobe FormsCentral. Acrobat XI additionally supports IT departments with seamless Microsoft Office and SharePoint integration, easy deployment, applications virtualization and robust application security to help provide a low cost of ownership and sound return on investment.
Products included in this release are: Acrobat XI Pro, Acrobat XI Standard, Adobe Reader® XI and newly integrated document services, Adobe FormsCentral and Adobe EchoSign. The mounting productivity inefficiencies and cost of document-based challenges are highlighted in a recent global IDC white paper. A typical company with 1,000 employees has a productivity cost of US$15.9 million annually, the white paper calls out, and addressing these inefficiencies would be tantamount to hiring an additional 213 people. READ FULL PRESS RELEASE...
Photoshop Plugins - Get 15% Off All onOne, Topaz & Nik Plugins
![]() Enter coupon code - PSSPPT06 - during checkout at onOne Software for an instant 15% discount on any onOne Software product.
Enter coupon code - PSSPPT06 - during checkout at onOne Software for an instant 15% discount on any onOne Software product.
Topaz Labs Photoshop Plugins — 15% Off
Enter coupon code PHOTOSHOPSUPPORT at Topaz Labs for an instant 15% discount, including bundles and upgrades.
NIK Photoshop Plugins — 15% Discount Coupon
Enter coupon code NIKPSS during the checkout process at Nik Software for an instant 15% discount on any Nik plugin or bundle.
posted by Jennifer Apple | facebook | RSS feed | bookmark | comment | twitter
![]()
5 Free Grayscale Photoshop Patterns
SEPTEMBER 29, 2012
From Bittboxx: Speed up your workflow with these simple but flexible Photoshop patterns. The solid colors and simple shapes make them easily scalable to fit your desired vision. (All textures on Bittbox.com are free for personal use. For commercial use they require a unrestricted usage fee of $9.99 per file.)

posted by Jennifer Apple | facebook | RSS feed | bookmark | comment | twitter
![]()
Get 30% Off Any Topaz Product Or Upgrade, Including The Plugin Bundle - Only 2 Days Left
SEPTEMBER 28, 2012
 There's only 2 days left to save 30% on the new Topaz Simplify 4 plugin, but you can also save 30% on all other Topaz programs as well. Updated with over 100 new presets categorized by style, new adjustment sliders, an intuitive edge-aware brush and an updated interface, it is easier than ever to create high-impact photo-realistic images and digital art.
Get it now for only $27.99 and give your photography a true creative edge. Just enter the code "getsimplified" when purchasing (valid through 9/30/12). And if you are interested in purchasing other Topaz programs you can also use this 30% discount code for the Bundle, Bundle upgrades and all of the various individual programs. Here are the new and improved features in Topaz Simplify 4:

New Adjustment Sliders. Instantly add depth and tonality to create realistic artistic effects using Dynamics, structure and structure boost sliders.
Instant Transformations with over 100 new presets to help stimulate your creative juices.
Preset Organization via convenient effect categories – so you can easily find and apply the perfect look in seconds.
Intuitive 4-in-1 selective brush to dodge, burn, smooth, and brush out adjustments.
Plus advanced edge-aware technology for precise selections every time.
Integration of the Apply button – so you can stack multiple presets during the same workflow and build your own style.
Finishing Touches tab with options for vignette, toning and transparency.
posted by Jennifer Apple | facebook | RSS feed | bookmark | comment | twitter
![]()
Working With Color Lookup Adjustments In Photoshop CS6
SEPTEMBER 28, 2012
 Here is a Photoshop tutorial from Photoshop Daily that looks at this new adjustment layer that was introduced in Photoshop CS6 (30-day free trial).
There are so many new features in Photoshop CS6, that some of them seem to get swept under the table with the focus being on the big additions to each version of the program. For example, did you know that there is now a Color Lookup adjustment layer in CS6? This works using Lookup Tables (LUTs), which are common in the film, video and TV industry to grade and composite film during post-production.
This means that you can quickly and easily apply preset looks to your photos in seconds, to get some really interesting effects. You can also use them on video, which means that you can grade your film. Don’t be afraid to stack up multiple adjustments either, as you can really get some professional-looking results by learning which of the presets work well together and which don’t. There are three categories of presets (3DLUT, Abstract and Device Link), which together offer over 30 different effects. You can also import more of your own. While there are some very advanced ways to use this adjustment layer, for now, we shall just run through the basics to introduce you to the feature.
Step 1: Initial adjustment
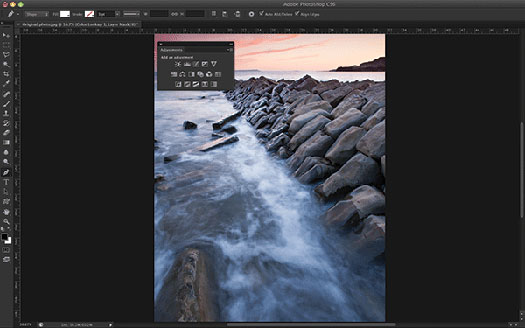
First of all, you’ll want to consider what effect you are trying to achieve, and choose you image accordingly. Once you’ve decided, open up the image in Photoshop. You will need an RGB image to access the 3DLUT presets, but you can use the other categories with CMYK images. From the Adjustments palette, pick the Color Lookup option at the end of the second row.
Step 2: Pick an effect

The Properties panel will now open, where you can select from the various presets available in the three different categories. You can load your own presets too. We expect to see more of these presets available of on the internet in the future. All the presets are applied like the normal adjustment layers, with a mask attached, so the process will seem very familiar.
Step 3: Stack them up

If you want to add more than one look to your image, then simply repeat this process, selecting the Color Lookup adjustment from the Adjustments window and picking a preset from the Properties palette. It is worth experimenting, as there are some great combinations available. You can even add these adjustments to video clips in the same way.
posted by Jennifer Apple | facebook | RSS feed | bookmark | comment | twitter
![]()
Photoshop Artist in Action: Uli Staiger's Perestroika - 4 Free Videos - Create a Detailed, Realistic Landscape Scene
SEPTEMBER 27, 2012
 Here are 4 free videos from Photoshop Artist in Action: Uli Staiger´s Perestroika. If you decide to purchase the complete training, use our discount code PSSEP30 for an instant 30% savings, good through October 2012.
In this fun workshop you’ll combine supplied source images, make adjustments, and add details to create a complex, realistic scene with lots of layers. Along the way you’ll learn lots of tricks and techniques for painting with light and shadow, creating motion blur, brush-based masking, adding vignettes, and more.
First Look at the Final Image
In this course we'll use the tools and techniques available in Photoshop to create an amazing landscape scene from scratch. This video gives you a quick look at the final product so you can understand where we're heading.
Placing the Sky
As you'll see in this lesson, a Faux Finish brush is very useful for cleaning up the horizon layer of your work. You'll learn that you can work magic by using a layer mask and painting in black with a very small brush tip.
Creating a Shadow
There is nothing like a shadow to add a sense of depth and dramatic interest to your image. In this lesson you'll learn how to create realistic-looking shadows using Curves and Levels adjustments.
Painting Dust
In this lesson we'll add some final details to the scene. As you'll see, specialized brush tips like Photoshop's Scattered Roses brush can help you create realistic-looking dust.
posted by Jennifer Apple | facebook | RSS feed | bookmark | comment | twitter
![]()
The Photoshop Blog - Earlier Posts
![]() The Photoshop Blog offers the latest Photoshop news and software updates, Photoshop tips and tutorials, and random thoughts from graphic artist and Photoshop expert Jennifer Apple.
The Photoshop Blog offers the latest Photoshop news and software updates, Photoshop tips and tutorials, and random thoughts from graphic artist and Photoshop expert Jennifer Apple.
PHOTOSHOP NEWS — September 2012
39- 5 Free Grayscale Photoshop Patterns
38- Get 30% Off Any Topaz Product Or Upgrade, Including The Plugin Bundle - Only 2 Days Left
37- Working With Color Lookup Adjustments In Photoshop CS6
36- Photoshop Artist in Action - 4 Free Videos - Create a Detailed, Realistic Landscape Scene
35- Adobe Photoshop Elements Quick Review - Free Shipping Offer
34- Using Mini Bridge In Photoshop - You Don’t Have To Be In The Full Bridge Program To Access Some Of Its Key Tools
33- Adobe Photoshop Elements 11 At A Glance
32- Adobe Premiere Elements 11 At A Glance - Moviemaking Made Easier
31- How To Create Spirograph-style Art In Illustrator - Video Tutorial
30- New Topaz Simplify 4 Photoshop Plugin - Save 30% Instantly
29- Resampling With Photoshop Interpolation - Master Your Image Pixels With Photoshop Resizing Technology
28- Alphabet Photoshop Brushes - Plus Tutorial On Creating Them
27- NIK Color Efex Pro 4 Workshop - 3 Free Videos
26- Learning Adobe Photoshop Lightroom 4 Tutorial DVD - Video Training - 12 Free Videos
25- How To Create A Furry Text Effect In Photoshop CS6
24- Adobe Dreamweaver CS6 Training Video - 12 Free Videos
23- AKVIS HDRFactory 3 - Tool to Create High Dynamic Range Photos
22- Interpolate Extension for Adobe Photoshop CS6 - Smoothly Blend Between Colors
21- Bridge CS6 for Photographers - 4 Free Videos
20- Photoshop CS5 Tutorial DVD - Video Training - 18 Free Videos
19- Photo Restoration in Photoshop - 5 Free Videos - Bring Old Photos Back to Life
18- Editing An Existing Remote Website in Dreamweaver
17- Photoshop CS6 RAW Workshop - Free Video Tutorials -
Maximize Your Photo Quality with ACR 7
16- 5 Free Murky Plastic Textures For Photoshop
15- Creating A Hand-carved Wood Effect in Photoshop - Step-by-Step Tutorial and Video
14- Photoshop CS6 Oil Paint Filter Tutorial
13- Graphic Artist Tattoos - Collection Of Job Specific Designs
12- Adobe Special Offers And Deals For September
11- Adobe Releases New Set of Features Exclusively to Creative Cloud Members
10- Free Set Of 5 Fractal Brushes For Photoshop
09- Mixed Media Photoshop Brush Set - 10 Free Brushes
08- Learning Adobe Photoshop CS6 Tutorial DVD - Video Training - 16 Free Videos
07- Julieanne Kost's Top 10 Photoshop Layer Shortcuts - From Photoshop World 2012
06- Free Photoshop Touch Upgrade - Retina Display Support, Higher Resolution Capabilities
05- onOne Software Announces Perfect Photo Suite 7 - 15% Discount
04- Cloning Yourself In Photoshop - Video Tutorial
03- Topaz Labs Image Enhancement Bundle - 15% Coupon ($45 Off)
02- Lightroom 4.2, Camera Raw (for CS6) And DNG Converter Candidates Now On Adobe Labs
01- Nik Software Vintage Photo Competition - Win A Nikon 1 Or iPad
See Earlier Posts From The Photoshop Blog - SEPTEMBER 2011.
![]()
Exclusive 15% Discount On All Topaz Plugins - Use Coupon Code PHOTOSHOPSUPPORT - Includes Bundles And Upgrades
 Enter our exclusive discount coupon code PHOTOSHOPSUPPORT during the checkout process at Topaz Labs for an instant 15% discount on any Topaz product, including bundle deals and upgrades.
Topaz Labs Photoshop plug-ins are specifically designed to expand a photographer's creative toolbox by harnessing powerful image technology developments.
Photographers everywhere are now taking advantage of the creative exposure effects, artistic simplification, unique edge manipulation, and top-of-the-line noise reduction offered in Topaz products. The Topaz Photoshop Bundle includes the following Topaz plugins:
Topaz Adjust optimizes image exposure, color, and detail strength for stunning image results.
 Topaz DeNoise offers a complete noise reduction solution that removes far more noise and preserves far more detail than other solutions.
Topaz Detail gives full control over all aspects of detail manipulation and micro-contrast adjustment without creating any edge artifacts or halos.
Topaz Simplify provides creative simplification, art effects, and line accentuation for easy one-of-a-kind art.
Topaz Clean integrates unique smoothing capabilities with stylized detail manipulation to add refreshing flair to photos.
Topaz ReMask quickly creates detailed masks and extractions from even the most difficult images.
Topaz DeJPEG drastically improves the quality of web images and other compressed photos.
READ ABOUT THE TOPAZ BUNDLE OFFER.
![]()
Exclusive onOne Software 10% Instant Discount Coupon
 Enter our exclusive discount coupon code - PSSPPT06 - during the checkout process at onOne Software for an instant 10% discount on any onOne product. This includes Genuine Fractals and their amazing Photoshop Plug-In Suite.
onOne Software's Plug-In Suite combines full versions of six essential software tools — Genuine Fractals Print Pro, PhotoTools Pro, PhotoFrame Pro, Mask Pro, PhotoTune and FocalPoint — an affordable combination that includes everything a photographer needs to make their images look their best.
Why do you need plugins? Photoshop is an amazing image editing application that has forever changed graphic design and digital photographic editing, but like any tool, if you don't have time to fully learn it, you can't get the most out of it.
Plugins for Photoshop allow you to either do something that you cannot do with the features included in Photoshop or they allow you to do something easier, faster or better than you could do in Photoshop without the plug-in. Whether it is color correction, resizing, masking or creating an effect, you can find a Photoshop plug-in that can help you be more efficient with your time.
![]()
Photoshop Masking Plugin Fluid Mask 3 - Price Drop And Exclusive $20 Instant Discount - Now Only $129
 The 4 1/2 out of 5 star review of Fluid Mask 3 at MacWorld begins by saying that this "Photoshop plug-in takes the pain out of extracting backgrounds," and goes on to recommend the latest version, stating that "Fluid Mask 3.0.2 is a very effective tool for separating objects from their backgrounds. It offers a variety of useful features for tackling almost any difficult image, from wispy hair to complex foliage. Online video tutorials and live training sessions help ease the learning curve."
Our friends at Vertus, the makers of Fluid Mask 3 Photoshop Plugin, have set up a special exclusive discount for PhotoshopSupport.com. Buy now for only $129. Just follow this discount link and instantly get $20 off your purchase of Fluid Mask 3.
Fluid Mask 3 is designed for photographers, image editors, graphic designers and all those who take digital image editing seriously. In a streamlined interface and workflow, Fluid Mask 3 instantly shows key edges in the image and provides comprehensive easy to use tools that work with difficult-to-see edges and tricky areas like trees & lattices. Fluid Mask will also preserve all-important edge information for a professional quality cut out. Simply follow this discount link and pay only $129 for Fluid Mask 3.
![]()
Special Deals On Nik Software Photoshop Plugins - Viveza, Complete Collection - 15% DISCOUNT COUPONS
Follow the links below and the 15% discount will be AUTOMATICALLY APPLIED to any purchase you make, or use our exclusive discount coupon code - NIKPSS - during the checkout process at Nik Software for the instant 15% discount. This exclusive discount coupon code can be applied to all the latest Nik Software Photoshop plugins, including Silver Efex Pro, Color Efex Pro, Viveza, HDR Efex Pro, and The Complete Collection (big savings).
Nik Software The Complete Collection (Plugins Bundle)
 The Complete Collection includes all of Nik Software's latest award-winning plug-in software titles for Photoshop, Lightroom and Aperture including: Dfine, Viveza, HDR Efex Pro, Color Efex Pro, Silver Efex Pro, and Sharpener Pro.
The Complete Collection features products with Nik Software's patented U Point® technology, giving photographers the most powerful tools for precise and natural photographic enhancements and corrections without the need for complicated selections or layer masks.
The Complete Collection is offered in two editions: (1) the Complete Collection Ultimate Edition includes support for every plug-in to work in Photoshop, Lightroom, and Aperture, and offers Color Efex Pro 3.0 to work in Capture NX 2 as well. (2) the Complete Collection for Lightroom and Aperture includes support for each plug-in to only work in Lightroom and Aperture. Click here to compare both editions
Color Efex Pro 3.0
 52 photographic filters with over 250 effects for professional quality images.
Completely Original. Completely Indispensable.
Nik Software Color Efex Pro 3.0 filters are the leading photographic filters for digital photography. The award-winning Color Efex Pro 3.0 filters are widely used by many of today's professional photographers around the world to save time and get professional level results. Whether you choose the Complete Edition, Select Edition, or Standard Edition, you’ll get traditional and stylizing filters that offer virtually endless possibilities to enhance and transform images quickly and easily.
Patented U Point technology provides the ultimate control to selectively apply enhancements without the need for any complicated masks, layers or selections. Control color, light and tonality in your images and create unique enhancements with professional results. With 52 filters and over 250 effects found in Color Efex Pro 3.0, you can perform high quality retouching, color correction, and endless creative enhancements to your photographs. Download a free Trial version.
Viveza
 The most powerful tool to selectively control color and light in photographic images without the need for complicated selections or layer masks.
Two of the most important factors in creating great photography are color and light. Mastering the art of selectively correcting or enhancing each of these is now possible for every photographer without the need for complicated masks or selections, or expert-level knowledge of Photoshop. Integrating award-winning U Point technology, Viveza is the most powerful and precise tool available to control light and color in photographic images.
U Point powered Color Control Points, placed directly on colors or objects in an image (such as sky, skin, grass, etc.), reveal easy-to-use controls that photographers can use to quickly adjust brightness, contrast or color in a fraction of the time needed by other tools. With Viveza you’ll spend more time shooting photographs and save hours of image editing. Download a free Trial version.
Silver Efex Pro
 Complete power and control to create professional quality black and white images in one convenient tool.
Silver Efex Pro from Nik Software is the most powerful tool for creating professional quality black and white images from your photographs. For the first time, all the advanced power and control required for professional results have been brought together in one convenient tool.
Featuring Nik Software’s patented U Point technology to selectively control the tonality and contrast of the image, Silver Efex Pro includes advanced imaging algorithms to protect against unwanted artifacts, a comprehensive collection of emulated black and white film types, a variable toning selector for adding traditional toning techniques, over 20 one-click preset styles, and a state-of-the-art grain reproduction engine that help produce the highest quality black and white images possible from your color images while providing more freedom to experiment. Download a free Trial version to use Silver Efex Pro.
HDR Efex Pro
 Experience the power, control, and creative expression of HDR. This all in one toolkit lets you achieve your best HDR images ever, ranging from the realistic to artistic.
HDR Efex Pro is the essential new standard for creating amazingly high quality realistic to artistic HDR images with a revolutionary new all-in-one workflow. HDR Efex Pro includes a vast selection of one-click visual presets for incredibly fast results, advanced tone mapping algorithms, powerful and detailed HDR controls, and patented U Point® technology
Follow our discount coupon links, or enter our exclusive discount coupon code - NIKPSS - during the checkout process at Nik Software for the instant 15% discount. This exclusive discount coupon code can be applied to all the latest Nik Software Photoshop plugins, including Silver Efex Pro, Color Efex Pro, Viveza, HDR Efex Pro, and The Complete Collection (big savings).
![]()


